
Calc Guide


3) Hold down the Shift key and click.
Tip
You can also select a contiguous range of cells by first clicking
in the STD field on the status bar and changing it to EXT,
before clicking in the opposite corner of the range of cells in
step 3 above. If you use this method, be sure to change EXT
back to STD or you may find yourself extending the selection
unintentionally.
To select a range of cells without using the mouse:
1) Select the cell that will be one of the corners in the range of cells.
2) While holding down the Shift key, use the cursor arrows to select
the rest of the range.
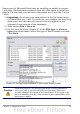
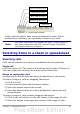
The result of any of these methods looks like the right side of Figure
10.
Tip
You can also directly select a range of cells using the Name
Box. Click into the Name Box as described in “Using a cell
reference” on page 23. To select a range of cells, enter the cell
reference for the upper left-hand cell, followed by a colon (:),
and then the lower right-hand cell reference. For example, to
select the range that would go from A3 to C6, you would enter
A3:C6.
Range of noncontiguous cells
1) Select the cell or range of cells using one of the methods above.
2) Move the mouse pointer to the start of the next range or single
cell.
3) Hold down the Control key and click or click-and-drag to select
another range of cells to add to the first range.
4) Repeat as necessary.
Tip
You can also select a noncontiguous range of cells by first
clicking twice in the STD field on the status bar to change it to
ADD, before clicking on a cell that you want to add to the
range of cells in step 3 above. This method works best when
adding single cells to a range. If you use this method, be sure
to change ADD back to STD or you may find yourself adding
more selections unintentionally.
28 OpenOffice.org 3.x Calc Guide