
Calc Guide

Using “what if” scenarios
Scenarios are a tool to test “what-if” questions. Each scenario is
named, and can be edited and formatted separately. When you print
the spreadsheet, only the contents of the currently active scenario are
printed.
A scenario is essentially a saved set of cell values for your calculations.
You can easily switch between these sets using the Navigator or a
drop-down list which can be shown beside the changing cells. For
example, if you wanted to calculate the effect of different interest rates
on an investment, you could add a scenario for each interest rate, and
quickly view the results. Formulas that rely on the values changed by
your scenario are updated when the scenario is opened. If all your
sources of income used scenarios, you could efficiently build a complex
model of your possible income.
Creating scenarios
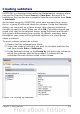
Tools > Scenarios opens a dialog with options for creating a scenario.
To create a new scenario:
1) Select the cells that contain the values that will change between
scenarios. To select multiple ranges, hold down the Ctrl key as
you click. You must select at least two cells.
2) Choose Tools > Scenarios.
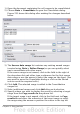
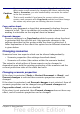
3) On the Create Scenario dialog (Figure 226), enter a name for the
new scenario. It’s best to use a name that clearly identifies the
scenario, not the default name as shown in the illustration. This
name is displayed in the Navigator and in the title bar of the
border around the scenario on the sheet itself.
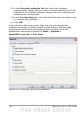
4) Optionally add some information to the Comment box. The
example shows the default comment. This information is
displayed in the Navigator when you click the Scenarios icon and
select the desired scenario.
5) Optionally select or deselect the options in the Settings section.
See page 278 for more information about these options.
6) Click OK to close the dialog. The new scenario is automatically
activated.
You can create several scenarios for any given range of cells.
Chapter 9 Data Analysis 277