
Calc Guide
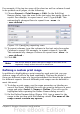


For example, if the top two rows of the sheet as well as column A need
to be printed on all pages, do the following:
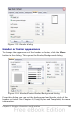
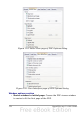
1) Choose Format > Print Ranges > Edit. On the Edit Print
Ranges dialog, type the rows in the text entry box under Rows to
repeat. For example, to repeat rows 1 and 2, type $1:$2. This
automatically changes Rows to repeat from - none - to
- user defined -.
Figure 113: Specifying repeating rows
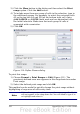
2) To repeat columns, type the columns in the text entry box under
Columns to repeat. For example, to repeat column A, type $A.
This automatically changes Columns to repeat from - none - to
- user defined -.
3) Click OK.
Note
You do not need to select the entire range of the rows to be
repeated; simply select one cell in each row.
Defining a custom print range
In addition to highlighting a print range for each print job, you can
define a range of cells to be used repeatedly. This may be useful if
there are different areas of a large spreadsheet that need to be printed
for different reports. Several different print ranges can be defined to
meet this need.
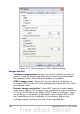
1) To define a print range, use the same procedure as labeling an
area of the sheet. Highlight the cells you want to define as a print
range and select Insert > Names > Define. (The cells can be
highlighted after opening the Define Names dialog as well.)
2) On the Define Names dialog (Figure 114), type a name for the
range in the text box with the blinking cursor. The name of the
range cannot contain any spaces.
Chapter 6 Printing, Exporting, and E-mailing 161