
Calc Guide
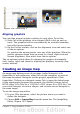
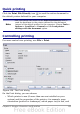
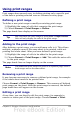

Ranges > Edit. If you have already selected a print range, the Edit
Print Ranges dialog looks something like Figure 111.
Figure 111: Edit a print range
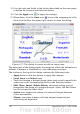
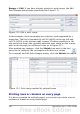
In this example, three rectangles are selected, each separated by a
semicolon. The first is bounded by cell A3 ($A$3) in the top left and
cell C9 ($C$9) in the bottom right corners. Clicking anywhere in the
text entry box shows the currently selected print range on the screen,
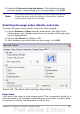
with each rectangle in a different color, as in Figure 112.
After making any changes, click the Shrink icon next to the text
entry box to redisplay the rectangles with their new values.
To re-expand the Edit Print Ranges dialog, click the Shrink icon again.
Figure 112: Print range marked by colored boxes
Printing rows or columns on every page
If a sheet is printed on multiple pages, you can set up certain rows or
columns to repeat on each printed page.
160 OpenOffice.org 3.x Calc Guide