
Calc Guide

Using print ranges
Print ranges have several uses, including printing only a specific part
of the data or printing selected rows or columns on every page.
Defining a print range
To define a new print range or modify an existing print range:
1) Highlight the range of cells that comprise the print range.
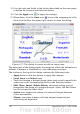
2) Choose Format > Print Ranges > Define.
The page break lines display on the screen.
Tip
You can check the print range by using File > Page Preview.
OOo will only display the cells in the print range.
Adding to the print range
After defining a print range, you can add more cells to it. This allows
multiple, separate areas of the same sheet to be printed, while not
printing the whole sheet. After you have defined a print range:
1) Highlight the range of cells to be added to the print range.
2) Choose Format > Print Ranges > Add. This adds the extra cells
to the print range.
The page break lines no longer display on the screen.
Note
The additional print range will print as a separate page, even if
both ranges are on the same sheet.
Removing a print range
It may become necessary to remove a defined print range, for example
if the whole sheet needs to be printed later.
Choose Format > Print Ranges > Remove. This removes all defined
print ranges on the sheet. After the print range is removed, the default
page break lines will appear on the screen.
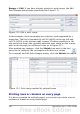
Editing a print range
At any time, you can directly edit the print range, for example to
remove or resize part of the print range. Choose Format > Print
Chapter 6 Printing, Exporting, and E-mailing 159