
Calc Guide

3) Use the tools and fields in the dialog (described on the next page)
to define the hotspots and links necessary.
4) Click the Apply icon to apply the settings.
5) When done, click the Save icon to save the imagemap to a file,
then click the X in the upper right corner to close the dialog.
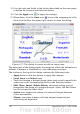
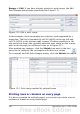
Figure 107: The dialog to create or edit an image map
The main part of the dialog shows the image on which the hotspots are
defined. A hotspot is identified by a line indicating its shape.
The toolbar at the top of the dialog contains the following tools:
• Apply button: click this button to apply the changes.
• Load, Save, and Select icons.
• Tools for drawing a hotspot shape: these tools work in exactly the
same way as the corresponding tools in the Drawing toolbar.
• Edit, Move, Insert, Delete Points: advanced editing tools to
manipulate the shape of a polygon hotspot. Select the Edit Points
tool to activate the other tools.
• Active icon: toggles the status of a selected hotspot between
active and inactive.
• Macro: associates a macro with the hotspot instead of just
associating an hyperlink.
152 OpenOffice.org 3.x Calc Guide