
Administration Manual

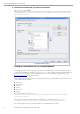
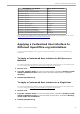
Table Of Contents
- Copyright
- 1 Deploy OpenOffice.org using package managers
- 2 OpenOffice.org Basic Macros and Libraries
- 3 OpenOffice.org Extension Manager
- 4 Adding Template Files to an OpenOffice.org Installation
- 5 Adding AutoText Files to an OpenOffice.org Network Installation
- 6 Deactivating the OpenOffice.org Registration Wizard
- 7 Accessing Email Clients
- 8 Customizing the User Interface
- 9 Restricting Functionality in OpenOffice.org
- 10 Accessing OpenOffice.org User Profiles on an LDAP Server

To Add an AutoText Directory to an OpenOffice.org Installation
4 Locate the directory that contains the AutoText *.bau files that you want to
add and click the Select button.
5 In the Edit Paths dialog box, click OK.
6 In the Options - OpenOffice.org - Paths dialog box, click OK.
7 Exit OpenOffice.org.
OpenOffice.org saves the AutoText path to the ooo-user-
dir/user/registry/data/org/openoffice/Office/Common.xcu configuration file.
8 Copy the code below into the appropriate Common.xcu file.
To make the AutoText directory available to all users of the OpenOffice.org network installation, copy the
code into the install-
dir/basis<version>/share/registry/data/org/openoffice/Office/Common.xcu file.
To make the AutoText directory available to a single user of an OpenOffice.org network installation, copy the
code into the ooo-user-dir/user/registry/data/org/openoffice/Office/Common.xcu file.
<node oor:name="Path">
<node oor:name="Current">
<prop oor:name="AutoText" oor:type="oor:string-list">
<value>$(inst)/share/autotext/$(vlang)
$(user)/autotext new_autotext_directory
</value>
</prop>
</node>
</node>
26 OpenOffice.org 3.2 Administration Guide · March 2010