Owners Manual Bluetooth Helmet Headset ALOHA
1 ACCESSORY PACKAGE................................................................................................................ 8 2 INSTALLATION ........................................................................................................................... 9 2.1 HEADSET FIXTURE INSTALLATION ..................................................................................... 9 2.1.1 Adhesive type installation of Fixture: .................................................................
9.2.3 Group Intercom Usage ............................................................................................... 28 10 FM RADIO ............................................................................................................................... 29 11 RESET/ERASE PAIRING INFORMATION..................................................................................... 30 12 VOICE NOTIFICATIONS LANGUAGE SELECTION .......................................................................
*Please read this manual before using any accessory and follow the instructions. *Please keep this manual for future reference. *When you sell or give this product to another user, please also give them this manual. ■Confirm Before Use■ ※ The company will not be held responsible for any accidents or damages caused by the user not complying with the cautions, notes and warnings in this manual. ※ The product warranty is indicated in the purchase certificate.
1. Prohibit to use this product in airplane, airport or hospital (turn off the power), as it may interfere with air control communication and medical electronics. 2. Prohibit to use in the vicinity of the medical equipments, such as, pacemakers, as it may have adverse effects and cause damage. 3. Prohibit the use of excessive volume, which may hinder hearing surrounding traffic conditions and could lead to accidents. 4. Stop immediately when you hear thunder, as you may be struck by lightning.
avoid a direct pull at the cable causing damage or malfunction. ・ When the product is installed on a helmet, avoid direct impact on the headset. ・ This product has been certified to meet technical standards for wireless regulations. If you want to use in a country other than Taiwan, follow the laws and regulations of the country. ・ For using headsets when riding, please confirm compliance with local laws and regulations. ・ Do not soak the product in water.
Dear Customer: Thank you for choosing ALHOA. This product has been specifically designed to meet your every communication need when riding a motorcycle. Should you have any questions, suggestions or comments, please email us at service@openroad.com.tw. For a better and safer experience we recommend users familiarize themselves with the owner's manual before using ALHOA to know about installation, features and operations of ALHOA. Safety is the foremost priority when riding.
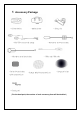
1 Accessory Package ・ALOHA headset ・Mini USB connector and speaker ・Microphone for full-face helmet ・Pad for 3/4-face helmet (fabric fastener)x2 pcs ・Spring clip ・Headset fixture ・Microphone for 3/4-face helmet ・USB to mini USB cable ・Speaker pad(fabric fastener)x2 pcs ・Sponge pad x2 pcs ・Cleaning-pad (For the dual-pack, the number of each accessory item will be doubled.
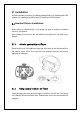
2 Installation ALOHA installation includes (1) installing headset fixture (2) installing Mini USB speaker (3) installing microphone and (4) installing ALOHA headset. 2.1 Headset Fixture Installation Select either (1) adhesive-type or (2) spring clip type to install your headset fixture to your helmet. Note: please do not remove the 3M adhesive-type pad once it is fixed to the helmet. 2.1.
Mount the fixture to the helmet. Tear the cover off the adhesive pad, pull open the spring clip to attach the helmet. 2.2 Installation of Mini USB speaker Place the Mini USB speakers to both sides (inside) the helmet. Sponge pads can be used to adjust the position before applying the adhesive pad.
Note: For optimal voice/audio clarity, the speakers should be placed as closely as possible to your ears without compromising comfort. 2.3 Microphone Installation The ALOHA headset comes with (1) microphone for 3/4-face helmet types and (2) microphone for full-face helmet types. 2.3.1 3/4-face Helmet installation Detach the inner left side lining of the helmet, and attach the fabric fastener for microphone to the helmet behind the inner lining.
surface before attaching. Then, connect the microphone for 3/4-face helmet to the Mini USB speaker. Please refrain from unnecessary removal of the fabric fastener from the helmet, as it may damage the adhesive on fabric fastener. Note: ALOHA headset provides quality voice and VOX intercom. For optimal performance, the microphone must be as close to the mouth (1-2 cm) of the user as possible when installing the microphone. . 2.3.
3 ALOHA Buttons Button [A]: to select 1-on-1 intercom with A1, A2 or A3 headset Button [C]: to start group intercom Button [F]: to turn on/off FM Button [M]: voice dial cell phone and redial the last dial-out number, start/end music playback.
4 ALOHA Headset Operation This manual describes the following functions provided by the ALOHA headset: , , , , . Each button on the ALOHA headset is designed to provide a variety of functions and each function setting will be accompanied by voice notification and is described in this manual. 5 Power and LED Indicator 1.
3. If the device asks for a password, input password <0000> (four zeros) to complete the connection. The LED flashes blue slowly to indicate successful pairing. 6.2 Setting cell phone answer mode Once paired, set the answering mode of the cell phone as (a) voice answer, or (b) automatic answer. (a) Voice Answer: push the [P] button upward for about 8 seconds. A voice notification will confirm that you are in . (b) Automatic answer: push the [P] button downward for about 8 seconds.
3. Using automatic answering, by setting the automatic answering function, the incoming call will automatically be answered after 10 seconds of ringing. 4. To reject an incoming call, press the [M] button for about 3 seconds. (note: when automatic answering is not set, the incoming call will be rejected after ringing for approx 16 seconds.) 5. Voice Dialing: press the [M] button once and speak into microphone (the cell phone MUST provide voice dial function). 6.
3. If the device asks for a password, input password <0000> (four zeros) to complete the connection. The LED flashes blue slowly to indicate successful pairing. Note: ALOHA supports simultaneous connection to both GPS and cell phone. 7.2 GPS Usage If you have paired your ALOHA with a GPS, vocal GPS directions can be heard through the headset. If you are on an intercom with another ALOHA headset when the GPS audio instruction comes in, the intercom connection will be automatically paused.
8.1 1-on-1 Intercom Pairing 1. Press [A] on ALOHA#1 in ON state until the LED flashes green rapidly. 2. Press [M] on ALOHA#2 in ON state until the LED flashes red/blue rapidly. The two headsets automatically start pairing steps 2, 3. When the LED on both headset flashes in a blue-blue-green pattern and both headsets hear the voice notification “Comm A Paired", the pairing is successful, and both headsets are ready for intercom. 。 3. After pairing, ALHOA#1 places ALOHA#2 as its first priority (A1).
1. ALHOA#1 first pairs with ALHOA#5, then pairs with ALOHA#4, ALOHA#3 and ALOHA#2, all for 1-on-1 intercom pairing. At this point, for ALHOA#1, A1 refers to ALHOA#2, A2 refers to ALOHA#3, and A3 refers to ALOHA #4. ALOHA#5 is no longer in ALOHA#1’s 1-on-1 intercom pairing list. 2. If ALOHA#3 pairs with ALOHA#5 after paired with ALOHA#1 for 1-on-1 intercom, at this point for ALOHA#3, A1 refers to ALOHA#5 and A2 refers to ALOHA#1. 8.
Example: For 5 ALHOA headsets: 1. ALHOA#1 first pairs with ALHOA#5, then pairs with ALOHA#4, ALOHA#3 and ALOHA#2, all for 1-on-1 intercom pairing. At this point, for ALHOA#1, A1 refers to ALHOA#2, A2 refers to ALOHA#3, and A3 refers to ALOHA #4. ALOHA#5 is no longer in ALOHA#1’s 1-on-1 intercom pairing list. 2. If ALOHA#3 pairs with ALOHA#5 after paired with ALOHA#1 for 1-on-1 intercom, at this point for ALOHA#3, A1 refers to ALOHA#5 and A2 refers to ALOHA#1.
If ALOHA#3 is not within intercom distance of ALOHA#1, ALOHA#1 will hear "A2 connection failed". When ALHOA#3 wants to start 1-on-1 intercom with ALHOA#5, press [A] once. 8.2.2 Manually Ending 1-on-1 Intercom During 1-on-1 intercom, any of the tow headsets can press [A] once to end the intercom. 8.2.3 VOX Mode ALOHA provides four sensitivity levels for VOX to start 1-on-1 intercom to accommodate for different speeds and ambient noise levels. 8.2.3.
1. The 1-on-1 intercom activation mode for ALOHA#1, ALOHA#2, ALOHA#4 and ALOHA#5 is “VOX Level 1”, and the 1-on-1 intercom activation mode for ALOHA#3 is “VOX sensitivity Manual mode”. 2. ALHOA#1 first pairs with ALHOA#4, then pairs with ALOHA#3 and ALOHA#2, all for 1-on-1 intercom pairing and currently in intercom with ALOHA#2. At this point, for ALHOA#1, A1 refers to ALHOA#2, A2 refers to ALOHA#3, and A3 refers to ALOHA #4. 3.
in cell phone or intercom with another headset, both ALOHA#1 and ALOHA#2 will hear “doo-doo” tone and start the intercom. If ALOHA#2 is not within intercom distance of ALOHA#1, ALOHA#1 will hear "A1 connection failed". Similar situations if ALHOA#2 speaks into microphone, instead of ALOHA#1. If ALHOA#1 finishes intercom with ALOHA#2 and wishes to intercom with ALHOA#3, ALOHA#1 must manually press [A] twice rapidly. Then, ALOHA#1 will hear "Comm A2 selected".
8.3 Voice Activation (VOX) 8.3.1 VOX Level: The ALOHA headset provides five volume levels for setting the voice volume required to activate the intercom connection. It is possible to adjust the required voice volume according to your needs. Level 1 means that VOX has a lower activation threshold, i.e., you may use a lower voice volume to activate the headset intercom connection. The higher the level is, the higher the voice volume required to activate the intercom connection.
sensitivity is too great so a higher level must be used. VOX Level 4 Description: When adjusting to Level 4, a voice notification saying “VOX sensitivity Level 4”, and when adjusting to Manual Activation Mode, a voice notification saying “VOX sensitivity Manual Mode”. Manual activation mode (default) Description: “Manual activation mode” you must activate the intercom manually.
Detailed Procedure: 9.2.1 Assign number (1,2,3,4,5) a. Enter Group Member Setting Mode: In ON state, press both [A] and [C] until LED stays green. b. Assign a number to headset: According to the number assigned, press [C] rapidly. For example: To assign 1 to ALOHA headset (called ALOHA#1), press [C] once. At this point, LED flashes green once every 2 seconds and voice notification “Group Member 1”. To assign 2 to ALOHA headset (called ALOHA#2), press [C] once.
d. Check the current headset number: In ready state, press [C] for 6 seconds and a voice notification will announce the current assigned number. Note: Make sure the number of times the LED flashes green is the same as your assigned number. If they do not match, repeat the above (a), (b), (c) steps to assign the numbers again. 9.2.2 Group Intercom Pairing The pairing must follow the assigned number done in 9.1.
c. Pairing between ALOHA#3 and ALOHA#4 (refer to: a. Pairing between ALOHA#1 and ALOHA#2)4 d. Pairing between ALOHA#4 and ALOHA#5 (refer to: a. Pairing between ALOHA#1 and ALOHA#2) Note: When turning off the headsets paired for group intercom, the pairing information will be lost. If any member of the group turns off their headset, all the headsets must be assigned a new number and paired again for group intercom (following the procedure in 9.1) for group intercom. 9.2.
connection, ALOHA#4 starts to connect to ALOHA#5, and after successful connection, all the five headsets can conduct group intercom. Connection Fail: When ALOHA#2 is in cell phone or not within the intercom distance of ALOHA#1, ALOHA#1 cannot connect to ALOHA#2. ALOHA#1 will hear “Connection Member 2 fail”. Leave group intercom: During group intercom, any headset can press [A] to leave the group intercom.
determine whether to stay on this channel. After 6 seconds, the headset will scan for the next channel. In rescanning channel mode, press [F] twice rapidly to store the scanned channel. The headset will store channels in the order of Channel 1, Channel 2, …, Channel 10. After 10 channels are store, old channels will be replaced if newer channels are stored, also in the order of Channel 1, Channel 2, …, Channel 10. Note: when entering “rescanning channel mode”, ALOHA cannot receive any Bluetooth signal.
12 Voice notifications Language Selection ALOHA headsets are equipped with two languages for voice notifications. The default language is English and the second is the local language (market specific). To switch between languages: Power off ALOHA headset (if already ON). After the LED indicator turns red and hear the voice notification, continue pressing the [A] button and press [M] ([A] and [M] are pressed simultaneously).
Set Automatic Turn the [V] upward for 8 seconds until the notification Answer "Answering Mode Automatic" is heard (only when not in sound) Setting Voice Turn the [V] downward for 8 seconds until the notification Answering "Answering Mode Automatic" is heard (only when not in sound) CELL PHONE OPERATION Answering an Press [M] to answer incoming call Ending a call Press [M] to end Rejecting a call Press [M] for about 3 seconds (when the automatic answering mode is not activated, the call will be
Assign headset Press [C] once (in member setting mode) number Exit member setting Press [F] once (in member setting mode) mode Headset number Press [C] until hear the headset number (only when not in sound).
"Level three" "Level four" "Manual mode" Pairing "Bluetooth Device Paired" (for intercom Headset) "Comm A Paired" Pairing " Member 1 Paired" (for Conference " Member 2 Paired" Headset) " Member 3 Paired" " Member 4 Paired" " Member 5 Paired" + "Member 1 Joined" Joining of group "Member 2 Joined" member "Member 3 Joined" "Member 4 Joined" "Member 5 Joined" "Member 1 Exited" Group member exit "Member 2 Exited" "Member 3 Exited" "Member 4 Exited" "Member 5 Exited" Intercom selection "Comm A1
"Missed A3 page" "intercom canceled" "Connection lost" "Auto-reconnection " “A1 connection failed" “A2 connection failed" “A3 connection failed" Create Group "Group initiated" Intercom "Group canceled" Group connection fail " Member 1 connection failed “ " Member 2 connection failed “ " Member 3 connection failed “ " Member 4 connection failed “ " Member 5 connection failed “ Group Member " Member 1 " Setting " Member 2 " " Member 3 " " Member 4 " " Member 5 " "Missed Group Page" "Connection lost
"next track" "previous track" FM Radio "FM on" "FM off" "FM re-scan for channels" "Stop Scan" "Save Channel" " Channel1、 Channel2….
Warranty ・A 24-month warranty period from date of purchase is provided for the headset. Please read and understand the contents of the manual before using the product. ・The product is shipped under strict quality control. In case of malfunction, the warranty applies only to the headset. Costs incurred by accessories, parts, maintenance costs, and upgrades are not covered by the warranty. ・Please note that the warranty may not be applicable if the appearance of the headset shows a severe damage or a crack.
- Connect the equipment into an outlet on a circuit different from that to which the receiver is connected. - Consult the dealer or an experienced radio/TV technician for help. FCC Caution: Any changes or modifications not expressly approved by the party responsible for compliance could void the user's authority to operate this equipment. This device complies with Part 15 of the FCC Rules.