User Guide: Open Mesh A42 Version 1.
Table of Contents 1. 2. 3. 4. 5. 6. 7. 8. Creating a CloudTrax Network ................................................................3 Configuring a CloudTrax network .............................................................9 Monitoring, Management and Troubleshooting ............................................14 Additional Resources ..........................................................................16 Product Specifications ....................................................................
Creating a CloudTrax network Overview: what we’re doing This guide is intended to help you set up your first cloud-managed wireless mesh network with CloudTrax. CloudTrax is a free cloud-based network controller that makes it easy for anyone to build, manage, and monitor wireless networks from anywhere in the world. This guide will assist you in setting up a new network on the CloudTrax web application. For easier, faster setup, use the CloudTrax for iOS or CloudTrax for Android apps.
3. A computer with a browser pointed to www.cloudtrax.com, or an iOS or Android device running the CloudTrax app. Terminology We’ll make this process as easy and nontechnical as possible. Here are a few key words that will help. Network: A group of computers or devices that can talk to each other (in our case, wirelessly). Gateway: A CloudTrax-compatible router that is connected to the Internet (usually through a DSL, cable, or LAN connection).
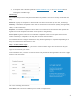
Username: This is your master login you will use to access ALL networks you create. It allows you to login once and edit/view all your networks. It MUST be different from your network name(s) which you will create in a second step. You may want to use your company name here. Email: You’ll receive an email at this address asking you to verify this master login to continue. Password: This is your master administrator password. It can be used with the above login name to access all of your networks.
Network Location: Enter a street address for the first access point. To add access points, you will be shown a map that you click on to place access points. By entering an address here, you will be centered on the correct location for your network. Email for Notifications: Enter the email addresses, separated by spaces, for all people you’d like to receive “outage” notifications. These are sent hourly. When finished, click “Create” to save your new network settings.
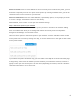
Fill in the following information: Name: Enter a name for this access point. This name is used to reference its location and will be displayed in reports. It does not affect users. MAC address: A MAC address is a sequence of 12 numbers and the letters A-F often separated by colons (Eg: 00:02:6F:8A:B2:6E). This can be found on a label on the bottom of the router and on the side of the product box. Description: You can enter optional descriptive text that will be shown on the reports.
For both of these options, your access points will be added to the map based on your network location (similar to how the CloudTrax iOS and Android apps add access points). You can reposition these access points on the map after adding them. When adding by CSV, the CSV file must be in a specific format. You can download a sample CSV file here. Step 4: Install the access points Once your access points are added to CloudTrax, it’s time to install them.
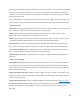
Configuring a CloudTrax Network Your network should now be up and running, but there’s a lot we can do to customize it to meet your specific needs. We’ll walk you through the most common settings here. Configure > General Settings The General Settings tab controls network-wide settings. This will be partially filled in with the information you used to create the network. Location: This defaults to the first address you entered when setting up the network. You can change it at any time.
splash pages, bandwidth throttling, DNS filtering and client isolation - and private SSIDs, with WPA Enterprise authentication and access to LAN resources and other clients. When we created your network, we set the first SSID to be public and the second SSID to be private, but you can adjust these any way you wish. We’ll go through most of the features you may want to enable or change. You can also learn more about voucher access, pay networks and more by following the links at the end of this document.
Require voucher: Require a valid voucher on splash pages. If unchecked, allows you to provide a basic tier of service at the rates and durations above and (optionally) faster service using vouchers or PayPal. Redirect URL: The page to display after the splash page. Leave blank to display the user’s requested page. Include user data in redirect URL: If set, additional information specific to the request is added as URL parameters when the final redirect occurs.
PayPal Item ID: You can require guests to pay for all service or enhanced service through PayPal. See the guides at the end of this document. Configure > Radio The Radio settings controls network-wide access point settings. The main items you'll want to set are Channels and Internet Check. Channels: Auto Channel will let CloudTrax optimize channel settings daily for your network, taking into consideration mesh repeaters, nearby access points, and sources of interference.
Allow Read-Only: Click to enable the password-free read-only view of the network status. When enabled, read-only view can be accessed by entering just the network name in CloudTrax without a password. The password will still be required to change any network settings. Enable 12 Hour Display: Check to display time in 12 hour (am/pm) format. External embeds: Use the HTML snippet to embed CloudTrax reporting pages on an external site like a client portal.
Monitoring, Management and Troubleshooting With your network running and customized, you can now monitor its usage and status by selecting the Network Status link. Here’s an overview of the tools available: Network Usage graph at the top of the page shows the number of users on SSID#1 and the amount of upload and download traffic. Node Map shows the nodes relationship to each other on a map. Node List gives details on each individual node. Node Outages Chart shows the check-in status of a node using colors.
Booting Up Solid Yellow Firmware upgrade (node is executing the firmware upgrade) Solid Red CloudTrax check-in failure Flash White Key re-pair Flash Yellow Configuration change AP not ready Solid White Net failure - no default route Flash Red Gateway-Specific States STATE COLOR CloudTtrax check-in succeeded Solid Teal IP acquired via DHCP, but inet test is failing Flash Purple Repeater-Specific States STATE COLOR Checkin performed, mesh speed <= 2Mbps Flash Green Orphan mode Flash (Ye
Additional resources To learn more about planning and optimizing your network, download the Cloudtrax Network Planning Guide. To learn more about CloudTrax’s splash page feature, download the Using the Splash Page Editor Guide. To learn more about CloudTrax’s vouchers feature, download the Using Vouchers in CloudTrax Guide. To learn more about integrating vouchers with PayPal, download the Using PayPal in CloudTrax Guide.
Product specifications Data rate (aggregate) Radio Antenna Max users (recommended) WLAN standard Processor Memory 300 + 1430 Mbps 2.4 GHz: 2 stream, 802.11 b/g/n (max data rate: 300 Mbps) 5 GHz: 2 stream, 802.11 a/b/g/n/ac (max data rate: 1430 Mbps) 4 internal 30-60 per AP 802.11 a/b/g/n/ac MCU: IPQ4018 RF: IPQ4018, 2.
Appendix A: 18
Appendix B: 19
Appendix C: EU Declaration of Conformity This device complies with the essential requirements of the R&TTE Directive 1999/5/EC.
Česky [Czech] Open Mesh tímto prohlašuje, že tento [typ zařízení] je ve shodě se základními požadavky a dalšími příslušnými ustanoveními směrnice 1999/5/ES. Dansk [Danish] Undertegnede Open Mesh erklærer herved, at følgende udstyr [udstyrets typebetegnelse] overholder de væsentlige krav og øvrige relevante krav i direktiv 1999/5/EF.
Polski [Polish] Niniejszym Open Mesh oświadcza, że [nazwa wyrobu] jest zgodny z zasadniczymi wymogami oraz pozostałymi stosownymi postanowieniami Dyrektywy 1999/5/EC. Português Open Mesh declara que este [tipo de equipamento] está conforme com os [Portuguese requisitos essenciais e outras disposições da Directiva 1999/5/CE. ] Slovensko Open Mesh izjavlja, da je ta [tip opreme] v skladu z bistvenimi zahtevami in [Slovenian] ostalimi relevantnimi določili direktive 1999/5/ES.