
User Guide


PART 3: Appendices
Studio 4 Manual 77
All devices (including those connected to
the standard interface) appear in the
patch edit window's pop-up menus.
If you use OMS patches, you can access
devices connected to the standard inter-
face just as if they were connected
directly to the Studio 4.
NETWORKING A STUDIO 4 AND
A STUDIO 3
If you're networking a Studio 4 and a
Studio 3, read the first part of this
appendix.
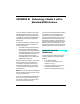
You can connect your Studio 3's Modem
port to the Studio 4's “B” port and achieve
the results discussed in the first part of
this appendix. You may, however, gain
additional control by connecting the
Studio 3 Printer port back to the free Mac-
intosh serial port as shown here.
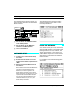
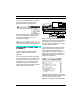
When you create a new Studio Setup doc-
ument, you'll see one icon for the Studio 4
and another for the Studio 3's Printer
port. The Studio 3's modem port is repre-
sented by Studio 4 cable 17.
The illustration below shows the Studio
Setup document for the studio connec-
tions shown above (assuming that
Studio 3 MIDI outputs are configured in
their default mode—that is, outputs 1-3
assigned to the Modem and outputs 4-6
assigned to the Printer).
The biggest advantage of connecting the
Studio 3's Printer port back to the Macin-
tosh is that you can configure the
Studio 3's six outputs to use the Modem
MACINTOSH
MIDI OUT MIDI IN PRINTER
PORT
MODEM
PORT
123456
FOOTSWITCHES
FS2 FS1 FC1 OUT I N
TAPE / AUDIO
OUT
MIDI OUT MIDI INSMPTE
IN
PORT B PORT A
B
THRU
A
THRU
9VDC 8
16
7
15
6
14
5
13
4
12
3
11
2
10
1
9
6
14
5
13
4
12
3
11
2
10
1
9
IN OUT
Gizmatronics
IN OUT
Digiwhiz 2000
IN OUT
Vectorific