
User Guide


PART 3: Appendices
76 Opcode Systems, Inc.
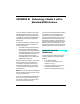
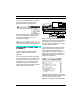
The following figure shows a typical net-
work involving a Studio 4 and a standard
MIDI interface.
햲 Put the Studio 4's 1MHZ/Fast switch
in the 1MHz position.
햳 Put the Studio 4's two MIDI/Thru
switches in the MIDI position.
햴 Turn on the Studio 4.
SOFTWARE SETUP
햲 Create a new, custom Studio Setup
document.
햳 Double-click the Studio 4 icon and
make sure the Studio 4 speed is set to
1MHz.
햴 Define and connect MIDI devices to
the Studio 4.
Notice that since the standard MIDI inter-
face isn't connected directly to the
Macintosh, it doesn't appear in the
Studio Setup document. In the Studio
Setup document, use Studio 4 port 17 to
represent the standard MIDI interface.
Connect any devices attached to the
standard interface to port 17 in your
Studio Setup document.
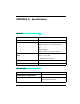
The following figure shows the Studio
Setup document for the studio connec-
tions depicted above.
USING THE NETWORK
You cannot access port 17 (or its devices)
with the MIDI Routing, Channelizing and
Muting window. You can, however, use
either OMS patches or your OMS-com-
patible MIDI sequencer to communicate
with devices connected to the standard
MIDI interface.
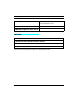
For example, look at the following patch
document.
IN OUT
Gizmatronics
IN OUT
Digiwhiz 2000
OUT
MIDI OUT MIDI IN
SMPTE
IN
PORT B PORT A
B
THRU
A
THRU
9VDC 8
16
7
15
6
14
5
13
4
12
3
11
2
10
1
9
6
14
5
13
4
12
3
11
2
10
1
9
MACINTOSH
MIDI
OUT
MIDI
OUT
MIDI
IN
MIDI
OUT
STANDARD
MIDI
INTERFACE
IN OUT
Vectorific