
User's Manual

InTemp CX500 Series Temperature Logger Manual
1-800-LOGGERS 2 www.onsetcomp.com
Logger Components and Operation
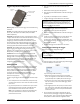
Mounting Loop: Use this to tie the logger to the materials being
monitored.
Duration: This number indicates how many days the logger will
last: 15, 90, or 365 days for the CX501, CX502, and CX503
models respectively.
Alarm LED: This LED blinks red every 4 seconds when an alarm
is tripped. Both this LED and the status LED will blink once when
you press the start button to wake up the logger before
configuring it. Both LEDs will blink four times when you press
the start button to begin logging (if the logger was configured
to start “On button push”). If you select Page Logger LED in the
InTemp app, both LEDs will be illuminated for 4 seconds.
Status LED: This LED blinks green every 4 seconds when the
logger is logging. If the logger is waiting to start logging
(because it was configured to start “On button push” or with a
delayed start), it will blink green every 8 seconds.
Start Button: Press this button for 1 second to wake up the
logger to begin using it. Press this button for 4 seconds to start
the logger when it is configured to start “On button push” (see
Configuring and Starting the Logger). For CX503 models, you
can also press this button to stop the logger when it is
configured to stop “On button push.”
Getting Started
InTempConnect is web-based software where you can monitor
CX500 series logger deployments and view downloaded data
online. Using the InTemp app, you can configure the logger
with your phone or tablet and then download reports, which
are saved in the app and automatically uploaded to
InTempConnect. You also have the option to use the logger
with the InTemp app only.
To begin using the loggers with InTempConnect and the InTemp
app:
1. Go to intempconnect.com and follow the prompts to set up
an administrator account. You’ll receive an email to activate
the account.
2. Log into intempconnect.com and add users to your account.
Click Settings and then the Users tab. Click Add and enter
the email address and first and last name of the user.
Note: If your organization is already using InTempConnect,
contact your administrator to receive a user name and
password for the account.
3. New users will receive an email to activate their user
accounts.
4. Download the InTemp app from the App Store®.
5. Open the app and enable Bluetooth in the device settings if
prompted.
6. Log in with your InTempConnect user credentials.
7. Configure the logger as described in the next section.
Important: Loggers configured by an InTempConnect user
will then only be able to be accessed by InTempConnect
users associated with the same administrator account. See
Passkey Protection for more details.
To begin using the loggers with the InTemp app only:
1. Download the InTemp app from the App Store.
2. Open the app and enable Bluetooth in the device settings if
prompted.
3. Create a local user account. Enter your email address, first
and last name, and a password. You can also enter a
company name, add notes and select a profile photo. Tap
Save when done entering your user settings and log into the
account when prompted.
4. Configure the logger as described in the next section.
Configuring and Starting the Logger
Use the InTemp app to configure the logger.
Important: CX501 and CX502 loggers can only be started
once. Do not continue with these steps until you are ready
to use these loggers.
1. Press the button on the logger to wake it up.
2. From the Loggers screen in the InTemp app, find the logger
in the list and tap it to connect to it.
If you are having trouble connecting:
• Make sure the logger is within range of your mobile
device. The range for successful wireless communication
is approximately 30.5 m (100 ft) with full line-of-sight.
• If your device can connect to the logger intermittently or
loses its connection, move closer to the logger, within
sight if possible.
• If the logger appears in the list, but you cannot connect
to it, close the app, power down the mobile device, and
then turn it back on. This forces the previous Bluetooth
connection to close.
3. Once connected, tap Configure. Swipe left and right to
select one of the preset logger configurations (Cold Chain,
CRT, and Frozen). Type a name for this logger deployment
and tap Start to load the selected configuration to the
Duration (CX503
model shown)
Alarm LED
Status LED
Mounting
Loop
Start Button