
Specifications


HOBO TidbiT MX Temp 400 (MX2203) and Temp 5000 (MX2203) Logger Manual
1-800-LOGGERS 7 www.onsetcomp.com
sampling interval throughout the deployment, the battery
usage is similar to what it would be if you had selected this
rate for the normal logging interval.
7. Tap Done.
8. Tap Done again to exit the Logging Mode screen.
9. Tap Start in the Configure screen to load the statistics
settings onto the logger if you are ready to start.
Setting a Password
You can create an encrypted password for the logger that will
be required if another phone or tablet attempts to connect to
it. This is recommended to ensure that a deployed logger is not
mistakenly stopped or purposely altered by others. This
password uses a proprietary encryption algorithm that changes
with every connection.
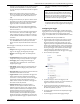
To set a password:
1. Tap the HOBOs icon and connect to the logger.
2. Tap Logger Password.
3. Type a password up to 10 characters.
4. Tap Save.
Only the phone or tablet used to set the password can then
connect to the logger without entering a password; all other
mobile devices will be required to enter the password. For
example, if you set the password for the logger with your tablet
and then try to connect to the device later with your phone,
you will be required to enter the password on the phone but
not with your tablet. Similarly, if others attempt to connect to
the logger with different devices, then they would also be
required to enter the password. To reset a password, connect
to the logger, tap Set Logger Passkey, and select Reset to
Factory Default or press the button on the logger for 10
seconds.
Reading Out the Logger
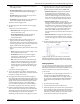
To download data from the logger:
1. Open HOBOmobile.
2. If the logger was configured with Bluetooth Always On,
continue to step 3.
If the logger was configured with Bluetooth Always Off,
press the button on the logger for 1 second to wake it up.
If the logger was configured with Bluetooth Water Detect
and it is deployed in water, remove it from the water.
3. Tap the HOBOs icon and tap the logger to connect to it.
4. Once connected, tap Readout.
5. Tap the Data Files icon to view a mini-graph of the
downloaded data.
6. Tap the mini-graph to view a larger version of the graph or
to share the file. See the HOBOmobile User’s Guide for
details on viewing graphs and sharing data.
Data can also be uploaded automatically to HOBOlink, Onset’s
web-based software. Tap the Settings icon to enable the
HOBOlink Upload Data option (this requires a HOBOlink
account at www.hobolink.com). See the HOBOmobile User’s
Guide for more details on this setting and see the HOBOlink
Help for details on working with data in HOBOlink.
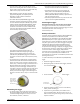
Logger Events
The logger records the following events to track logger
operation and status. To plot events in HOBOmobile, tap a
mini-graph and then tap . Select the events you wish to plot
and then tap again. You can also view events in shared or
exported data files.
Event Name Definition
Host Connect The logger was connected to a mobile
device.
Started The logger started logging.
Stopped The logger stopped logging.
Alarm
Tripped/Cleared
An alarm has occurred because the reading
was outside the alarm limits or back within
range. Note: Although the reading may
return to a normal range, an alarm cleared
event will not be logged if the logger was
set up to maintain alarms until
reconfigured.
Button Up/Down The button on the logger was pressed to
wake it up/bring it to the top of the loggers
list in HOBOmobile.
New Interval The logger has switched to logging at the
burst logging rate or back to the normal
rate.
Water Detect The logger has been placed in water or
removed from water.
Power Warn The battery level dropped below 2.3 V.
Safe Shutdown The battery level dropped below a safe
operating voltage and performed a safe
shutdown.
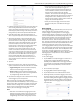
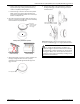
Deploying and Mounting the Logger
Follow these guidelines for deploying and mounting the logger.
• You can deploy the logger by using the two mounting
tabs on the protective boot. Insert two screws through
the holes on the mounting tabs to affix the logger to a
flat surface. Insert cable ties through the rectangular
holes on both mounting tabs to attach the logger to a
pipe or pole.
Use cable ties with
the rectangular holes
Use screws with
the round holes