
Manual

TX NR702,602 t r_book Page 38 b'Io_day,July 26, 2004 11:05 AM
Connecting the AV receiver--Continued
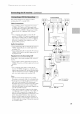
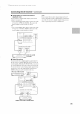
The AV receiver has AC outlets on its rear panel that can
be used to connect the power cords of AV other compo-
nents that you intend to use with the AV receiver. These
components can then be left turned on so that they turn
on and off as and when the AV receiver is turned on and
set to Standby.
L0'I_
AeOUTLETS
AC2_k2_V _
TOTAL'00WU_ j
European and some
Asian models
A¢ OUTLEIS
A¢ 12_v_
_WJTC_EO
TOTAL_20W_AU_
American model
Caution:
• Make sure that the total capacity of the components
that you connect to the AC OUTLETS does not exceed
the stated capacity (e.g., TOTAL 120 W).
Note:
• Onkyo components with F_I jacks should be con-
nected directly to wall outlets, not the AV receiver's
AC OUTLETS.
• The number of AC OUTLETS, socket type, and total
capacity depends on the country in which you pur-
chased the AV receiver.
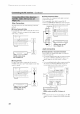
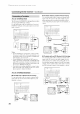
The TX-SR602/602E, TX-SR8260, American and Aus-
tralian TX-SR702 do not have this port.
This port can be used to connect an external controller
for controlling the AV receiver.
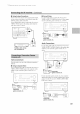
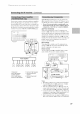
• Before connecting the power cord, connect all your
speakers and AV components.
• Turning on the AV receiver may cause a momentary
power surge that might interfere with other electrical
equipment on the same circuit. If this is a problem,
plug the AV receiver into a different branch circuit.
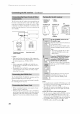
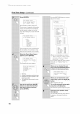
• American &
Australian
models
STANDBY/ON
• Other
models
STANDBY/ON
POWER
ON
STANDBY
I I_ _ _lc_
Set the [POWER] switch to the
ON position (_).
(Skip this step if you have the American
or Australian model.)
The AV receiver enters Standby mode,
and the STANDBY indicator comes on.
Note:
The remote controller has no effect
while the [POWER] switch in the
OFF position.
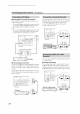
Press the [STANDBY/ON] button.
Alternatively, press the remote
controller's [RECEIVER] button
followed by the [ON] button.
The AV receiver comes on, the display
lights up, and the STANDBY indicator
goes off.
To turn off the AV receiver, press the
[STANDBY/ON] button. The AV
receiver will enter Standby mode.
Notes:
• Pressing the remote controller's [ON] button once will
turn on the AV receiver. Pressing it again will turn on
any components connected via if41.
• When the AV receiver is on Standby, it will turn on
automatically when any one of its input selector but-
tons is pressed.
Not for the American and Australian models:
• The AV receiver is shipped with the POWER switch in
the ON position (.L). When the power cord is con-
nected for the very first time, the AV receiver will go
on Standby and the STANDBY indicator will light up.
• To completely shut clown the AV receiver, set the
POWER switch to the OFF position (11.).
38