Contents Introduction ..................................... 2 AV Receiver TX-SR574 Connection .................................... 16 Turning On & First Time Setup..... 32 Instruction Manual Basic Operation Playing your AV components ....... 37 Listening to the Radio .................. 39 Enjoying the Listening Modes ..... 43 Thank you for purchasing an Onkyo AV Receiver. Please read this manual thoroughly before making connections and plugging in the unit.
WARNING: TO REDUCE THE RISK OF FIRE OR ELECTRIC SHOCK, DO NOT EXPOSE THIS APPARATUS TO RAIN OR MOISTURE. CAUTION: TO REDUCE THE RISK OF ELECTRIC SHOCK, DO NOT REMOVE COVER (OR BACK). NO USER-SERVICEABLE PARTS INSIDE. REFER SERVICING TO QUALIFIED SERVICE PERSONNEL.
Precautions 1. Recording Copyright—Unless it’s for personal use only, recording copyrighted material is illegal without the permission of the copyright holder. 2. AC Fuse—The AC fuse inside the unit is not userserviceable. If you cannot turn on the unit, contact your Onkyo dealer. 3. Care—Occasionally you should dust the unit all over with a soft cloth. For stubborn stains, use a soft cloth dampened with a weak solution of mild detergent and water. Dry the unit immediately afterwards with a clean cloth.
Supplied Accessories Precautions—Continued Make sure you have the following accessories: For British models Replacement and mounting of an AC plug on the power supply cord of this unit should be performed only by qualified service personnel.
Features Amplifier • 7-channel amplifier • 80 watts per channel rms into 8 ohms, 2 channels driven, 20 Hz to 20 kHz, less than 0.08% total harmonic distortion (FTC rating) • WRAT (Wide Range Amplifier Technology) • Optimum Gain Volume Circuitry *1 Manufactured under license from Dolby Laboratories. “Dolby”, “Pro Logic” and the double-D symbol are registered trademarks of Dolby Laboratories. *2 “DTS,” “DTS 96/24,” “DTS-ES,” and “Neo:6” are trademarks of DTS, Inc.
Enjoying Home Theater Speaker Sets A and B You can use two sets of speakers with the AV receiver: speaker set A and speaker set B. Speaker set A should be used in your main listening room for up to 7.1-channel playback. *While speaker set B is on, speaker set A is reduced to 5.1-channel playback. Speaker set B can be used in another room and offers 2-channel stereo playback. *Only analog input sources are output by speaker set B.
Contents Introduction Basic Operation Important Safety Instructions ....................2 Precautions .................................................3 Supplied Accessories.................................4 Features .......................................................5 Playing Your AV Components ................ 37 Enjoying Home Theater ..............................6 Listening to AM/FM stations ....................... 39 Presetting Radio Stations ...........................
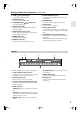
Getting to Know the AV Receiver Front Panel North American Model 1 2 3 4 5 6 7 MASTER VOLUME TUNING PRESET STANDBY/ON STANDBY ENTER MULTI CH DVD VIDEO 1 VIDEO 2 VIDEO 3 TAPE TUNER CD RETURN SETUP VCR VIDEO 3 INPUT PHONES VIDEO SPEAKERS A TONE B STEREO LISTENING MODE DISPLAY DIGITAL INPUT DIMMER L AUDIO R TUNING MODE MEMORY CLEAR 8 9 J K L M N OP Q R S T Other Models MASTER VOLUME TUNING PRESET STANDBY/ON STANDBY ENTER PURE AUDIO MULTI CH DVD VIDEO 1 VIDEO 2
Getting to Know the AV Receiver—Continued J TONE, [–], and [+] buttons (41) Q TUNING MODE button (39) Used to adjust the bass and treble. Selects the Auto or Manual tuning mode for AM and FM radio. K STEREO button (43) R RETURN button Selects the Stereo listening mode. Selects the previously displayed setup menu. L LISTENING MODE [ ]/[ ] buttons (43) S SETUP button Select the listening modes. Used to access the setup menus.
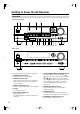
Getting to Know the AV Receiver—Continued Rear Panel 1 2 3 4 COMPONENT VIDEO IN 3 IN 2 IN 1 6 SURROUND BACK SPEAKERS ANTENNA AM DIGITAL IN 5 FRONT SPEAKERS A SURROUND SPEAKERS CENTER SPEAKER FM 75 L L R R OUT COA XIAL Y VIDEO 2 VIDEO 1 DVD OPTICAL 1 PB V 2 PR S L L L R R R MONITOR OUT AC OUTLET AC 120V 60Hz SWITCHED 120W 1A MAX.
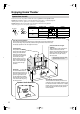
Remote Controller Installing the Batteries 1 To open the battery compartment, press the small hollow and slide open the cover. Aiming the Remote Controller When using the remote controller, point it toward the AV receiver’s remote control sensor, as shown below. Remote control sensor AV receiver STANDBY indicator 2 3 Insert the two supplied batteries (AA/R6) in accordance with the polarity diagram inside the battery compartment. Slide the cover shut. Approx. 16 ft.
Remote Controller—Continued Using the Remote Controller RECEIVER/TAPE Mode Including the AV receiver, the remote controller can be used to control up to seven different components. The remote controller has a specific operating mode for use with each type of component. Modes are selected by using the six REMOTE MODE buttons. ■ RECEIVER/TAPE Mode In RECEIVER/TAPE mode, you can control the AV receiver and an Onkyo cassette recorder connected via .
Remote Controller—Continued For detailed information, see the pages in parentheses. A ON/STANDBY button (32) Sets the AV receiver to On or Standby. ■ Buttons used when the TUNER input is selected To select the Tuner (AM/FM) as the input source, press: B INPUT SELECTOR buttons (37) Used to select the input sources. RECEIVER 8 TUNER C MULTI CH button (38) Selects the multichannel DVD input. D DIMMER button (41) Adjusts the display brightness.
Remote Controller—Continued A ON/STANDBY button DVD Mode Sets the DVD player to On or Standby. By default, the remote controller is set to control an Onkyo DVD player. To select your DVD player as the input source, press: RECEIVER or 6 DVD B Number buttons Used to enter title, chapter, and track numbers and times for locating specific points. C DISC +/– button Selects discs on a DVD changer. 5 D TOP MENU button MULTI CH Selects a DVD’s top menu.
Remote Controller—Continued A ON/STANDBY button CD/MD/CDR/HDD Mode Sets the component to On or Standby. By default, the remote controller is set to control an Onkyo CD player. To select the input source, press: 9 Selects discs on a CD changer, or the next or previous album on an HDD-compatible component. CD player MD or CD recorder 7 TAPE 7 Next generation HDDcompatible component 2 or TAPE V2 Used to enter track numbers and times for locating specific points on CD/MD players.
Connecting Your Speakers Speaker Configuration Speaker Connection Precautions For the best surround-sound experience, you should connect seven speakers and a powered subwoofer. The following table shows which channels you should use based on the number of speakers that you have.
Connecting Your Speakers—Continued Connecting Speaker Set A Connecting Speaker Set B 1 Strip 5/8" (15 mm) of insulation from the ends of the speaker cables, and twist the bare wires tightly, as shown. 2 Unscrew the terminal. Fully insert the bare wire, making sure that it’s touching the threaded shaft in the center. Screw the terminal tight. 5/8" (15 mm) 1 Strip 3/8" (10 mm) of insulation from the ends of the speaker cables, and twist the bare wires tightly, as shown.
Connecting Antennas This section explains how to connect the supplied indoor FM antenna and AM loop antenna, and how to connect commercially available outdoor FM and AM antennas. The AV receiver won’t pick up any radio signals without any antenna connected, so you must connect the antenna to use the tuner.
Connecting Antennas—Continued Connecting an Outdoor FM Antenna Connecting an Outdoor AM Antenna If you cannot achieve good reception with the supplied indoor FM antenna, try a commercially available outdoor FM antenna instead. If good reception cannot be achieved using the supplied AM loop antenna, an outdoor AM antenna can be used in addition to the loop antenna, as shown.
Connecting Your Components AV Connection Color Coding About AV Connections RCA-type AV connections are usually color coded: red, white, and yellow. Use red plugs to connect right-channel audio inputs and outputs (typically labeled “R”). Use white plugs to connect left-channel audio inputs and outputs (typically labeled “L”). And use yellow plugs to connect composite video inputs and outputs. • Before making any AV connections, read the manuals supplied with your other AV components.
Connecting Your Components—Continued Connecting Audio and Video Signals to the AV Receiver By connecting both the audio and video outputs of your DVD player and other AV components to the AV receiver, you can switch the audio and video signals simultaneously simply by changing the input source on the AV receiver. : Signal Flow Video Video Audio Audio TV, projector, etc. Speakers (see page 17 for hookup details) DVD player, etc.
Connecting Your Components—Continued Connecting a TV or Projector Step 1: Video Connection Choose a video connection that matches your TV ( A , B , or C ), and then make the connection. Step 2: Audio Connection Choose an audio connection that matches your TV ( a , b , or c ), and then make the connection. • With connection a , you can listen to and record audio from your TV and listen via speaker set B. • To enjoy Dolby Digital and DTS, use connection b or c . (For recording, use a and b , or a and c .
Connecting Your Components—Continued Connecting a DVD player Step 1: Video Connection Choose a video connection that matches your DVD player ( A , B , or C ), and then make the connection. You must connect the AV receiver to your TV via the same type of connection. Step 2: Audio Connection Choose an audio connection that matches your DVD player ( a , b , or c ), and then make the connection. • With connection a , you can listen to and record audio from a DVD and listen via speaker set B.
Connecting Your Components—Continued Hooking Up the Multichannel DVD Input If your DVD player supports multichannel audio formats such as DVD-Audio or SACD, and it has a multichannel analog audio output, you can connect it to the AV receiver’s multichannel DVD input. Use a multichannel analog audio cable, or several normal audio cables, to connect the AV receiver’s DVD IN FRONT L/R, CENTER, SURROUND L/R, SURR BACK L/R, and SUBWOOFER jacks to the 7.1-channel analog audio output on your DVD player.
Connecting Your Components—Continued Connecting a VCR or DVD Recorder for Playback Hint! With this hookup, you can use your VCR’s tuner to listen to your favorite TV programs via the AV receiver, useful if your TV has no audio outputs. Step 1: Video Connection Choose a video connection that matches your VCR or DVD recorder ( A , B , or C ), and then make the connection. You must connect the AV receiver to your TV via the same type of connection.
Connecting Your Components—Continued Connecting a VCR or DVD Recorder for Recording Step 1: Choose a video connection that matches your VCR or DVD recorder ( A or B ), and then make the connection. The video source to be recorded must be connected to the AV receiver via the same type of connection. Step 2: Make the audio connection a .
Connecting Your Components—Continued Connecting a Satellite, Cable, Set-top box, or Other Video Source Hint! With this hookup, you can use your satellite or cable receiver to listen to your favorite TV programs via the AV receiver, useful if your TV has no audio outputs. Step 1: Video Connection Choose a video connection that matches the video source ( A , B , or C ), and then make the connection. You must connect the AV receiver to your TV via the same type of connection.
Connecting Your Components—Continued Connecting a CD Player or Turntable ■ CD Player or Turntable (MM) with Built-in Phono Preamp Step 1: Choose a connection that matches your CD player ( a , b , or c ). Use connection a for a turntable with a built-in phono preamp.
Connecting Your Components—Continued Connecting an HDD-compatible Component As of this printing, the Onkyo Remote Interactive Dock is the only HDD-compatible component available. ■ For HDD-compatible components that don’t support video Connect your HDD-compatible component’s analog audio output jacks to the AV receiver’s TAPE IN L/R jacks.
Connecting Your Components—Continued Connecting a Cassette, CDR, MiniDisc, or DAT Recorder Step 1: Choose a connection that matches the recorder ( a , b , or c ), and then make the connection.
Connecting Your Components—Continued Connecting Onkyo Components Step 1: Make sure that each Onkyo component is connected to the AV receiver with an analog audio cable (connection a in the hookup examples) (see pages 22 to 30). Step 2: Make the connection. Step 3: If you’re using an MD, CDR, or HDD component, change the Input Display (see page 33).
Turning On the AV Receiver ON/STANDBY STANDBY/ON STANDBY indicator REMOTE MODE ON/STANDBY DVD RECEIVER TAPE INPUT SELECTOR RECEIVER M D/CDR 1 2 3 V1 V2 V3 CD HDD MASTER VOLUME TUNING 4 PRESET STANDBY/ON 5 6 MULTI CH DVD TV STANDBY 7 8 VCR 9 ENTER TAPE MULTI CH DVD VIDEO 1 VIDEO 2 VIDEO 3 TAPE TUNER CD RETURN TUNER 10 SETUP VIDEO 3 INPUT VIDEO SPEAKERS A B TONE STEREO LISTENING MODE DISPLAY DIGITAL INPUT DIMMER MEMORY L AUDIO CABLE 12 +10 0 --/--- DI
First Time Setup Assigning Digital Inputs to Input Sources 1 Changing the Input Display If you connect an -capable Onkyo MiniDisc recorder, CD recorder or next generation HDD-compatible component to the TAPE IN/OUT or VIDEO 2 IN jacks, for to work properly, you must change this setting. This setting can only be changed on the AV receiver.
First Time Setup—Continued ON/STANDBY REMOTE MODE DVD RECEIVER TAPE INPUT SELECTOR 3 Use the Left and Right [ ]/[ ] buttons to select the setting for “Impedance.” 4 ohms: Select if the impedance of any connected speaker is 4 ohms or more but less than 6. 6 ohms: Select if the impedances of all connected speakers are between 6 and 16 ohms.
First Time Setup—Continued 3 Use the Up and Down [ ]/[ ] buttons to select an input selector, and use the Left and Right [ ]/[ ] buttons to select: IN1: Select if the video component is connected to COMPONENT VIDEO IN 1. IN2: Select if the video component is connected to COMPONENT VIDEO IN 2. IN3: Select if the video component is connected to COMPONENT VIDEO IN 3. VIDEO: Select to output composite video and S-Video sources from the COMPONENT VIDEO OUT. 4 Press the [SETUP] button. Setup closes.
First Time Setup—Continued 6 Use the Down [ ] button to select “Surround,” and then use the Left and Right [ ]/[ ] buttons to select Small, Large, or None. Small: Select if the surround speakers are small. Large: Select if the surround speakers are large. None: Select if no surround speakers are connected. Note: • If the Front setting in step 4 is set to Small, the Large option cannot be selected.
Playing Your AV Components Basic AV Receiver Operation 4 1 MULTI CH ON/STANDBY DVD TAPE 1 MASTER VOLUME TUNING REMOTE MODE RECEIVER INPUT SELECTOR 1 2 1 M D/CDR CD 3 HDD PRESET V1 V2 4 STANDBY/ON V3 5 6 MULTI CH DVD TV STANDBY ENTER 7 MULTI CH DVD VIDEO 1 VIDEO 2 VIDEO 3 TAPE TUNER CD RETURN SETUP 8 TAPE 9 TUNER 10 +10 VCR VIDEO SPEAKERS A B STEREO TONE LISTENING MODE DISPLAY DIGITAL INPUT DIMMER MEMORY L AUDIO 12 CLR CABLE SAT ENT --/--- R CD
Playing Your AV Components—Continued Displaying Source Information ON/STANDBY REMOTE MODE DVD RECEIVER TAPE INPUT SELECTOR RECEIVER M D/CDR 1 2 3 V1 V2 V3 You can display various information about the current input source as follows.
Listening to the Radio Tuning into AM/FM Radio Stations Listening to AM/FM stations ■ Auto Tuning Mode TUNER TUNING 1 TUNING MODE MASTER VOLUME TUNING PRESET STANDBY/ON STANDBY Press the [TUNING MODE] button so that the AUTO indicator appears on the display.
Listening to the Radio—Continued ■ Tuning into Stations by Frequency You can tune into AM and FM stations directly by entering the appropriate frequency. ON/STANDBY Press the [MEMORY] button. The MEMORY indicator appears and the preset number flashes.
Common Functions This section explains functions that can be used with any input source. ON/STANDBY REMOTE MODE Press [RECEIVER] first DVD RECEIVER TAPE INPUT SELECTOR M D/CDR 1 2 3 CD V1 V2 V3 HDD 4 5 6 MULTI CH DVD 7 8 TAPE DIMMER +10 0 --/--- DIMMER 12 SLEEP SAT ENT TV SLEEP CH VOL TONE Press the AV receiver’s [TONE] button repeatedly to select either Bass or Treble.
Common Functions—Continued Using the Sleep Timer Adjusting Speaker Levels With the sleep timer, you can set the AV receiver so that it turns off automatically after a specified period. SLEEP Press the remote controller’s [SLEEP] button repeatedly to select the required sleep time. You can set the sleep time from 90 to 10 minutes in 10 minute steps. The SLEEP indicator appears on the display when the sleep timer has been set, as shown.
Using the Listening Modes Selecting with the Remote Controller Selecting Listening Modes TV For a description of each listening mode, see “About the Listening Modes” on page 45. • While a pair of headphones is connected, you can select only the Pure Audio (not North American model), Mono, Direct, or Stereo listening mode.
Using the Listening Modes—Continued The following table shows which listening modes can be used with each input signal format. Source format 3/2.1 2/2.1 CD, TV, radio, cassette, etc. Listening mode DTS/DTS 96/24*2 Dolby Digital Analog, PCM*1 2/0 1/0, 1+1 Other 3/2.1 2/2.1 DVD, DTV, etc. DTS-ES 2/0 Discrete Matrix DVD, CD, etc.
Using the Listening Modes—Continued About the Listening Modes The AV receiver’s listening modes can transform your listening room into a movie theater or concert hall, with high fidelity and stunning surround sound. The illustration shows which speakers are active in each listening mode with 7.1 channel speaker system.
Using the Listening Modes—Continued DTS-ES Matrix This mode is for use with DTS-ES Matrix soundtracks, which use a matrix-encoded back-channel for 6.1/7.1-channel playback. Use it with DVDs that bear the DTS-ES logo, especially those with a DTS-ES Matrix soundtrack. Onkyo Original DSP Modes Mono Movie This mode is suitable for old movies and other mono sources.
Using the Listening Modes—Continued Using the CinemaFILTER ON/STANDBY REMOTE MODE DVD RECEIVER RECEIVER TAPE INPUT SELECTOR M D/CDR 1 2 3 V1 V2 V3 CD HDD 4 5 6 MULTI CH DVD 7 8 TAPE TV VCR 9 TUNER 10 CD 11 12 +10 0 --/--- DIMMER SLEEP VOL DISC ALBUM CLR D TUN CABLE SAT ENT TV CH VOL 1 INPUT GUIDE TOP MENU PREVIOUS MENU SP A / B With the CinemaFILTER, you can soften overly bright movie soundtracks, which are typically mixed for reproduction in a movie theater
Using the Listening Modes—Continued 4 Press the [SETUP] button. Setup closes. SETUP The Audio Adjust settings are explained below. Input Channel Settings ■ Multiplex This setting determines which channel is output from a stereo multiplex source. Use it to select audio channels or languages with multiplex sources, multilingual TV broadcasts, and so on. Main: The main channel is output (default). Sub: The sub channel is output. M/S: Both the main and sub channels are output.
Recording This section explains how to record the selected input source to a component with recording capability, and how to record audio and video from different sources. Recording the Input Source You can only record to a component that’s connected to the TAPE OUT or VIDEO 1 OUT jacks. See pages 20–31 for information on connecting your AV components.
Advanced Setup Advanced Speaker Settings The Crossover Frequency, Double Bass, and Speaker Distance settings cannot be changed while a pair of headphones is connected, speaker set B is on, or the multichannel DVD input is being used. Crossover Frequency This setting only applies to the speakers that you specified as Small in the “Speaker Configuration” on page 35.
Advanced Setup—Continued Speaker Distance With these settings, you can specify the distance from each speaker to the listening position. 1 2 Measure and make a note of the distance from each speaker to the listening position. RECEIVER Press the [RECEIVER] REMOTE MODE button, followed by the [SETUP] button. example, if the Front distance is set to 20 ft. (6 m), the Center and Subwoofer distances can be set between 15 and 25 ft. (4.5 and 7.5 m).
Advanced Setup—Continued 4 Use the Left and Right [ ]/[ ] buttons to adjust the speaker level, and use the Down [ ] button to select the next speaker. The levels can be adjusted from –12 to +12 dB in 1 dB steps (–15 to +12 dB for the subwoofer). Digital Input Signal Formats The following table shows the display indicator for each digital signal format. Format Display Dolby Digital DTS PCM 5 Repeat step 4 so that the level of the test tone coming from each speaker is the same.
Advanced Setup—Continued Correcting Sound and Picture Sync When using progressive scanning on your DVD player, you may find that the picture and sound are out of sync. With this setting, you can correct this by delaying the audio signals. You can set it from 0 to 100 milliseconds (ms) in 20 millisecond steps.
Controlling Other Components You can use the AV receiver’s remote controller (RC-647M) to control your other AV components, including those made by other manufacturers. This section explains how to enter the necessary remote control code for the component that you want to control (e.g., DVD player, TV, or VCR). 2 REMOTE MODE DVD M D/CDR CD While holding down the REMOTE MODE button that you want to set, press the [DISPLAY] button for 3 seconds. The REMOTE MODE button lights up.
Controlling Other Components—Continued Remote Control Codes for Onkyo Components Connected via Onkyo components that are connected via are controlled by pointing the remote controller at the AV receiver, not the component. This allows you to control components that are out of view, in a rack, for example. Resetting REMOTE MODE Buttons You can reset a REMOTE MODE button to its default remote control code.
Controlling Other Components—Continued To control another component, point the remote controller at it and use the buttons explained below. (You must select the appropriate remote control mode first.) With some AV components, certain buttons may not work as expected, and some may not work at all.
Troubleshooting If you have any trouble using the AV receiver, look for a solution in this section. If you can’t resolve the issue yourself, try resetting the AV receiver before contacting your Onkyo dealer. To reset the AV receiver to its factory defaults, turn it on and, while holding down the [VIDEO 1] button, press the [STANDBY/ON] button. “Clear” will appear on the display and the AV receiver will enter Standby mode.
Troubleshooting—Continued • The surround back speakers are not used with all listening modes. Select another listening mode (page 45). • Not much sound may be produced by the surround back speakers with some sources. • Make sure the speakers are configured correctly (page 35). The subwoofer produces no sound • The subwoofer outputs no sound while only speaker set B is on. Turn on speaker set A. • When you play source material that contains no information in the LFE channel, the subwoofer produces no sound.
Troubleshooting—Continued Remote Controller The remote controller doesn’t work • Make sure that the batteries are installed with the correct polarity (page 11). • Make sure that the remote controller is not too far away from the AV receiver, and that there’s no obstruction between the remote controller and the AV receiver’s remote control sensor (page 11). • Make sure you’ve selected the correct remote controller mode (page 12). • Make sure you’ve entered the correct remote control code (page 54).
Troubleshooting—Continued The AV receiver contains a microcomputer for signal processing and control functions. In very rare situations, severe interference, noise from an external source, or static electricity may cause it to lockup. In the unlikely event that this happens, unplug the power cord from the wall outlet, wait at least five seconds, and then plug it back in again. Onkyo is not responsible for damages (such as CD rental fees) due to unsuccessful recordings caused by the unit’s malfunction.
Specifications Amplifier Section General Rated Output Power (FTC) All channels: 80 watts minimum continuous power per channel, 8 ohm loads, 2 channels driven from 20 Hz to 20 kHz, with a maximum total harmonic distortion of 0.08% 100 watts minimum continuous power per channel, 6 ohm loads, 2 channels driven at 1 kHz, with a maximum total harmonic distortion of 0.
Sales & Product Planning Div. : 2-1, Nisshin-cho, Neyagawa-shi, OSAKA 572-8540, JAPAN Tel: 072-831-8023 Fax: 072-831-8124 ONKYO U.S.A. CORPORATION 18 Park Way, Upper Saddle River, N.J. 07458, U.S.A. Tel: 201-785-2600 Fax: 201-785-2650 http://www.us.onkyo.com/ ONKYO EUROPE ELECTRONICS GmbH Liegnitzerstrasse 6, 82194 Groebenzell, GERMANY Tel: +49-8142-4401-0 Fax: +49-8142-4401-555 http://www.eu.onkyo.
Remote Control Codes For RC-647M / 679M / 650M / 651M 1. While holding down the REMOTE MODE button that you want to set, press the [DISPLAY] button for 3 seconds. 2. Use the number buttons to enter the 4-digit remote control code. REMOTE MODE DVD 1 2 3 4 5 6 7 8 9 M D/CDR CD HDD DISPLAY TV VCR 0 CABLE SAT Codes de télécommande Códigos de control remoto 1. Maintenez le bouton REMOTE MODE à initialiser enfoncé et appuyez sur le bouton [DISPLAY] durant 3 secondes. 1.
DVD Codes DVD DVD Player Acoustic Solutions Advent Aiwa Akai Akura Amoisonic Amphion Media Works Amstrad AMW Apex Digital Aspire Digital Audiovox Axion Blue Nova International Broksonic Bush Cambridge Soundworks Celestial Changhong CineVision Clayton Coby Conia CyberHome Daewoo Daytek Denver Diamond Dick Smith Electronics Digitor Disney DSE DVD2000 ECC Elta Eltax Emerson Ferguson Funai Gateway GE Go Video Go Vision H&B Harman/Kardon Hitachi iLo Integra Jensen JVC jWin Kiss KLH 2 DVD Player 0730, 0713 10
M D/CDR CD/MD/CDR/HDD Codes CD HDD CD Player Anthem Bush Carver Classic Copland Denon Dynamic Bass Fisher Garrard Genexxa GoldStar GPX Harman/Kardon HHB Inkel JVC Kenwood KLH LG Magnavox Marantz Memorex Musical Fidelity NAD Onkyo Optimus Panasonic Philips Pioneer RCA Realistic Roksan Rotel Sanyo Sharp Sherwood Silsonic Sony TDK Teac Technics Thomson Universum Wards Yamaha CD Recorder 0897 0388 0179 1297 0393 0034, 0766 0179 0179, 1325 0393 0426 1208 1296 0173, 0426, 1202 0192 0180 1294 0826, 0028, 0037
TV Codes TV TV 888 Acura Addison Admiral Advent Aiko Aiwa Akai Akura Alba Albatron Alfide America Action Amstrad Anam Anam National Anhua Anitech AOC Aolinpike Apex Digital Asuka Audinac Audiosonic Audiovox Aventura Awa Baihe Baile Baird Bang & Olufsen Baohuashi Baosheng Basic Line Baur Baysonic Beijing Beko Bell & Howell BenQ Beon Blaupunkt Blue Sky BPL Bradford 4 TV 0264 0009 0653, 0108, 0092, 1150 0463, 0163 0761, 0783, 0815, 0842 0092 0701, 1180 0060, 0812, 0702, 0030, 0264, 0218, 0009, 0208, 0672
TV GE GEC Geloso Genexxa Gibralter Gintai Go Video GoldStar Goodmans Gorenje GPM Gradiente Graetz Granada Grandin Grundig Grunpy Haier Haihong Haiyan Hankook Hanseatic Harman/Kardon Harvard Harwa HCM Hello Kitty Himitsu Hinari Hisense Hitachi Hongmei Hongyan Hua Tun Huafa Huanghaimei Huanghe Huanglong Huangshan Huanyu Huaqiang Huari Huodateji Hypson ICE TV 0047, 0051, 0451, 0180, 0030, 1447, 1454, 0560, 0092, 1147, 1347 0037 0009 0218, 0163 0017, 0030 1150 0886 0154, 0030, 0037, 0001, 0056, 0109, 1150, 1
TV Codes TV TV NEC Neckermann NEI Netsat Newave Nikkai Nikko Noblex Nokia Norcent Nordmende NTC Oceanic Onwa Optimus Orion Osaki Oso Otto Versand Palladium Palsonic Panama Panasonic Panda Pausa Penney Philco Philips Phonola Pilot Pioneer Polaroid Portland Prima Princeton Prism Profex Proscan TV 0154, 0156, 0051, 0053, 0030, 0264, 0508, 0009, 0056, 0170, 1150, 1182, 1378, 1456 0556, 0037 0037 0037 0009, 0092, 0161, 1150 0037, 0264, 0218, 0035 0030, 0092 0154 0548, 0606, 0480, 0631 0748, 0824 0560,
TV Teac Technics Technisson Techwood Teco Teknika Teleavia Telefunken Teletech Tensai Tera Tevion Texet Thompson Thomson Thorn Thorn-Ferguson Tiny TMK TNCi Tobo Tongguang Tongtel Tophouse Toshiba Transonic Tuntex TVS Universum Vector Research Vestel Victor Videocon Vidikron Viewsonic Viore Vizio Voxson Wards Warumaia Watson Waycon Weipai Westinghouse TV 0037, 0698, 0712, 0264, 0009, 0418, 1149 0250, 0051 0714 0051, 0056 0051, 0264, 0218, 0653, 0009, 0092 0054, 0180, 0150, 0060, 0056, 0092 0343 0702, 0625
VCR Codes VCR VCR ABS Admiral Aiwa Akai Akiba Alba Alienware American High Amoisonic Anam Anam National Anitech Baird Basic Line Blaupunkt Brandt Brandt Electronique Broksonic Bush Canon CCE Cimline Citizen Colt Combitech Craig Crown Curtis Mathes CyberPower Daewoo Dansai Dell Dick Smith Electronics Digitor DirecTV DSE Dual Durabrand Elcatech Emerson Ferguson Firstline Fisher Fuji Funai Gateway GE Go Video 8 VCR 1972 0209, 0479 0348, 0307, 0352, 0124, 0479, 1291 0041, 0315, 0175 0072 0209, 0072, 0352, 0
VCR Sanyo Saville Schaub Lorenz Schneider Scott Sears Seleco Sharp Shintom Singer Sonic Blue Sonolor Sony Stack 9 Sunkai Sylvania Symphonic Systemax Tagar Systems Tatung Teac Technics Teco Teknika Teleavia Telefunken Tenosal Thomson Thorn Tivo Toshiba Touch Victor Viewsonic Voodoo Wards Wharfedale White Westinghouse XR-1000 Yamaha Yamishi Yokan Zenith ZT Group 0047, 0046, 0159, 1330 0352 0041 0072 0184, 0121 0035, 0047, 0046, 1237 0041 0209, 0807, 0848, 1285 0072 0072 0614, 0616 0046 0035, 0033, 0636, 1032
CABLE/SAT Codes CABLE SAT Cable Converter Cable Converter ABC Americast Amstrad Bell South British Telecom Cable & Wireless Clearmaster ClearMax Contec Coolmax Sony Starcom Sumitomo Supermax Tele Danmark Tele+1 Telewest Thomson Tocom Torx Toshiba Tristar TS United Cable V2 Viewmaster Vision Vortex View Zenith 0003, 0008, 0033 0899 1222 0899 0003 1068 0883 0883 0019 0883 0877, 1877, 0477, Daeryung 0008 Digeo 1187 Director 0476 DX Antenna 1500 Filmnet 0443 France Telecom 1734 Fujitsu 1497 Funai 0019 Ge
Satellite Receiver Satellite Receiver Satellite Receiver Hirschmann Hisense Preisner Proscan Proton QNS Radiola RadioShack Yes Hitachi HTS Hughes Hughes Network Systems Humax iLo Indovision ISkyB Jerrold JVC Kathrein Kreiselmeyer LG Lorenzen Magnavox Marantz Maspro Matsui Maximum MediaSat Medion Memorex Metronic Mitsubishi Morgan's Motorola Multichoice Myryad NEC Netsat Next Level Nikko Nokia OctalTV Opentel Optex Orbitech Pace Panasat Panasonic Paysat Philips Pioneer Plasmatic 0173 1535 0819, 1250
Sales & Product Planning Div. : 2-1, Nisshin-cho, Neyagawa-shi, OSAKA 572-8540, JAPAN Tel: 072-831-8023 Fax: 072-831-8124 ONKYO U.S.A. CORPORATION 18 Park Way, Upper Saddle River, N.J. 07458, U.S.A. Tel: 201-785-2600 Fax: 201-785-2650 http://www.us.onkyo.com/ ONKYO EUROPE ELECTRONICS GmbH Liegnitzerstrasse 6, 82194 Groebenzell, GERMANY Tel: +49-8142-4401-0 Fax: +49-8142-4401-555 http://www.eu.onkyo.