Contents AV RECEIVER TX-NR929 Safety Information and Introduction ............2 Table of Contents ...........................................6 Connections .................................................14 Turning On & Basic Operations..................25 Instruction Manual Playback........................................................33 Advanced Operations ..................................57 Controlling Other Components...................87 Appendix ...........................................
Safety Information and Introduction WARNING: TO REDUCE THE RISK OF FIRE OR ELECTRIC SHOCK, DO NOT EXPOSE THIS APPARATUS TO RAIN OR MOISTURE. CAUTION: TO REDUCE THE RISK OF ELECTRIC SHOCK, DO NOT REMOVE COVER (OR BACK). NO USER-SERVICEABLE PARTS INSIDE. REFER SERVICING TO QUALIFIED SERVICE PERSONNEL.
Safety Information and Introduction Precautions 1. Recording Copyright—Unless it’s for personal use only, recording copyrighted material is illegal without the permission of the copyright holder. 2. AC Fuse—The AC fuse inside the unit is not userserviceable. If you cannot turn on the unit, contact your Onkyo dealer. 3. Care—Occasionally you should dust the unit all over with a soft cloth. For stubborn stains, use a soft cloth dampened with a weak solution of mild detergent and water.
Safety Information and Introduction RF Exposure Compliance Modèle pour les Canadien IMPORTANT This equipment complies with FCC/IC radiation exposure limits set forth for an uncontrolled environment and meets the FCC radio frequency (RF) Exposure Guidelines in Supplement C to OET65 and RSS-102 of the IC radio frequency (RF) Exposure rules. This equipment has very low levels of RF energy that it deemed to comply without maximum permissive exposure evaluation (MPE).
Safety Information and Introduction –Hiermit erklärt Onkyo Corporation, dass sich das Gerät TX-NR929 in Übereinstimmung mit den grundlegenden Anforderungen und den übrigen einschlägigen Bestimmungen der Richtlinie 1999/5/EG befindet. –Käesolevaga kinnitab Onkyo Corporation seadme TX-NR929 vastavust direktiivi 1999/5/EÜ põhinõuetele ja nimetatud direktiivist tulenevatele teistele asjakohastele sätetele.
Safety Information and Introduction Table of Contents Safety Information and Introduction Important Safety Instructions ......................................2 Precautions ...................................................................3 Supplied Accessories...................................................5 Table of Contents..........................................................6 Features .........................................................................7 Front & Rear Panels.................
Safety Information and Introduction Features Amplifier • 135 Watts/Channel @ 8 ohms (FTC) • 185 Watts/Channel @ 6 ohms (IEC) • 230 Watts/Channel @ 6 ohms (JEITA) • WRAT–Wide Range Amplifier Technology (5 Hz to 100 kHz bandwidth) • Optimum Gain Volume Circuitry • H.C.P.S.
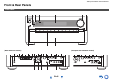
Safety Information and Introduction Front & Rear Panels Front Panel (North American models) (European and Australian models) En-8
Safety Information and Introduction For detailed information, see the pages in parentheses.
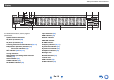
Safety Information and Introduction Display s For detailed information, see the pages in parentheses. Z2 (Zone 2) indicator (84) Input indicators (22) HDMI indicator (78) DIGITAL indicator ANALOG indicator Z3 (Zone 3) indicator (84) Bi AMP indicator Listening mode and format indicators (45, 76) Audyssey indicator (28, 71) Dynamic EQ indicator (72) Dynamic Vol indicator (72) Speaker/channel indicators M.
Safety Information and Introduction Composite video and analog audio jacks (BD/DVD IN, CBL/SAT IN, STB/DVR IN, GAME 1 IN, PC IN, TV/CD IN, PHONO IN) Rear Panel HDMI IN and HDMI output (HDMI OUT MAIN and HDMI OUT SUB/ZONE 2) jacks COMPONENT VIDEO IN and MONITOR OUT jacks IR IN and OUT jacks ZONE 2 and ZONE 3 12V TRIGGER OUT jacks ZONE 2 and ZONE 3 LINE OUT jacks FM ANTENNA jack and AM ANTENNA terminal PC IN jack AC INLET DIGITAL IN COAXIAL and OPTICAL jacks GND screw MONITOR OUT V jack PRE OUT jacks (FRONT
Safety Information and Introduction Remote Controller For detailed information, see the pages in parentheses. RECEIVER button (25) Controlling the AV Receiver ACTIVITIES buttons (55, 95) To control the AV receiver, press RECEIVER to select Receiver mode. REMOTE MODE/INPUT SELECTOR buttons (33) ■ Controlling the tuner To control the AV receiver’s tuner, press TUNER (or RECEIVER). You can select AM or FM by pressing TUNER repeatedly. / buttons ( 42) D.
Safety Information and Introduction ■ Aiming the remote controller To use the remote controller, point it at the AV receiver’s remote control sensor, as shown below. Remote control sensor AV receiver Approx. 16 ft. (5 m) ■ Installing the batteries Batteries (AA/R6) Note • If the remote controller doesn’t work reliably, try replacing the batteries. • Don’t mix new and old batteries or different types of batteries.
Connections Speaker Configuration Connections Connecting the AV Receiver Connecting Your Speakers *1 The following table indicates the channels you should use depending on the number of speakers that you have. No matter how many speakers you use, a powered subwoofer is recommended for a really powerful and solid bass. To get the best from your surround sound system, you need to set the speaker settings automatically (➔ page 28) or manually (➔ page 65).
Connections Attaching the Speaker Cable Labels The speaker terminals are color-coded for identification purpose.
Connections Connecting the Speaker Cables/Powered Subwoofers Please connect , , , , and for 5.1-channel surround. ■ 9.1-channel playback In addition to 5.1-channel playback connection, if surround back, front high, and front wide speakers are connected, selecting the speakers for 9.1-channel playback (surround back and front high, surround back and front wide, or front high and front wide) is possible. You can set which speakers you want to use by priority.
Connections ■ 11.1-channel playback By using a combination of the built-in power amplifier for 9-channel and an external power amplifier for 2-channel, you can enjoy up to 11.1-channel playback. Connect the external power amplifier’s analog audio input jacks to FRONT WIDE PRE OUT of the AV receiver with audio cables. To perform the 11.1-channel playback, set the “11ch Playback” setting to “Yes” (➔ page 65).
Connections Using Speakers Without Crossover Network Using Dipole Speakers Important: • Speakers without crossover network are speakers with no built-in crossover network. • With speakers without crossover network, be careful NOT to connect tweeters and woofers the wrong way around, as this may damage your speakers. • With speakers without crossover network, be careful NOT to set “Speakers Type(Front)” to “Bi-Amp” as this may damage your speakers.
Connections Connecting the TV/AV components Use this jack to connect to the game consoles, etc. Before connecting the power cord, connect all of your speakers and AV components. To display the setup menu on the TV screen, connecting the TV to HDMI OUT MAIN is required. Use this port to connect to a LAN port on a router so the AV receiver can be connected to your home network. Use jack and terminal here to connect the supplied FM antenna and AM loop antenna.
Connections ■ MHL (Mobile High-Definition Link) With its support for MHL (Mobile High-Definition Link), the AUX (Front) input allows you to deliver highdefinition video from a connected mobile device. Network connection by wireless LAN is possible. See “Performing Wireless LAN Setup” for connections (➔ page 31). Internet radio WAN Modem MHL OUT Router LAN MHL-enabled mobile device, etc.
Connections Operations that can be performed with connection ■ For -compatible TV The following linked operations are enabled by connecting the AV receiver to an -compatible TV. • The AV receiver will enter standby mode when the TV is set to standby. • You can set on the menu screen of the TV to either output the audio from the speakers connected to the AV receiver, or from the speakers of the TV.
Connections Video input signals flow through the AV receiver as shown, with composite video, PC IN (Analog RGB), and component video sources all being upconverted for the HDMI output(s). *2 Signal Selection Example Blu-ray Disc/DVD player, etc. Composite Component HDMI IN Video Signal Flow Chart AV receiver Blu-ray Disc/DVD player, etc.
Connections ■ Composite video Composite video is commonly used on TVs, DVDs, and other video equipment. Yellow Connecting the Antennas This section explains how to connect the supplied indoor FM antenna and AM loop antenna. The AV receiver won’t pick up any radio signals without any antenna connected, so you must connect the antenna to use the tuner. ■ Optical digital audio Optical digital connections allow you to enjoy digital sound such as PCM*1, Dolby Digital or DTS.
Connections Connecting Onkyo RI Components 1 Make sure that each Onkyo component is connected with an analog audio cable (connection in the hookup examples) (➔ page 19). 2 3 Make the Using Headphones 1 While the headphones plug is inserted in the PHONES jack, indicator, speaker/channel indicator FL and FR lights. connection (see the illustration). If you’re using an RI Dock, or cassette tape deck, change the Input Display (➔ page 54).
Turning On & Basic Operations Turning On & Basic Operations the same circuit. If this is a problem, plug the AV receiver into a different branch circuit. • Do not use a power cord other than the one supplied with the AV receiver. The supplied power cord is designed exclusively for use with the AV receiver and should not be used with any other equipment. • Never disconnect the power cord from the AV receiver while the other end is still plugged into a wall outlet. Doing so may cause an electric shock.
Turning On & Basic Operations Firmware Update Notification When a new version of the firmware is available, the notification window “AV receiver : Firmware Update Available” pops up. This notification only appears when the AV receiver is connected to the Internet (➔ pages 20, 31). To perform the firmware update, follow the instructions on screen. Use / and ENTER on the AV receiver or remote controller to select one of the options. ` Update Now: Starts the firmware update.
Turning On & Basic Operations Source Connection Remote Mode Setup This step checks the connection of source components. With this step, you can enter remote control codes for the components you want to operate. 1 1 2 3 4 Use / to select one of the following options, and then press ENTER. `Yes, Continue: Performs the checkings. `No, Skip: Skips this step and continues to “Remote Mode Setup”. Select the input selector for which you want to check the connection and press ENTER.
Turning On & Basic Operations Using the Automatic Speaker Setup With the supplied calibrated microphone, Audyssey MultEQ® XT32 automatically determines the number of speakers connected, their size for purposes of bass management, optimum crossover frequencies to the subwoofer (if present), and distances from the primary listening position.
Turning On & Basic Operations 1 Turn on the AV receiver and the connected TV. On the TV, select the input to which the AV receiver is connected. 2 Set the speaker setup microphone at the Main Listening Position , and connect it to the SETUP MIC jack. If “Speakers Type(Front)” is set to “Digital Crossover”, a confirmation screen appears. Select “Next” to display the screen for Digital Processing Crossover Network (➔ page 68). Continue with the settings.
Turning On & Basic Operations 10 Use / to select a target, and use / to change the setting. After the results of Audyssey MultEQ® XT32 have been saved, the menu will display the “Audyssey” (➔ page 71), “Dynamic EQ” (➔ page 72), “Dynamic Volume” (➔ page 72) settings. Error Messages While Audyssey MultEQ XT32 Room Correction and Speaker Setup is in progress, one of the error messages below may appear. MultEQ XT32: Auto Setup AUDYSSEY Ambient noise is too high.
Turning On & Basic Operations Performing Wireless LAN Setup 5 A wireless LAN (WLAN) is a local area network that relies on wireless communication. To achieve a wireless network connection, you will need the following component: ■ Access point Also known as the base station, it links your AV receiver (wireless client) with a PC or network.
Turning On & Basic Operations Manual wireless LAN setup 1 2 Press RECEIVER followed by HOME. 3 Use / to select “Hardware Setup”, and then press ENTER. 4 Use / to select “Network”, and then press ENTER. 5 Use / or / to select “Setup”, and then press ENTER. Use / to select “Network Connection”, and / to select “Wireless”, and then press ENTER (➔ page 80). The “Wireless Setup” menu is displayed on screen.
Playback Playback • “Playing Music Files on a Shared Folder” (➔ page 40) • “Remote Playback” (➔ page 41) • “Listening to AM/FM Radio” (➔ page 42) • “Playing Audio and Video from Separate Sources” (➔ page 44) • “Controlling Other Components” (➔ page 87) • “Using the Onkyo Dock” (➔ page 92) 1 * When you operate the AV receiver with the remote controller, press the RECEIVER button first.
Playback Controlling Contents of USB or Network Devices (➔ page 35) TOP MENU REPEAT This button displays the top menu for each media or service. Press this button repeatedly to cycle through the repeat modes. / and ENTER These buttons navigate through the menus. Press USB or NET first. / This button cycles through pages. This button starts playback. This button selects the beginning of the current song. Pressing this button twice selects the previous song. This button fast-reverses the current song.
Playback Understanding Icons on the Display This section describes icons that appear on the AV receiver’s display during media playback. Icon Description Folder Track Playback Pause Fast Forward Fast Reverse Artist Playing an Audio from Bluetoothenabled Device About the Bluetooth Wireless Technology Bluetooth wireless technology is a short-range wireless technology that enables wireless data communication between digital devices.
Playback 3 During this period (about 2 minutes), you can operate the Bluetooth-enabled device to pair with the AV receiver. Note • When establishing a connection with the AV receiver, select the profile (A2DP, AVRCP) at the Bluetoothenabled device. If the Bluetooth-enabled device does not support the AVRCP profile, you cannot perform playback or other operations with the AV receiver. Tip • For details on the Bluetooth connection, refer to the instruction manual of the Bluetooth-enabled device.
Playback 3 Use / to select a station or a program, and then press ENTER. Playback starts. tunein My Music 0 : 11 Great Artist My Favorite Go to Menu Setting an TuneIn account To create a user account for TuneIn, open a browser window such as Internet Explorer®, and connect to tunein.com website. With a TuneIn account, you can quickly search and browse for stations and programs at tunein.com website and save as your favorites which will automatically appear in your AV receiver My Presets account.
Playback Registering Other Internet Radio You need to connect the AV receiver to your home network (➔ pages 20, 31). Tip • The on-screen information appears only on a TV that is connected to HDMI outputs. Internet radio URLs in the following formats are supported: PLS, M3U, and podcast (RSS). However, depending on the type of data or audio format used by the Internet radio station, you may not be able to listen to some stations.
Playback Windows Media Player Setup 2 ■ Windows Media Player 11 Setup This section explains how to configure Windows Media Player 11 so that the AV receiver can play the music files stored on your computer. 1 2 Start Windows Media Player 11. 3 On the “Stream” menu, select “Turn on media streaming”. A dialog box appears. Tip Select the “Share my media” check box, and then click “OK”. A list of the supported devices appears. Move your cursor and click on “Turn on media streaming”.
Playback ■ Creating a shared folder Playing music files on a shared folder Right-click the folder that you want to share. In order to enjoy Home Media, you must first create a shared folder on your computer. Windows 8/Windows 7 Setup 1 2 3 ■ Setting the sharing options 4 Check the check box of “Share this folder” and then click “OK”. 1 5 Under “Network File and Folder Sharing”, select “Share”. 6 Select “Everyone” from the pull-down menu, click “Add”, and then click “Share”.
Playback Remote Playback 5 You need to connect the AV receiver to your home network (➔ pages 20, 31). Tip • The on-screen information appears only on a TV that is connected to HDMI outputs. Remote playback is supported by Windows Media Player 12. Remote Playback means you can play the music files stored on a media server or personal computer with the AV receiver by operating the controller device in the home network.
Playback Listening to AM/FM Radio 2 This section describes the procedure of using the buttons on the front panel, unless otherwise specified. Press TUNING / . Searching stops when a station is found. When tuned into a station, the TUNED indicator lights. When tuned into a stereo FM station, the FM STEREO indicator lights as shown. Using the Tuner With the built-in tuner you can enjoy AM and FM radio stations. You can store your favorite stations as presets for quick selection.
Playback 4 Press MEMORY again to store the station or channel. The station or channel is stored and the preset number stops flashing. Repeat this procedure for all of your favorite AM/FM radio stations. ■ Selecting Presets 1 To select a preset, use PRESET / on the AV receiver, or the remote controller’s CH +/–. Tip • You can also use the remote controller’s number buttons to select a preset directly. ■ Deleting Presets 1 Select the preset that you want to delete. See the previous section.
Playback ■ Listening to Traffic News (TP) RDS program types (PTY) You can search for stations that broadcast traffic news. Type 1 2 Display None None News reports News Press RT/PTY/TP three times. If the current radio station is broadcasting TP (Traffic Program), “[TP]” will appear on the AV receiver’s display. If “TP” without square brackets appears, this means that the station is not broadcasting TP.
Playback Using the Listening Modes Note About Listening Modes The AV receiver’s listening modes can transform your listening room into a movie theater or concert hall, with high fidelity and stunning surround sound. Selecting Listening Modes PURE AUDIO ■ Listening Mode Buttons MOVIE/TV button This button selects the listening modes intended for use with movies and TV. MUSIC button This button selects the listening modes intended for use with music.
Playback Input Source The following audio formats are supported by the listening modes. *1 This is mono (monophonic) sound. *2 This is stereo (stereophonic) sound. Two independent audio signal channels are reproduced through two speakers. This is 5.1-channel surround sound. This surround system has five main channels of sound and a sixth subwoofer channel (called the point-one channel). ■ Onkyo-Original DSP Listening Modes This is 7.1-channel surround sound. This is a further sound enhancement to 5.
Playback Listening Mode Description All Ch Stereo Ideal for background music, this mode fills the entire listening area with stereo sound from the front, surround, and surround back speakers. A l l Ch S t e r eo Full Mono Fu l l Mo n o T-D (TheaterDimensional) T–D Input Source Speaker Layout Sound is output from the front left and right speakers and subwoofer.
Playback Listening Mode Description DTS-HD Master Audio In this mode, audio from the input source is output without surround-sound processing. The speaker configuration (presence of speakers), crossover frequency, speaker distance, A/V Sync and much of the processing set via the audio setup are enabled. See “Onscreen Setup” for more details (➔ page 57).
Playback Listening Mode Description DTS Neo:X*8 This mode expands various sources and various inputs up to 11.1 channel. DTS Neo:X provides semi-spherical sound field adding height/wide speakers to create a natural, immersive and spacious surround soundscape. Ne o : X 6 C i n ema Ne o : X Mu s i c Ne o : X Game Audyssey DSX*9 Audy s s e y DSX • DTS Neo:X Cinema This mode is suitable for movie viewing. • DTS Neo:X Music This mode is suitable for any music source.
Playback Listening Mode THX C i n ema N TH eX o :M 6us i c THX Game s Description • THX Cinema THX Cinema mode corrects theatrical soundtracks for playback in a home theater environment. In this mode, THX Loudness Plus is configured for cinema levels and Re-EQ, Timbre Matching, and Adaptive Decorrelation are active. • THX Music THX Music mode is tailored for listening to music, which is typically mastered at significantly higher levels than movies.
Playback Listening Mode Description • THX Select2 Games For the replay of stereo and multichannel game audio, the THX Select2 Games mode should be selected. In this mode, THX ASA processing is applied to the surround channels of all 5.1 and 2.0 encoded game sources such as analog, PCM, DTS, and Dolby Digital. This accurately places all game audio surround information creating a full 360 degree playback environment.
Playback Dialogue Normalization Dialogue Normalization (DialogNorm) is a feature of Dolby Digital, which is used to keep the programs at the same average listening level so the user does not have to change the volume control between Dolby Digital, Dolby Digital Plus and Dolby TrueHD programs.
Playback Displaying Source Information Using the Sleep Timer You can display various information about the current input source as follows. With the sleep timer, you can set the AV receiver to turn off automatically after a specified period. 1 1 Press RECEIVER once followed by DISPLAY repeatedly to cycle through the available information. Tip • Alternatively, you can use DISPLAY on the AV receiver. The following information can be typically displayed.
Playback Changing the Input Display When you connect an -capable Onkyo component, you must configure the input display so that can work properly. This setting can be done only from the front panel. 1 Press RECEIVER followed by SP (speaker layout) repeatedly to select: ■ 9.1 ch playback Important: • The following layouts are only available when the “11ch Playback” is set to “No” (➔ page 65) and all corresponding speakers are enabled.
Playback Using Easy Macros By using ACTIVITIES in Easy macro mode, you can sequentially operate Onkyo components via simple commands from a single-button press. These commands are user-definable. See “Using Normal Macros” (➔ page 95). 1 Press ACTIVITIES (MY MOVIE, MY TV, or MY MUSIC) to start the Easy macro command. The default sequences of actions are described below. To change the related source component, see “Changing the Source Components” shown later in this chapter.
Playback Using the Home Menu The Home menu provides quick access to frequently used menus. Tip • The on-screen menus appear only on a TV that is connected to HDMI OUT MAIN. 1 Press RECEIVER followed by HOME. The Home menu will be superimposed on the TV screen. Tip • Alternatively, you can use HOME on the AV receiver. you can easily switch between inputs as their previews are displayed on a single screen.
Advanced Operations Using the Quick Setup Advanced Operations RECEIVER ENTER, / / / On-screen Setup RETURN Q SETUP This section describes the procedure for using the remote controller unless otherwise specified. With the AV receiver connected to a TV, there are two ways of changing the settings on-screen: using the Quick Setup or the Setup Menu (HOME). 1 Press RECEIVER followed by Q SETUP. The Quick Setup will be superimposed on the TV screen.
Advanced Operations Note *1 *2 *3 *4 *5 *6 *7 *8 “BLUETOOTH” cannot be selected, if you’ve selected NET or USB as input selector in Multi Zone. When HDMI IN 1/2/3/AUX INPUT is displayed on the main preview, HDMI IN 4 is also displayed on the preview thumbnails. • The video preview is not displayed when the “Zone 2 Monitor Out” setting is set to “Use” (➔ page 62). • The video of the currently-selected input is displayed on the main screen, not on a preview thumbnail.
Advanced Operations Phase Matching Bass Speaker Levels ■ Phase Matching Bass ` Off ` On From the warm low notes produced by a cello to the deep frequencies of electronic music, a good audio system should be able to deliver plenty of bass resonance. While traditional enhancement systems effectively boost low-frequency sound, they are often prone to the effects of phase shifting, which can overwhelm mid-range frequencies and muddy the sound.
Advanced Operations • The Late Night function is set to “Off” when the AV receiver is set to standby. For Dolby TrueHD sources, it will be set to “Auto”. • With Dolby TrueHD sources, the Late Night function cannot be used when “TrueHD Loudness Management” is set to “Off”. Music Optimizer ■ Music Optimizer ` Off ` On The Music Optimizer function enhances the sound quality of compressed music files. When set to “On”, the M.Opt indicator lights on the AV receiver’s display.
Advanced Operations Using the Setup Menu (HOME) Setup Menu Items Main menu item Main menu item Sub menu item 5. Listening Mode Preset BD/DVD (➔ page 76) CBL/SAT 1. Input/Output Assign (➔ page 62) Monitor Out STB/DVR HDMI Input GAME1 Component Video Input GAME2 Digital Audio Input PC Speaker Settings AUX Speaker Configuration TUNER Speaker Distance TV/CD Level Calibration PHONO Equalizer Settings NET THX Audio Setup USB RECEIVER 2.
Advanced Operations Explanatory Notes 1. Input/Output Assign 2. Speaker Setup Note • The “HDMI Through” setting is only available for the HDMI OUT MAIN jack (➔ page 78). Monitor Out Speaker Configuration ■ Subwoofer `Yes `No Main Menu Sub Menu Setting target Setting options (default setting underlined) On the “Monitor Out” settings, you can select whether or not to have the video sources’ images output through the HDMI output.
Advanced Operations ■ Resolution ` Through: Select this to pass video through the AV receiver at the same resolution and with no conversion. ` Auto: Select this to have the AV receiver automatically convert video at resolutions supported by your TV. ` 480p (480p/576p), 720p, 1080i, 1080p*1: Select the desired output resolution. ` 4K: Select this for an output resolution four times that of 1080p. Depending on the resolution supported by your TV, it will result in either 3840 × 2160 or 4096 × 2160 pixels.
Advanced Operations Component Video Input Digital Audio Input If you connect a video component to a component video input, you must assign that input to an input selector. For example, if you connect your Blu-ray Disc/DVD player to COMPONENT VIDEO IN 2, you must assign “IN2” to the “BD/DVD” input selector. Here are the default assignments. If you connect a component to a digital audio input, you must assign that input to an input selector.
Advanced Operations ■ Speaker Impedance ` 4ohms: Select if the impedance of any speaker is 4 ohms or more but less than 6. ` 6ohms: Select if the impedances of all speakers are between 6 and 16 ohms. ■ Speakers Type(Front) ` Normal: Select this if you’ve connected your front speakers normally. ` Bi-Amp: Select this if you’ve bi-amped your front speakers. ` Digital Crossover: Select this if you’re using speakers without crossover network.
Advanced Operations *6 *7 *8 *9 This setting cannot be selected if the “Speakers Type (Front)” setting is set to “Bi-Amp” or “Digital Crossover”. If the “11ch Playback” setting is enabled, “None” cannot be selected. When the “Powered Zone 3” setting is set to “Yes” (➔ page 65) while Powered Zone 2 is enabled (➔ page 84), this setting cannot be selected.
Advanced Operations Note • These settings cannot be calibrated when the AV receiver is muted. • Speakers that you set to “No” or “None” in “Speaker Configuration” cannot be selected (➔ page 65). • When the “Powered Zone 3” setting is set to “Yes” (➔ page 65) while Powered Zone 2 is enabled (➔ page 84), the surround back speakers cannot be used.
Advanced Operations ■ Preserve THX Settings ` Yes ` No If this setting is set to “Yes”, Dynamic EQ and Dynamic Volume have no effect in THX listening mode. Note • This setting is fixed at “Yes” if “Loudness Plus” is set to “On”. THX Loudness Plus THX Loudness Plus is a new volume control technology featured in THX Ultra2 Plus™ and THX Select2 Plus™ Certified receivers. With THX Loudness Plus, home theater audiences can now experience the rich details in a surround mix at any volume level.
Advanced Operations Dolby 3. Audio Adjust Tip • Sounds processed by Digital Processing Crossover Network are played. • You can switch from the current audio source to test noises by pressing MODE/D (Blue). ■ High Distance, Low Distance ` 0inch(0.0cm) to 12inch(30.0cm) in 1 inch (2.5 cm) steps. With this setting, you can adjust the virtual position of tweeter and woofer units. Adjusting “High Distance” virtually shifts woofers behind tweeters.
Advanced Operations ■ PL IIz Height Gain ` Low ` Mid ` High The Height Gain Control in Dolby Pro Logic IIz enables the listener to select how much gain is applied to the front high speakers. There are three settings, “Low”, “Mid” and “High”, and the front high speakers are accentuated in that order. While “Mid” is the default listening setting, the listener may adjust the Height Gain Control to their personal preference.
Advanced Operations *2 *3 DTS and DTS-HD High Resolution sources DSD (Super Audio CD) sources Sound Program Edit ■ Sound Program ` Stereo Source 1, Stereo Source 2, Stereo Source 3, Multich Source 1, Multich Source 2, Multich Source 3 When playing back different content types on the same source, or when listening to a single content type on different sources, you can pre-register the settings that best suit each content in “Sound Program”.
Advanced Operations ■ Dynamic EQ ` Off ` On: Audyssey Dynamic EQ® becomes active. The Dynamic EQ indicator will light. With Audyssey Dynamic EQ, you can enjoy great sound even when listening at low volume levels. Audyssey Dynamic EQ solves the problem of deteriorating sound quality as volume is decreased by taking into account human perception and room acoustics.
Advanced Operations IntelliVolume ■ IntelliVolume ` –12dB to 0dB to +12dB in 1 dB steps With IntelliVolume, you can set the input level for each input selector individually. This is useful if one of your source components is louder or quieter than the others. Use / to set the level. If a component is noticeably louder than the others, use to reduce its input level. If it’s noticeably quieter, use to increase its input level. Note • IntelliVolume does not work for Zone 2/3.
Advanced Operations Picture Adjust Using Picture Adjust, you can adjust the picture quality and reduce any noise appearing on the screen. Press ENTER to view the TV picture while setting when the video source is output to HDMI OUT MAIN. To return to the previous screen, press RETURN. ■ Wide Mode*1*6 This setting determines the aspect ratio. ` 4:3: ` Full: ` Zoom: ` Wide Zoom: ` Auto: According to the input signals and monitor output setting, the AV receiver automatically selects the aspect ratio.
Advanced Operations ■ Resolution*2*4*7 ` Through: Select this to pass video through the AV receiver at the same resolution and with no conversion. ` Auto: Select this to have the AV receiver automatically convert video at resolutions supported by your TV. ` 480p (480p/576p), 720p, 1080i, 1080p*8: Select the desired output resolution. ` 4K: Select this for an output resolution four times that of 1080p.
Advanced Operations Audio Selector ■ Audio Selector ` ARC: The audio signal from your TV tuner can be sent to HDMI OUT MAIN of the AV receiver.*1 With this selection, the TV’s audio can be automatically selected as a priority among other assignments. ` HDMI: This can be selected when HDMI IN has been assigned as an input source. If both HDMI (HDMI IN) and digital audio inputs (COAXIAL IN or OPTICAL IN) have been assigned, HDMI input is automatically selected as a priority.
Advanced Operations • For the “BLUETOOTH” input selector, only “Digital” is available. ■ Analog/PCM/Digital With this setting, you can specify the listening mode used when an analog (CD, TV, LD, VHS, MD, turntable, radio, cassette, cable, satellite, etc.) or PCM digital (CD, DVD, etc.) audio signal is played. Note • For the “GAME2” input selector, only “PCM” is available.
Advanced Operations 7. Hardware Setup Tuner ■ AM/FM Frequency Step (North American models) ` 10kHz/200kHz: ` 9kHz/50kHz: Select the frequency step according to your area. ■ AM Frequency Step (European and Australian models) ` 10kHz: ` 9kHz: Select the frequency step according to your area. For AM/FM tuning to work properly, you must specify the AM/FM frequency step used in your area. Note • When this setting is changed, all radio presets will be deleted.
Advanced Operations ■ Audio TV Out (Main) ` Off ` On This preference determines whether the incoming audio signal is output from HDMI OUT MAIN. You may want to turn this preference on if your TV is connected to HDMI OUT MAIN and you want to listen to the audio from a connected component through your TV’s speakers. Normally, this should be set to “Off”. Note • If “On” is selected and the audio can be output from the TV, the AV receiver will output no sound through its speakers.
Advanced Operations ■ InstaPrevue These settings apply to “InstaPrevue” of the Home menu (➔ page 56) and specify the preview display of HDMI video streams. Sub Window ` Multi: Displays preview thumbnails all at once. ` Single: Displays preview thumbnails one-by-one. With this setting, you can set the number of preview thumbnails displayed.
Advanced Operations ■ MAC Address This is the AV receiver’s MAC (Media Access Control) address. This address cannot be changed. ■ Proxy Port If you’re using a Web proxy, enter a proxy port number here. ■ DHCP ` Enable ` Disable This setting determines whether or not the AV receiver uses DHCP to automatically configure its IP Address, Subnet Mask, Gateway, and DNS Server settings. ■ Network Standby ` On ` Off This setting enables or disables control over the network.
Advanced Operations 8. Remote Controller Setup 9. Lock Setup Remote ID With this preference, you can protect your settings by locking the setup menus. ■ Remote ID ` 1, 2, or 3 When several Onkyo components are used in the same room, their remote ID codes may overlap. To differentiate the AV receiver from other components, you can change its remote ID from “1”, to “2” or “3”. ■ Setup ` Locked ` Unlocked When “Locked” is selected, the setup menus will be locked and you cannot change any setting.
Advanced Operations Multi Zone In addition to the main listening room, you can also enjoy playback in the other room, or as we call Multi Zone. And, you can select a different source for each room. Making Multi Zone Connections Connecting Your Zone Speakers Directly to the AV receiver Connecting the Zone Speakers to an Additional Amplifier This setup allows you to select different sources for Main room and Zone 2/3. This is called Powered Zone, as the Zone 2/3 speakers are powered by the AV receiver.
Advanced Operations 12V Trigger Out 1 Note When Zone 2/3 is turned on, the output from the 12V TRIGGER OUT jack goes high (+12 V and max. 150 mA for Zone 2, +12 V and max. 25 mA for Zone 3). Connecting this jack to a 12-volt trigger input on a component in Zone 2/3 will make that component turn on or off as the AV receiver turns on or off the Zone 2/3. • If you use HDMI OUT ZONE 2, make sure to set “Zone 2 Monitor Out” to “Use” (➔ page 62).
Advanced Operations 1 Press ZONE repeatedly, then point the remote controller at the AV receiver and press RECEIVER. Zone 2/3 turns on, the Z2 or Z3 indicator lights on the AV receiver’s display. Muting Zones ■ Operating on the remote controller 1 Press ZONE repeatedly, and then press MUTING. Tip • The corresponding trigger output goes high (+12 V). 2 3 To select an input source for Zone 2/3, press ZONE repeatedly, followed by an INPUT SELECTOR button.
Advanced Operations Using the Remote Controller in Zone and Multiroom Control Kits Using a Multiroom Kit with Other Components From the connecting block Miniplug cable To control the AV receiver with the remote controller while you’re in Zone, you’ll need a commercially available multiroom remote control kit for each zone. • Multiroom kits are made by Niles and Xantech.
Controlling Other Components Controlling Other Components You can use the AV receiver’s remote controller to control your other AV components, including those made by other manufacturers. This section explains how to enter the remote control code for a component that you want to control: DVD, TV, CD, etc. See “Learning Commands” for learning commands directly from another component’s remote controller (➔ page 94).
Controlling Other Components 3 Within 30 seconds, use the number buttons to enter the 5-digit remote control code. The REMOTE MODE button flashes twice. If the remote control code is not entered successfully, the REMOTE MODE button will flash once slowly. Note • Though the provided remote control codes are correct at the time of release, they are subject to change. Remapping Colored Buttons You can change the configuration of colored buttons, with which REMOTE MODE buttons are preset.
Controlling Other Components Resetting the Remote Controller You can reset the remote controller to its default settings. 1 While holding down RECEIVER, press and hold down HOME until RECEIVER lights (about 3 seconds). 2 Within 30 seconds, press RECEIVER again. RECEIVER flashes twice, indicating that the remote controller has been reset.
Controlling Other Components ■ TV operation Press the appropriate REMOTE MODE button first.
Controlling Other Components ■ Satellite receiver/Cable receiver operation Press the appropriate REMOTE MODE button first.
Controlling Other Components Using the Onkyo Dock RI Dock With the RI Dock, you can easily play the music of your iPod/iPhone, or watch the slideshows and videos of your iPod/iPhone on a TV. In addition, the on-screen display (OSD) allows you to view, navigate, and select your iPod/iPhone model’s contents on your TV, and with the supplied remote controller, you can control your iPod/iPhone from the comfort of your sofa. You can even use the AV receiver’s remote controller to operate your iPod/iPhone.
Controlling Other Components Controlling Your iPod/iPhone By pressing the REMOTE MODE button that’s been programmed with the remote control code for your Dock, you can control your iPod/iPhone in the Dock with the buttons described further in this section. See “Entering Remote Control Codes” for details on entering a remote control code (➔ page 87). See the Dock’s instruction manual for more information. ■ Press the appropriate REMOTE MODE button first.
Controlling Other Components If the command is learned successfully, the REMOTE MODE button flashes twice. Learning Commands The AV receiver’s remote controller can learn the commands of other remote controllers. By transmitting, for example, the Play command from your CD player’s remote controller, the supplied remote controller can learn it and then reproduce the exact same command when its is pressed in CD remote mode.
Controlling Other Components 3 Using Normal Macros You can program the remote controller’s ACTIVITIES to perform a sequence of remote control actions. Example: To play a CD you typically need to perform the following actions: 1. Press RECEIVER to select the Receiver remote controller mode. 2. Press RECEIVER to turn on the AV receiver. 3. Press TV/CD to select the TV/CD input source. 4. Press to start playback on the CD player.
Appendix Troubleshooting If you have any trouble using the AV receiver, look for a solution in this section. If you can’t resolve the issue yourself, contact your Onkyo dealer. The on-screen information appears only on a TV that is connected to HDMI outputs. ■ There’s no sound, or it’s very quiet Make sure that the digital input source is selected properly. (➔ page 64) Power ■ Can’t turn on the AV receiver Make sure that the power cord is properly plugged into the wall outlet.
Appendix If the input signal format is set to “PCM” or “DTS”. Set it to “Off”. (➔ page 76) ■ Only the front speakers produce sound When the Stereo or Mono listening mode is selected, only the front speakers and subwoofer produce sound. (➔ page 47) In the Mono listening mode, only the front speakers output sound if the “Output Speaker” setting is set to “Left / Right”. (➔ page 69) Make sure the speakers are configured correctly.
Appendix ■ The beginning of audio received by an HDMI IN can’t be heard ■ There’s no picture from a source connected to an HDMI IN Make sure that the batteries are installed with the correct polarity. (➔ page 13) Since it takes longer to identify the format of an HDMI signal than it does for other digital audio signals, audio output may not start immediately. Reliable operation with an HDMI-to-DVI adapter is not guaranteed. In addition, video signals from a PC are not guaranteed.
Appendix To control an Onkyo component that’s not connected via , point the remote controller at the component. Be sure to enter the appropriate remote control code first. (➔ page 88) Make sure you’ve selected the right remote mode. (➔ page 93) The entered remote control code may not be correct. If more than one code is listed, try each one. If you still can’t control your iPod/iPhone, start playback by pressing your iPod/iPhone model’s Play button. Remote operation should then be possible.
Appendix ■ Cannot connect with the AV receiver The Bluetooth-enabled device does not support the profiles required for the AV receiver. The Bluetooth function of the Bluetooth-enabled device is not enabled. Refer to the instruction manual of the Bluetooth-enabled device for how to enable the function. If the server is serving large music files to several networked devices simultaneously, the network may become overloaded and playback may be interrupted.
Appendix ■ The following settings can be made for the composite video inputs You must use the buttons on the unit to make these settings. On the AV receiver, press the input selector for the input source that you want to set and the HOME button simultaneously. While holding down the input selector button, press HOME until “Video ATT :On” appears on the AV receiver’s display. Then, release both buttons.
Appendix Radio Wave Reflections The radio waves received by the AV receiver include the radio wave coming directly from the devices and waves coming from various directions due to reflections by walls, furniture and building (reflected waves). The reflected waves (due to obstacles and reflecting objects) further produce a variety of reflected waves as well as variation in reception condition depending on locations.
Appendix DISCLAIMER Through this device you are able to link to other services or websites which are not under the control of any company which has designed, manufactured or distributed/have distributed this device, and its affiliates (collectively, “Company”). We have no control over the nature, content and availability of those services. The inclusion of any links does not necessarily imply a recommendation or endorse the views expressed within them.
Appendix Firmware Update To update the firmware of the AV receiver, you can choose from the following two methods: update via network, or update via USB storage. Choose the one that best suits your environment. Before proceeding with the update, please read the corresponding explanations carefully. ■ Update via network You need a Internet connection to update the firmware. ■ Update via USB storage (➔ page 105) Please prepare a USB storage device such as a USB flash memory stick.
Appendix 6 Press ON/STANDBY on the front panel. The AV receiver will enter standby mode. Do not use RECEIVER on the remote controller. The AV receiver will enter standby mode automatically in 3 minutes regardless of whether ON/STANDBY is pressed. Congratulations! You now have the latest firmware installed on your Onkyo AV receiver. Troubleshooting Case 1: If an error occurs, “Error!! *-**” is displayed on the AV receiver’s display. (Alpha-numeric characters on the front display are denoted by asterisks.
Appendix Update Procedure 1 Connect a USB device to your PC. If there is any data in the USB device, remove it first. 2 Download the firmware file from the Onkyo web site. The file name is as follows: ONKAVR****_************.zip 10 Unzip the downloaded file. The numbers of folders and files differ according to the model. 3 Copy all the extracted folders including all folders and files to the root folder of the USB device. Be careful not to copy the zip file.
Appendix About HDMI Designed to meet the increased demands of digital TV, HDMI (High Definition Multimedia Interface) is a new digital interface standard for connecting TVs, projectors, Blu-ray Disc/DVD players, set-top boxes, and other video components. Until now, several separate video and audio cables have been required to connect AV components.
Appendix Network/USB Features Network Requirements ■ Ethernet Network For the best results, a 100Base-TX switched Ethernet network is recommended. Although it’s possible to play music on a computer that’s connected to the network wirelessly, playback may be unreliable, so it is recommended to use wired connections. ■ Ethernet Router A router manages the network, data-routing and supplying of IP addresses. Your router must support the following: • NAT (Network Address Translation).
Appendix • Operation is not guaranteed for all USB devices, which includes the ability to power them. • Do not connect your USB device via a USB hub. The USB device must be connected directly to the AV receiver’s USB port. • If the USB device contains a lot of data, the AV receiver make take a while to read it. • USB devices with security functions cannot be played. Supported Audio File Formats The AV receiver does not support playback of video files.
Appendix License and Trademark Information “x.v.Color” is a trademark of Sony Corporation. Manufactured under a license from U.S. Patent No’s: 5,956,674; 5,974,380; 5,978,762; 6,487,535; 6,226,616; 7,212,872; 7,272,567; 7,668,723; 7,392,195; 7,930,184; 7,333,929; 7,548,853; 7,003,467 and 7,283,634. DTS, the Symbol, and DTS and the Symbol together are registered trademarks & DTS Neo:X | 11.1 is a trademark of DTS, Inc. ©2012 DTS, Inc. All Rights Reserved.
Appendix The Bluetooth® word mark and logos are registered trademarks owned by Bluetooth SIG, Inc. and any use of such marks by Onkyo is under license. Other trademarks and trade names are those of their respective owners. Onkyo does not guarantee Bluetooth compatibility between the AV receiver and all Bluetooth-enabled devices. For compatibility between the AV receiver and another device with Bluetooth technology, consult the device’s documentation and dealer.
Appendix Specifications Amplifier Section Rated Output Power All channels: 135 watts minimum continuous power per channel, 8 ohm loads, 2 channels driven from 20 Hz to 20 kHz, with a maximum total harmonic distortion of 0.
Appendix ■ Video Inputs Component Composite Analog RGB IN 1, IN 2 BD/DVD, CBL/SAT, STB/DVR, GAME 1, AUX PC IN ■ Video Outputs Component Composite MONITOR OUT MONITOR OUT ■ Audio Inputs Digital Analog Optical: 2 (Rear), 1 (Front) Coaxial: 3 BD/DVD, CBL/SAT, STB/DVR, GAME 1, PC, TV/CD, PHONO, AUX ■ Audio Outputs Analog ZONE2 LINE OUT, ZONE3 LINE OUT Analog Multichannel Pre Outputs 11 Subwoofer Pre Outputs 2 Speaker Outputs Main (L, R, C, SL, SR, SBL, SBR) + Front Wide/ZONE2 (L, R) + Front High/ZONE3 (L,
Appendix Memo En-114
Appendix Memo En-115
2-1, Nisshin-cho, Neyagawa-shi, OSAKA 572-8540, JAPAN http://www.onkyo.com/ The Americas 18 Park Way, Upper Saddle River, N.J. 07458, U.S.A. For Dealer, Service, Order and all other Business Inquiries: Tel: 201-785-2600 Fax: 201-785-2650 http://www.us.onkyo.com/ For Product Support Team Only: 1-800-229-1687 http://www.us.onkyo.com/ Europe Liegnitzerstrasse 6, 82194 Groebenzell, GERMANY Tel: +49-8142-4401-0 Fax: +49-8142-4208-213 http://www.eu.onkyo.
Using Internet Radio Using Internet Radio Common Procedures in Internet Radio Menu Note • Available services may vary depending on the region. • Certain network service or contents available through this device may not be accessible in case the service provider terminates its service. 1 2 Press NET. A list of the network services appears, and the NET indicator lights. If it flashes, verify that the Ethernet cable is firmly connected to the AV receiver. Select the desired service and press ENTER.
Using Internet Radio Pandora® internet radio –Getting Started (U.S. only) Pandora is a free, personalized Internet radio service that plays the music you know and helps you discover music you’ll love. 1 Use / to select “I have a Pandora Account” or “I’m new to Pandora” and then press ENTER. If you are new to Pandora select “I’m new to Pandora”. You will see an activation code on your TV screen. Please write down this code. Go to an Internet connected computer and point your browser to www.pandora.
Using Internet Radio Using Rhapsody (U.S. only) 1 Use / to select “Sign in to your account” and then press ENTER. To use Rhapsody, you need an account. If you don’t have one yet, you can create a new account at www.rhapsody.com/onkyo If you have an existing Rhapsody account, select “Sign in to your account” and press ENTER. Enter your user name (usually your email) and password in the next keyboard screen, or in Web Setup. ■ Using the keyboard screen 1.
Using Internet Radio Using the SiriusXM Internet Radio (North American only) 1 Your Onkyo AV receiver includes a free trial of SiriusXM Internet Radio. The “Account Info” screen shows how many days are left in your trial. After the trial period expires, if you want to continue listening to the service, you must subscribe. To subscribe go to www.siriusxm.com/internetradio with your computer. Use / to select “Sign In”, and then press ENTER.
Using Internet Radio Using Last.fm Internet Radio 1 Last.fm is a music service that learns what you love... Your new Onkyo AV receiver is very clever. If you have a free Last.fm account, it will keep track of all the songs you’ve just played. When you visit the Last.fm website, you can see personal charts of the music you’ve enjoyed, share them with friends and see what they like, too. ■ Using the keyboard screen 1. Use / / / and the ENTER to enter your user name and password. 2. Select “OK”. 3.
Using Internet Radio Using Slacker Personal Radio 1 If you do not have an account, create one on the Slacker website (www.slacker.com) with your computer. If you already have a Slacker account, select “Sign in to your account” and then press ENTER. The keyboard screen appears. You can enter information from the remote control or the keys on the main unit. 2 If there are no mistakes in the information you have entered, use / / / to select “OK” then press ENTER.
Using Internet Radio Using MP3tunes Listen to your music collection on your home stereo in complete digital fidelity without a personal computer plus safely backup all your songs. Here’s how: Playing Contents on the AV Receiver Tip • Before proceeding, you need to select the MP3tunes service as described in “Common Procedures in Internet Radio Menu” (➔ page 1). The track at the top of the music list is automatically played back.
Utilisation d’une webradio Utilisation d’une webradio Procédures courantes dans le menu de webradio Remarque • Les services disponibles peuvent varier en fonction de la région. • Certain services réseau ou contenus disponible via cet appareil peuvent être inaccessibles au cas où le prestataire de services terminerait son service. 1 2 Appuyez sur NET. Une liste des services réseau s’affiche, et le témoin NET s’allume.
Utilisation d’une webradio Pandora® internet Radio –Pour commencer (États-Unis uniquement) Pandora est un service de radio en ligne libre et personnalisé vous permettant de lire la musique que vous connaissez et de découvrir celle que vous aimez. 1 Utilisez / pour sélectionner « I have a Pandora Account » ou « I’m new to Pandora », puis appuyez sur ENTER. Si vous ne connaissez pas Pandora sélectionnez « I’m new to Pandora ». Un code d’activation apparaîtra sur l’écran de votre téléviseur. Notez ce code.
Utilisation d’une webradio Utilisation de Rhapsody (Etats-Unis uniquement) 1 Utilisez / pour sélectionner « Sign in to your account », puis appuyez sur ENTER. Vous devez posséder un compte pour utiliser Rhapsody. Si vous ne disposez pas encore d’un compte, vous pouvez en créer un à partir de www.rhapsody.com/onkyo Si vous possédez déjà un compte Rhapsody, sélectionnez « Sign in to your account », puis appuyez sur ENTER.
Utilisation d’une webradio Utilisation de SiriusXM Internet Radio (Amérique du Nord uniquement) 1 Votre ampli-tuner AV Onkyo comprend un essai gratuit de SiriusXM Internet Radio. L’écran « Account Info » affiche le nombre de jours restants dans votre essai. Une fois la période d’essai expirée, si vous souhaitez continuer à écouter le service, vous devez vous abonner. Pour vous inscrire, accédez à l’adresse www.siriusxm.com/internetradio à l’aide de votre ordinateur.
Utilisation d’une webradio Utilisation de la webradio Last.fm 1 Last.fm un service de musique qui apprend ce que vous aimez… Votre nouvel ampli-tuner AV Onkyo est très intelligent. Si vous avez un compte Last.fm gratuit, il garde une trace de toutes les chansons que vous avez juste jouées. Quand vous vous rendez sur le site Web de Last.fm, vous pouvez voir les graphiques personnels de la musique que vous avez appréciée, les partagez avec vos amis et également voir ce qu’ils aiment.
Utilisation d’une webradio Utilisation de Slacker Personal Radio 1 Si vous ne possédez pas de compte, créez-en un à partir du site Web de Slacker (www.slacker.com) à l’aide de votre ordinateur. Si vous possédez déjà un compte Slacker, sélectionnez « Sign in to your account », puis appuyez sur ENTER. L’écran clavier s’affiche. Pouvez saisir des informations à partir de la télécommande ou des touches sur l’appareil principal.
Uso de Internet Radio Uso de Internet Radio Procedimientos comunes en el menú Internet Radio Nota • Los servicios disponibles pueden variar de una región a otra. • Es posible que determinados servicios de red o contenidos disponibles a través de este dispositivo no sean accesibles si el proveedor del servicio da por finalizado el servicio. 1 2 Pulse NET. Aparecerá una lista de los servicios de red y se iluminará el indicador NET.
Uso de Internet Radio Pandora® Internet Radio –Primeros pasos (solo EE.UU.) Pandora es un servicio de radio por Internet gratuito y personalizado que reproduce la música que usted conoce y le ayudará a descubrir música que le encantará. 1 Utilice / para seleccionar “I have a Pandora Account” o “I’m new to Pandora” y luego pulse ENTER. Si no conoce Pandora seleccione “I’m new to Pandora”. Verá un código de activación en la pantalla del televisor. Tome nota de este código.
Uso de Internet Radio Uso de Rhapsody (sólo EE.UU.) 1 Utilice / para seleccionar “Sign in to your account” y luego pulse ENTER. Para utilizar Rhapsody, necesitará una cuenta. Si todavía no tiene una, puede crear una nueva en www.rhapsody.com/onkyo Si ya tiene una cuenta Rhapsody, seleccione “Sign in to your account” y pulse ENTER. Escriba su nombre de usuario (normalmente el correo electrónico) y contraseña en la pantalla de teclado que aparece a continuación o en la configuración web.
Uso de Internet Radio Uso de SiriusXM Internet Radio (solo Norteamérica) 1 Su receptor de AV Onkyo incluye una prueba gratuita de SiriusXM Internet Radio. La pantalla “Account Info” muestra los días que quedan de la prueba. Una vez que termine el periodo de prueba, si desea seguir escuchando este servicio, deberá contratarlo. para suscribirse vaya a www.siriusxm.com/internetradio con su ordenador. Utilice / para seleccionar “Sign In”, y luego pulse ENTER.
Uso de Internet Radio Uso de Last.fm Internet Radio 1 Last.fm es un servicio musical que sabe lo que le gusta... Su nuevo receptor de AV Onkyo es muy inteligente. Si tiene una cuenta gratuita de Last.fm, hará un seguimiento de todas las canciones que acaba de escuchar. Cuando visite el sitio web de Last.fm, podrá ver listas personales de la música que ha disfrutado, compartirlas con sus amigos y también ver lo que les gusta a ellos. ■ Utilización de la pantalla de teclado 1.
Uso de Internet Radio Uso de Slacker Personal Radio 1 Si no tiene una cuenta, cree una en el sitio web de Slacker (www.slacker.com) con su ordenador. Si ya tiene una cuenta de Slacker, seleccione “Sign in to your account” y pulse ENTER. Aparecerá la pantalla de teclado. Puede introducir información desde el mando a distancia o desde el teclado de la unidad principal. 2 Si no hay errores en la información que ha introducido, utilice / / / para seleccionar “OK” y luego pulse ENTER.
Y1212-1 SN 29401478IRUS * 2 9 4 0 1 4 7 8 I R U S *
Using Internet Radio Using Internet Radio Common Procedures in Internet Radio Menu Note • Available services may vary depending on the region. • Certain network service or contents available through this device may not be accessible in case the service provider terminates its service. 1 2 Press NET. A list of the network services appears, and the NET indicator lights. If it flashes, verify that the Ethernet cable is firmly connected to the AV receiver. Select the desired service and press ENTER.
Using Internet Radio Using Last.fm Internet Radio 1 Last.fm is a music service that learns what you love... Your new Onkyo AV receiver is very clever. If you have a free Last.fm account, it will keep track of all the songs you’ve just played. When you visit the Last.fm website, you can see personal charts of the music you’ve enjoyed, share them with friends and see what they like, too. ■ Using the keyboard screen 1. Use / / / and the ENTER to enter your user name and password. 2. Select “OK”. 3.
Internetradio verwenden Internetradio verwenden Allgemeine Verfahren bei den Internetradio-Menüs Verwendung mehrerer Konten Der AV-Receiver unterstützt mehrere Nutzerkonten, was bedeutet, dass Sie frei zwischen mehreren Logins umschalten können. Nach der Anmeldung der Nutzerkonten wird das Login vom „Users“ Bildschirm aus vorgenommen. Anmerkung • Die verfügbaren Dienste sind länderabhängig verschieden.
Internetradio verwenden Verwendung von Last.fm Internet Radio Last.fm ist ein Musikdienst, der sich Ihre Lieblingsmusik merkt... Ihr neuer Onkyo AV-Receiver ist äußerst clever. Wenn Sie ein kostenloses Last.fm-Konto eingerichtet haben, werden darin alle kürzlich abgespielten Titel gespeichert. Wenn Sie die Last.fm-Website besuchen, können Sie Ihre persönlichen Charts der von Ihnen abgespielten Musik anzeigen; teilen Sie diese mit Freunden und sehen Sie auch, welche Musik Ihre Freunde mögen. können.
Remote Control Codes Remote Control Codes 1 / While holding down the REMOTE MODE button to which you want to assign a code, press and hold down [DISPLAY] (about 3 seconds). The REMOTE MODE button/Remote indicator lights. On Integra products, button names are capitalized. For example, “Remote Mode” button and “Display” button. Notes: • Remote control codes cannot be entered for [RECEIVER] and the multi zone button. • Only TV remote control codes can be entered for [TV].
Remote Control Codes Codes de télécommande Códigos de control remoto 1 1 Tout en maintenant enfoncé le bouton REMOTE MODE auquel vous souhaitez associer un code, pressez et maintenez enfoncé le bouton [DISPLAY] (pendant environ 3 secondes). Le bouton REMOTE MODE/le témoin Remote s’allume. Les noms de boutons sont en manjuscules sur les produits Integra. Par exemple, le bouton « Remote Mode » et le bouton « Display ».
Remote Control Codes Codici del telecomando Fernbedienungscodes 1 1 Tenendo premuto il tasto REMOTE MODE al quale si desidera assegnare il codice, premere e tenere premuto [DISPLAY] (per circa 3 secondi). Il tasto REMOTE MODE/l'indicatore Remote si accende. Sui prodotti Integra, i nomi dei tasti sono scritti con l'iniziale maiuscola. Ad esempio, tasto “Remote Mode” e tasto “Display”. Note: • I codici di controllo del telecomando non possono essere inseriti per [RECEIVER] e i tasti multi zona.
Remote Control Codes Afstandsbedieningscodes Fjärrstyrningskoder 1 1 Houd terwijl u de REMOTE MODE toets ingedrukt houdt waarvoor u een code wilt toewijzen de [DISPLAY] toets ingedrukt (ongeveer 3 seconden). De toets REMOTE MODE (afstandsbedieningsmodus) / Het indicatielampje afstandsbediening gaat branden. Op producten van Integra staan de namen van de toetesn in hoofdletters. Bijvoorbeeld, de toetsen “Remote Mode” en “Display”.
Remote Control Codes 遥控代码 1 1 按住想指定编码的 REMOTE MODE (遥控模式)按钮的同时,按住 [DISPLAY (显示)] (大约 3 秒钟)。 REMOTE MODE (遥控模式)按钮 / 遥控指示灯亮起。 Integra 产品上的按钮名称单词首字母大写。例如,“Remote Mode (遥控模 式)”按钮和 “Display (显示)”按钮。 注意: • [RECEIVER (接收机)] 和多区域按钮不能输入遥控编码。 • 只能为 [TV (电视)] 输入电视遥控编码。 • 除 [RECEIVER (接收机)]、[TV (电视)] 和多区域按钮外,不能为 REMOTE MODE (遥 控模式)按钮指定任何类别的遥控编码。 但是,这些按钮仍可用作输入选择器按钮,因 此,选择与设备所要连接的输入端对应的 REMOTE MODE(遥控模式) 按钮。 例如,如果 要将 CD 播放机连接到 CD 输入端,应在输入遥控编码时选择 [TV/CD (电视 /CD)]。 • • • 2 2 在 30 秒内,使用数字按钮输入 5 位数的遥控编码。 REMOTE MODE
Remote Control Codes Dedicated Onkyo Receiver Cable Set Top Box Default 62503 mio TV 02802 Toshiba 01509 Samsung Zone 2 62506 Motorola UPC 01582 Scientific Atlanta 01877, 01982 Zone 3 62507 01376, 00858, 01562, 01982, 01998, 02378 Verizon 02378 Shaw 01376 Moxi 02187 Videotron 01877 Suddenlink 01376, 01877 NEC 01496 Virgin Media 01068, 01060 Thomson 01582 Cable Set Top Box Cable Set Top Box Cable/PVR Combination 01877 ADB 02254, 02769 Neuf TV 03107 Visiopass 00817
Remote Control Codes IPTV/PVR Combination CD AT&T 00858 Goldmund 70157 Restek 70157 BT Vision 02294 Grundig 70157 Revox 70157 Cisco 00858, 02345, 02378 Harman/Kardon 70157 Rotel 70157 Cassette Deck Kreatel 01385 Hitachi 70032 SAE 70157 Aiwa 70157 Arcam 40076 40029 Motorola 00858, 02378 Integra CD 71817, 70101 Sansui MD Yamaha 70490 40029 Neuf TV 03107 JVC 70072 SAST 70157 Audiolab Philips 02294 Kenwood 70626, 70157, 70036 Siemens 70157 Carver 40029 40076
Remote Control Codes Accessory Polk Audio 82228 Video - Accessory Satellite Set Top Box Satellite Set Top Box Satellite Set Top Box Amstrad 00847, 01175, 01662, 01693 CGV 01413, 01567 Durabrand 01284 Chess 01334, 01626 Echostar Ansonic 02418 CityCom 01176 00775, 00853, 01323, 01409, 02527 Clatronic 01413 Eco-Star 01413 01631 ADB 02254, 02769 Arnion 01300 Aon 02769 ASCI 01334 Clayton 01626 Edision Apple 02615 AssCom 00853 Com Hem 01176, 01915 Elap 01413, 01567 AT&T
Remote Control Codes Satellite Set Top Box Satellite Set Top Box Satellite Set Top Box Satellite Set Top Box Hama 01567 Leiko 01626 Pace Sat Industrie 01611 Hanseatic 01100 Lemon 01334 SAT+ 01409 Hirschmann 00173 Lenoxx 01611 Hitachi 01284 Linsar 01284 00847, 00853, 00887, 01175, 01323, 01356, 01423, 01662, 01693, 01850, 02059, 02060, 02211, 02657 Hornet 01300 Listo 01626 Pacific 01284 Schaub Lorenz 02418 HTS 00775 Lodos 01284 Palcom 01409, 01611 Schneider 01206, 012
Remote Control Codes Satellite Set Top Box Satellite Set Top Box SAT/PVR Combination SAT/PVR Combination Star 00887 UBC 00642 BskyB 01175, 01662 Schneider 01206 Stream System 01300 UEC 00879, 01356 Bush 01645 Sedea Electronique 01206 Strong 00853, 00879, 01284, 01300, 01409, 01626, 02418 United 01251, 01626, 02418 Canal Satellite 02657 SKY Unitymedia 01882 Canal+ 02657 01175, 01662, 01693, 01850, 02754 Universum 00173, 01251 CanalSat 02657 SKY Deutschland 02754 01693, 01
Remote Control Codes Television Akai Television 10178, 10556, 10037, 10714, 10715, 10208, 11675 Basic Line Akiba 10037 Akito Akura Alba 10037 10037 Dick Smith Electronics 10698 Cathay Baur 10037, 10195, 10512 CCE 10037 Digatron 10037 Beaumark 10178 11667 10037 11037 Digihome Beijing 10208 10037 10037, 10668 10171, 10037, 10714, 10668, 11037, 11363, 11585, 11667, 11709 Centurion Digiline Beko 10037, 10714, 10715, 11652 Changhong 10508 Digitek 11709 11666 Digitor 10037, 1
Remote Control Codes Television Television Television Erres 10037 Genesis 10037 ESA 10171 Genexxa 10037 ESC 10037 GFM 10171, 11864, 11886 Euroman 10037 Godrej 11585 Europa 10037 Goldfunk 10668 Europhon 10037 GoldStar Evesham 11248, 11667 10178, 10037, 10714, 10715 Excello 11037 Exquisit 10037 Ferguson 10037, 10625, 10560, 10195, 11037, 11585 Fidelity 10171, 10037, 10512 Finlandia 10208 Finlux 10556, 10037, 10714, 10715, 11248, 11667 Firstline 10556, 10037, 10714, 10
Remote Control Codes Television Lifetec Television 10037, 10714, 10668, 11037, 12001 Linsar 11585 Local India TV 10208 Local Malaysia TV 10698 Lodos 11037 Loewe 10037, 10512, 11884 Logik 11037, 10698 Logix 10668 Luma 11037 Lumatron 10037, 10668 Lumenio 10037 Lux May 10037 Luxor 11037, 10208 LXI 10178 M Electronic 10037, 10714, 10634, 10195, 10512, 11652 Madison 10037 Magnavox 10171, 11454, 11365, 11506, 11755, 11867, 12372 Medion Television 10556, 10037, 10714, 10668, 1103
Remote Control Codes Television Television Television Television Phoenix 10037 Reflex 10037, 10668, 11037 Sei-Sinudyne 10037 SunBriteTV 11610 Phonola 10556, 10037 Relisys 11585 Serie Dorada 10178 Sungoo 11248 Pioneer 10037, 10698, 10512, 11457, 11636, 12171 Remotec 10171, 10037 Shanghai 10208 Sunny 10037 Reoc 10714 Sharp Sunstar 10037 Plantron 10037 Revox 10037 10650, 10818, 11165, 11423, 11659 Sunstech 12001 Playsonic 10037, 10714, 10715, 11652 RFT 10037 Shintosh
Remote Control Codes Television Technosonic Techvision Television 10556, 10625, 10499, 11324 Television VCR Toyoda 11709 VU 11365, 12098 Humax TRANS-continents 10556, 10037, 10668, 11037 Walker 11667 Panasonic 20614, 20616 Waltham 10037, 10668, 11037 Philips 20739 10037, 10698, 10512, 11363 Wansa 12098 ReplayTV 20614, 20616 Wards 10178 Sonic Blue 20614, 20616 Watson 10037, 10714, 10668, 11037 Sony 20636 TiVo 20636, 20739 11709 Techwood 11037, 11667 Tecnimagen 10556 Tec
Remote Control Codes TV/VCR Combination DVD Technics 10556 Dantax 30539, 30713 Harman/Kardon 30582, 31229, 33228 Maxim 30713 Thomson 10625 Denon 30490, 30634, 31634, 32258, 32748 Henss 30713 MDS 30713 Hitachi 30573, 30713, 31664 Medion 30630, 30741 31152 Hoeher 30713 Memorex 32213 3D LAB 30539 Dick Smith Electronics Metz 30571, 30713 30675 30713 31152 Accurian Digihome HotMedia Micromedia 30503, 30539 30713 30713 30646 Acoustic Solutions DigiLogic Humax 30713 M
Remote Control Codes DVD DVD DVD Radionette 30741 Sylvania 30630, 30675 Radiotone 30713 Symphonic 30675 RCA 30522, 30571, 32213, 32587 Tamashi 31394 Tandberg 30713 REC 30490 Targa 30741 Red 32213 Tchibo 30741 Redstar 31394 TCL 32587 TCM 30741 Roadstar 30713 Rotel 30623 Salora 30741 Samsung 30490, 30573, 30199, 30820, 31635, 32069, 32329, 32489, 33195 Sanyo 30713 Schneider 30539, 30646, 30713 Schoentech 30713 Scott 31394 SEG 30713 Semp Sharp 30571, 30741, 306
Remote Control Codes DVD-R TV/DVD Combination Victor 31597 Magnavox Yamaha 30646 Matsui 11037, 30713 Zenith 30741 Medion 12719 Nordmende 12001 Odys 12719 HD-DVD 12372 Integra 32901, 33104 33504 Panasonic 12170 LG 30741 Philips Microsoft 32083 11454, 10556, 11394, 30539 10698 Onkyo 32901, 33104 33504 Powerpoint Xbox 32083 Prosonic 12001 Pvision 12001 TV/DVD Combination RCA 12746, 12932 Akai 11675 Schaub Lorenz 12001 Black Diamond 11037, 30713 SEG 11037, 12719,
Remote Control Codes Memo 19
Y1303-2 SN 29401094A * 2 9 4 0 1 0 9 4 A *