
Operation Manual
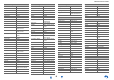
Table Of Contents
- Informazioni sulla sicurezza e introduzione
- Collegamenti
- Accensione e funzioni di base
- Riproduzione
- Riproduzione
- Controllo dei Contenuti USB o degli Apparecchi di Rete
- Significato delle Icone sul Display
- Riproduzione da un iPod/iPhone via USB
- Riproduzione da un Dispositivo USB
- Ascolto di TuneIn
- Registrazione di altre radio internet
- Riproduzione di file musicali su un server (DLNA)
- Riproduzione di file musicali su una cartella condivisa
- Riproduzione Remota
- Ascolto della radio AM/FM
- Riproduzione di audio e video da sorgenti separate
- Utilizzo dei modi di ascolto
- Visualizzazione delle informazioni relative alla sorgente
- Utilizzo della funzione di spegnimento ritardato
- Impostazione della luminosità del display
- Modifica del display di ingresso
- Silenziamento del Ricevitore AV
- Utilizzo del Menu Home
- Riproduzione
- Funzioni avanzate
- Impostazioni su schermo
- Uso di Quick setup
- Uso delle impostazioni audio di Quick Setup
- Uso di Setup Menu (HOME)
- Voci del menu di impostazione
- 1. HDMI Input (Ingresso HDMI)
- 2. Component (Ingresso video component)
- 3. Digital Audio (Ingresso audio digitale)
- 4. Sp Config (Configurazione altoparlanti)
- 5. Sp Distance (Distanza altoparlanti)
- 6. Level Cal (Calibratura livelli)
- 7. Audio Adjust (Regolaz audio)
- 8. Source Setup (Impostazione Sorgente)
- 9. Hardware (Impostazione Hardware)
- 10. HDMI Setup (Impostazione HDMI)
- 11. Network Setup (Impostazione rete)
- Zona 2
- Impostazioni su schermo
- Controllo di altri apparecchi
- Controllo di altri apparecchi
- Codici di controllo del telecomando preprogrammati
- Immissione dei codici telecomando
- Mappatura dei tasti colorati
- Codici telecomando per gli apparecchi Onkyo collegati tramite RI
- Ripristino dei tasti REMOTE MODE
- Reimpostazione del telecomando
- Controllo di altri apparecchi
- Utilizzo del dock Onkyo
- Controllo dell'iPod/iPhone
- Controllo di altri apparecchi
- Appendice
- Guida di Internet Radio
- Codici del telecomando

Remote Control Codes
1
Remote Control Codes
/
1
While holding down the REMOTE MODE button to which you want to assign a
code, press and hold down [DISPLAY] (about 3 seconds).
The REMOTE MODE button/Remote indicator lights.
On Integra products, button names are capitalized. For example, “Remote Mode”
button and “Display” button.
Notes:
• Remote control codes cannot be entered for [RECEIVER] and the multi zone button.
• Only TV remote control codes can be entered for [TV].
• Except for [RECEIVER], [TV], and the multi zone button, remote control codes from any
category can be assigned for the REMOTE MODE buttons. However, these buttons also work
as input selector buttons, so choose a REMOTE MODE button that corresponds with the input
to which you connect your component. For example, if you connect your CD player to the CD
input, choose [TV/CD] when entering its remote control code.
2
Within 30 seconds, use the number buttons to enter the 5-digit remote control
code.
The REMOTE MODE button/Remote indicator flashes twice.
If the remote control code is not entered successfully, the REMOTE MODE
button/Remote indicator will flash once slowly.
Notes:
• The flashing element of the remote controller will differ according to your AV receiver’s model.
• The remote controller is preconfigured with remote controller presets of different components.
By entering a code from the Remote Control Code list, you can activate the relevant preset for
that component.
• When there are multiple codes related to one manufacturer, try and enter them one-by-one until
it matches your component.
• Depending on the model and year of your component, compatibility is not guaranteed.
• With some models, the remote controller may not not work or its compatibility may be limited
to part of the component’s functionality.
• Besides, it is not possible to add new codes to the existing remote controller presets.
• Though the provided remote control codes are correct at the time of printing, they are subject to
change by the manufacturer.