Contents AV Receiver TX-NR1000 TX-NR5000E Getting Started 2 Installation and Connections 18 Operations 48 Setup Menu 82 Instruction Manual Thank you for purchasing an Onkyo AV Receiver. Please read this manual thoroughly before making connections and plugging in the unit. Following the instructions in this manual will enable you to obtain optimum performance and listening enjoyment from your new AV Receiver. Please retain this manual for future reference.
WARNING: TO REDUCE THE RISK OF FIRE OR ELECTRIC SHOCK, DO NOT EXPOSE THIS APPARATUS TO RAIN OR MOISTURE. WARNING AVIS RISK OF ELECTRIC SHOCK DO NOT OPEN RISQUE DE CHOC ELECTRIQUE NE PAS OUVRIR The lightning flash with arrowhead symbol, within an equilateral triangle, is intended to alert the user to the presence of uninsulated “dangerous voltage” within the product’s enclosure that may be of sufficient magnitude to constitute a risk of electric shock to persons.
Precautions 1. Recording Copyright Unless it’s for personal use only, recording copyrighted material is illegal without permission of the copyright holder. 2. AC Fuse The AC fuse inside the TX-NR1000/TX-NR5000E is not user-serviceable. If you cannot turn on the TX-NR1000/ TX-NR5000E, contact your Onkyo dealer. 3. Care Occasionally you should dust the TX-NR1000/ TX-NR5000E all over with a soft cloth. For stubborn stains, use a soft cloth dampened with a weak solution of mild detergent and water.
Table of Contents Getting Started Important Safety Instructions ..........................2 Precautions ........................................................3 Features .............................................................6 Supplied Accessories .......................................8 Connecting the Supplied Power Cord .............8 Before Using the TX-NR1000/TX-NR5000E .....9 Installing the Batteries .....................................9 Using the Remote Controller ...........................
Table of Contents—Continued About Network Configuration ........................ 73 Using the Remote Controller......................... 74 Enjoying Internet Radio................................. 76 Playing a Music File Saved on the Net-Tune Server ......................................................... 78 Configuring the Music Server........................ 80 Setup Menu Setup Menu...................................................... 82 OSD Map (MAIN A).......................................
Features Amplifier Features Next Generation User Interface • 192 kHz/24-Bit DAC for All Channels • Color-Coded Heavy Duty Dual Banana Plug Compatible Transparent Speaker Posts • Color-Coded 7.
Features—Continued • • • • • • Audiophile Grade Parts IntelliVolume Pure Audio Mode Digital Upsampling Absolute Ground Plate Large, Fluorescent, 35 Dot Matrix Display With 4 Mode Dimmer • For Ultimate Control—The Last Remote You’ll Ever Need • A-Form Listening Mode Memory In catalogs and on packaging, the letter added to the end of the product name indicates the color of the TX-NR1000/TX-NR5000E. Specifications and operation are the same regardless of color.
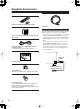
Supplied Accessories Make sure you have the following accessories: Remote Controller & Three Batteries (AA/R6) Power Cord Connecting the Supplied Power Cord AM Loop Antenna (not supplied with USA and Canadian models) Surround Back Right Surround Back Right Zone 2 Right Zone 2 Right Surround Back Right Surround Back Right Zone 2 Right Zone 2 Right Center Center Surround Back Left Surround Back Left Zone 2 Left Zone 2 Left Surround Right Surround Right Center Surround Left Surround Left Surround Ri
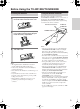
Before Using the TX-NR1000/TX-NR5000E Installing the Batteries 1 To open the battery compartment, press the small hollow and slide off the cover. Using the Remote Controller To use the remote controller, point it at the TX-NR1000/TX-NR5000E’s remote control sensor, as shown below. The TX-NR1000/TX-NR5000E’s [STANDBY] indicator flashes while a signal is being received from the remote controller. Remote control sensor TX-NR1000/ TX-NR5000E STANDBY indicator ft. 30˚ Ap pr ox .
Index Parts and Facilities Here is an explanation of the controls and displays on the front panel of the TX-NR1000/TX-NR5000E. The specifications for your model may differ due to regional requirements.
Index Parts and Facilities—Continued For further operational instructions, see the pages indicated in brackets [ ]. 1 POWER switch (for all models other than USA, Canadian, and Australian models) [50] Press to turn on and off the main power supply for the TX-NR1000/TX-NR5000E. When the TX-NR1000/TX-NR5000E is turned on with the [POWER] switch, the [STANDBY] indicator lights. • Before turning on the power, check to make sure that all cords are properly connected.
Index Parts and Facilities—Continued Inner Panels USA, Canadian, and Australian models LISTENING MODE AUDIO SELECTOR TONE ZONE 2 SELECT/ PRESET SETUP CONTROL / TUNING VIDEO 7 INPUT REC/ ZONE 3 DIGITAL S VIDEO VIDEO L AUDIO R PHONES TUNING MODE MEMORY DIMMER EXIT LEVEL CLEAR PUSH TO ENTER LEVEL PUSH TO ENTER European models LISTENING MODE AUDIO SELECTOR TONE ZONE 2 SELECT/ PRESET SETUP CONTROL / TUNING REC/ ZONE 3 VIDEO 7 INPUT DIGITAL PHONES TUNING MODE MEMORY CLEAR 12 R
Index Parts and Facilities—Continued A LISTENING MODE button [59] Press this button to enter the setup mode for the listening mode. Turning the [SELECT/PRESET] allows you to select the listening mode. To confirm your selection and exit the setup mode, press the [SELECT/PRESET]. B AUDIO SELECTOR button [55] Press this button to enter the audio selector mode. Turning the [SELECT/PRESET] allows you to select the audio mode. C TONE button [52] Press this button to enter the tone adjustment mode.
Index Parts and Facilities—Continued Rear Panel * B A C DIGITAL IN D DIGITAL IN OPTICAL 1 MULTI - CH E COAXIAL FR 2 2 3 3 AUDIO IN G F R IN 1 FL L SUB C SR SL R L H S VIDEO VIDEO IN COMPONENT VIDEO I IN 1 IN IN 2 K J L ANTENNA COMPONENT VIDEO Y 1 RS 232 HDMI IN 4 4 PH 1 Y IN 1 5 2 6 3 PB GND “Net-Tune” is a trademark of Onkyo Corporation. R SBR PB L 1 REMOTE CONTROL PR 12V TRIGGER OUT FM 75 IN 3 OUT 1 SBL A PR 4 7 2 4 200mA MAX.
Index Parts and Facilities—Continued B RS 232 This port is for connecting the TX-NR1000/ TX-NR5000E to home automation and external controllers. C PRE OUT A/B To use the TX-NR1000/TX-NR5000E as a preamplifier, connect a power amplifier to this jack. D SPEAKERS A/B These terminals are for connecting the speakers. Two sets of home theater connections are available (simultaneous playback of different sources in each of two home theaters is not supported).
Index Parts and Facilities—Continued Remote Controller (Amp Mode) The TX-NR1000/TX-NR5000E’s remote controller is a multipurpose device that can be used to control not just the TX-NR1000/TX-NR5000E but your other AV components as well. This section explains how its various operating modes can be used to control the TX-NR1000/TX-NR5000E. When you use the NetTune mode, see page 74 for details.
Index Parts and Facilities—Continued E DIRECT button S MAIN B button This button is used to select the Direct listening mode. For the speakers used in main room B, every press of this button toggles the status between enabled and disabled. F PURE A button This button is used to select the Pure Audio listening mode. T All ST button This button is used to select the All Ch Stereo listening mode.
Speaker Placement Basic Speaker Placements for Home Theater and the Function of Respective Speakers The TX-NR1000/TX-NR5000E has many excellent features to recreate a clear three-dimensional sound image and lively sound movement. This enables you to enjoy, at home, the rich sound effects of a live theater or concert hall performance. When playing a DVD, you can enjoy sound effects provided by DTS or Dolby Digital, depending on recording format.
Speaker Placement—Continued Placing the Speakers To fully enjoy surround sound, the configuration and placement of the speakers used are important. Be sure to read through the descriptions in the previous page and shown below. This section provides the examples and descriptions that assume a typical situation. Front Left and Right Speakers, and Center Speaker • Place the front left and right speakers symmetrically and so that the distance from the listening position is the same.
Speaker Placement—Continued Subwoofer Using a subwoofer greatly improves the volume level and sound quality of bass sounds. The subwoofer effect depends not only on the listening position but also on the shape of the listening room. • In general, place the subwoofer in a corner of the room or at a point 1/3 the width of the room. • Play a movie or music that contains high quality bass sounds to determine the subwoofer placement.
Speaker Placement—Continued The following speaker placements will be available according to the number of speakers connected to the TX-NR1000/TX-NR5000E. For the number of speaker channel, _.1 ch represents a subwoofer. 2 ch/2.1 ch This placement is used with two speakers (front left and FR FL right speakers). It is optimum for 2 ch sources including analog 2 ch, 2 ch linear PCM, Dolby Digital, DTS, DTS96/24, and AAC format sources. When the number of channels in the source is 3.
Speaker Placement—Continued Connection Examples The TX-NR1000/TX-NR5000E has two speaker terminal blocks for speaker system [A] and [B]. This allows you to build two 7.1 ch home theater systems, and various speaker placements and connections are also available. For example, some channels of either speaker system can be used for another room (Zone 2), or you can select one of two speaker systems for playback according to the source.
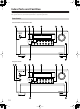
Speaker Placement—Continued Main room A: 7.1 ch speaker systems and the two additional front speakers (When you want to use speaker system [A] for movies and enjoy 7.1 surround sound and the two additional front speakers for classic music.) FL C FR 1-1.Speaker Config ===================== FR SW FL Main room A SL SR SBL SBR Speaker A a.Front L/R :Main A b.Center :Main A c.Surr L/R :Main A d.Surr Back :Main A 2ch e.Subwoofer :Main A Speaker B f.Front L/R :Main A g.Center :Not Used h.
Speaker Placement—Continued Main room A: 5.1 ch speaker system including the front speakers connected through the BTL or biamp connections C 1-1.Speaker Config ===================== FR SW FL Speaker A a.Front L/R :Main A b.Center :Main A c.Surr L/R :Main A d.Surr Back :BTL for Front e.Subwoofer :Main A Speaker B f.Front L/R :Not Used g.Center :Not Used h.Surr L/R :Not Used i.Surr Back :Not Used j.
Connecting Speakers Connecting to the Speaker Terminals After determining the layout of your speaker system, it is now necessary to connect the speakers correctly to your TX-NR1000/TX-NR5000E. For the USA and Canadian models, you can also use banana plugs/connectors. Caution: Connect only speakers with an impedance between 4 and 16 Ω to the TX-NR1000/TX-NR5000E. If the impedance of even one speaker is between 4 and 6 Ω, be sure to set the speaker impedance setting accordingly (See page 89).
Connecting Speakers—Continued Connecting a Subwoofer Use the SUBWOOFER PRE OUT A/B jack to connect a subwoofer with a built-in power amplifier. If your subwoofer does not have a built-in amplifier, connect an amplifier to the SUBWOOFER PRE OUT A/B jack and the subwoofer to the amplifier. You can connect two subwoofers for different speaker systems. You have to assign a subwoofer to the room in which it will be used (See pages 88, 89).
Connecting Speakers—Continued Using the BTL Connection To get more powerful sound output, you can make the BTL (Bridged Transless) connection using the front and surround back speaker terminals on the TX-NR1000/ TX-NR5000E. In this connection, two speaker outputs of the stereo amplifier will be used as mono output by combining the individual stereo channel outputs, allowing you to get about twice the output. Note: When using the BTL connection, make sure that the speaker impedance is 8 ohm or higher.
Connecting Antennas This chapter explains how to connect the supplied indoor FM antenna and AM loop antenna, and how to connect commercially available outdoor FM and AM antennas.
Connecting Antennas—Continued Connecting an Outdoor FM Antenna If you cannot achieve good reception with the supplied indoor FM antenna, try using a commercially available outdoor FM antenna instead. FM 75 Notes: • Outdoor FM antennas work best outside, but acceptable results can sometimes be obtained when installed in an attic or loft. • For best results, install the outdoor FM antenna well away from tall buildings, preferably with a clear line of sight to your local FM transmitter.
Connecting AV Components Types of Connection Cables and Terminals In addition to the conventional terminals, the TX-NR1000/TX-NR5000E has various terminals that are capable of nextgeneration digital transmission. Before connecting AV components to the TX-NR1000/TX-NR5000E, make sure that your cable type matches the terminal shape and the signal type and that the cable length is appropriate for the placement of your connected components.
Connecting AV Components—Continued • When you play the audio signal from the DIGITAL IN terminals in Zone 2, the source will be downmixed into 2channel analog audio signal and output to the AUDIO OUT terminals. • When you play the audio signal from the DIGITAL IN terminals in Zone 3, only the PCM signal will be output as an analog source to the AUDIO OUT terminals. Similarly, with this connection, you can record only the PCM signal as an analog source through the AUDIO OUT terminals.
Connecting AV Components—Continued Connecting Monitors such as TV or Projector • This section describes the connections for displaying the video source or the operating information of the TX-NR1000/TX-NR5000E on a monitor device such as a TV or projector. Before making a connection, check the terminal types on the monitor device and acquire the necessary cables by referring to page 31.
Connecting AV Components—Continued Connecting a DVD Player • When connecting a DVD player to the TX-NR1000/TX-NR5000E, make connections for video and audio signals using digital and analog terminals. Before making connections, refer to page 30 for correct connections. • When you want to perform analog recording of the audio signal from a DVD player or operate your -compatible Onkyo products via connections between the TX-NR1000/TX-NR5000E, you have to make analog audio signal connections.
Connecting AV Components—Continued Connecting a DVD Recorder or Digital VCR (VIDEO 1) • When connecting a DVD recorder or digital VCR to the TX-NR1000/TX-NR5000E, make connections for video and audio signals using digital and analog terminals. Before making connections, refer to page 30 for correct connections. • This section shows the connection example when you use the VIDEO 1 as an input. In this case, you do not need additional configurations.
Connecting AV Components—Continued Connecting a VCR (VIDEO 2, VIDEO 3) • When connecting a VCR to the TX-NR1000/TX-NR5000E, make connections for video and audio signals. Before making connections, refer to page 30 for correct connections. • This section shows the connection example when you use VIDEO 2 or VIDEO 3 as an input. In this case, you do not need additional configurations.
Connecting AV Components—Continued Example for connecting with the VIDEO 3 as input VCR When connecting to other audio terminals within the same terminal section, configure the audio input settings accordingly using the Audio Assign sub-menu (See page 94).
Connecting AV Components—Continued Connecting a DBS Tuner, DBS TV, or BS/CS Tuner • When connecting a DBS tuner, DBS TV, or BS/CS tuner to the TX-NR1000/TX-NR5000E, make connections for video and audio signals using digital and analog terminals. Before making connections, refer to page 30 for correct connections. • This section shows the connection example when you use the VIDEO 4 or VIDEO 5 as an input. In this case, you do not need additional configurations.
Connecting AV Components—Continued Connecting a Portable DVD Player or Video Camcorder • When connecting a portable DVD player or video camcorder to the TX-NR1000/TX-NR5000E, use the VIDEO 7 INPUT terminals on the front panel. • You can change the display name for the input source to represent the actual connected device (See page 97).
Connecting AV Components—Continued Connecting a Recording Device such as MD Recorder, DAT Deck, CD Recorder or Cassette Deck • When connecting a MD recorder, DAT deck or CD recorder to the TX-NR1000/TX-NR5000E, make connections using digital or analog terminals. Before making connections, refer to page 30 for correct connections. • Connect a cassette or DAT tape deck to TAPE1, and an MD or CD recorder to TAPE 2.
Connecting AV Components—Continued Connection Using the i.LINK (AUDIO) Terminal ( ) (Other than Chinese model) What is i.LINK i.LINK is an appellation of IEEE1394, which is the digital interface standard defined by the Institute of Electrical and Electronics Engineers (IEEE). Connecting i.LINK (AUDIO)-supported devices allows high speed transfer of data such as digital sound between the linked devices, and their control. What is i.LINK (AUDIO) The TX-NR1000/TX-NR5000E supports “i.LINK (AUDIO)” of the i.
Connecting AV Components—Continued Interconnection of i.LINK (AUDIO)-supported Devices The i.LINK connection allows for data transfer, even if the TX-NR1000/TX-NR5000E is connected to other devices via another i.LINK (AUDIO)-supported device. You can connect up to 17 devices in a daisy chain (in-line) connection arrangement using the i.LINK connection. Example: TX-NR1000/TX-NR5000E i.LINK ready DVD player i.LINK-ready BS tuner ...
Connecting AV Components—Continued How to Configure i.LINK Connections Selecting a Device When the i.LINK connection is ready, you can use the setup menu to select any device which is connected via i.LINK. Once you have configured the i.LINK setting, the next time you select the input source, it will be selected as the playing source. Using Remote Control 1. Press the [INPUT] button, and then turn the scroll wheel to select any source for setting. 2.
Connecting AV Components—Continued Connection Using HDMI Terminals About the HDMI (High Definition Multimedia Interface) The High Definition Multimedia Interface (HDMI) is an interface standard for next-generation TV, designed to connect between STB (Set Top Box) and display digitally in the home, responding to technological changes such as digitalization of TV broadcasting.
Connecting AV Components—Continued Connection example when the source selection is performed on the TX-NR1000/TX-NR5000E DVD Player with HDMI OUTPUT ENT K J L ANTENNA COMPONENT VIDEO IN 4 Y TV or Projector RS 232 HDMI Y IN 1 PB PB HDMI OUT REMOTE CONTROL PR 12V TRIGGER OUT FM 75 A PR 200mA MAX. IN 2 Y B 100mA MAX. C 100mA MAX. OUT 2 PB D 100mA MAX. Y E AM 100mA MAX.
Connecting Components not Reached by the Remote Controller Signals (IR IN/OUT) In order to use the remote controller to control the TX-NR1000/TX-NR5000E from a remote location, you will need to prepare a multiroom kit (sold separately) such as one listed below: • Onkyo’s Multi-Room System kits (IR Remote Controller Extension System) • Multiroom A/V distribution and control system such as those from Niles® and Xantech® RF Receivers can also be used with the remote controller to control the TX-NR1000/TX-NR500
Connecting Components not Reached by the Remote Controller Signals (IR IN/OUT)—Continued If Remote Controller Signal Does not Reach Other Components Effective Sensor Layout In this situation, you will need to use a commercially available IR emitter. Connect the mini plug of the IR emitter to the IR OUT terminal on the TX-NR1000/ TX-NR5000E and then place the IR emitter on the remote sensor of the component or facing it.
Connecting -compatible AV Components The terminal on the TX-NR1000/TX-NR5000E is for connecting other Onkyo components equipped with the same terminal. When a component is connected to the terminal, it can be operated by the remote controller supplied with the TX-NR1000/TX-NR5000E. In addition, when you connect a component to the terminal, you can also perform the system operations given below.
Basic Operation of Remote Controller Buttons The remote controller supplied with the TX-NR1000/TX-NR5000E is a multifunctional remote controller, so you can operate not only the TX-NR1000/TX-NR5000E but also AV components connected to the apparatus and components placed in another room. The basic operations are explained here. It is recommended that you read and understand this page before starting actual operations. This explanation focuses on remote controller operations.
Basic Operation of Remote Controller Buttons—Continued To Operate a Connected Component (Mode Switching) ON 1 Press the [MODE] button. The [MODE] button lights. 2 Roll the scroll wheel. STANDBY TV I INPUT 1 2 3 + @. - ' / ABC DEF TV CH 4 5 6 - GHI JKL Indication on the lower line changes to indicate the selected component mode.
Connecting the Power/Basic Operations • Before you plug in the TX-NR1000/TX-NR5000E, confirm that all connections have been made properly. • Turning on the power may cause a momentary power surge, which might interfere with other electrical equipment on the same circuit, such as computers. If this happens, use a wall outlet on a different circuit. (All models other than USA, Canadian, and Australian models) The TX-NR1000/TX-NR5000E is shipped with the main power (POWER) switch in the on position ( ON ).
Connecting the Power/Basic Operations—Continued Operating with Remote Controller ON 1 STANDBY TV ON STANDBY I INPUT 1 2 3 + @.
Connecting the Power/Basic Operations—Continued Adjusting the Brightness of the Front Display TONE MASTER VOLUME STANDBY/ON STANDBY DISPLAY TAPE 1 TAPE 2 TUNER PHONO CD NET AUDIO VIDEO 2 VIDEO 3 VIDEO 4 VIDEO 5 VIDEO 6 VIDEO 7 REC / ZONE 3 ( RED ) MAIN ( BLUE ) ZONE 2 ( GREEN ) VIDEO 1 DVD OPEN PURE AUDIO LISTENING MODE AUDIO SELECTOR TONE ZONE 2 TUNING MODE MEMORY DIMMER LEVEL SETUP SELECT/ PRESET VIDEO 7 INPUT REC/ ZONE 3 CONTROL / TUNING You can adjust the brightness of
Connecting the Power/Basic Operations—Continued MACRO ZONE 2 MODE INPUT Temporarily Changing the Speaker Output Levels (remote controller only) Scroll wheel DIMMER TV INPUT SLEEP P TO M EN SE R VE R CH - EX RE IT VOL TU R N GU ID E SET UP DISPLAY CH SEL MUTING REC MAIN A MAIN B RANDOM AUDIO SUBTITLE ANGLE LAST M THX ALL ST STEREO REPEAT A-B SEARCH MEMORY PURE A DIRECT DSP SURR SLEEP AD ENTER DISC PREV CH MEN U AUDI O J + U 1 Press the scroll wheel to
Connecting the Power/Basic Operations—Continued When an input source other than FM or AM is selected: Input MASTER VOLUME STANDBY/ON Program format* STANDBY TAPE 1 TAPE 2 TUNER PHONO CD NET AUDIO VIDEO 2 VIDEO 3 VIDEO 4 VIDEO 5 VIDEO 6 VIDEO 7 DISPLAY REC / ZONE 3 ( RED ) MAIN ( BLUE ) ZONE 2 ( GREEN ) VIDEO 1 DVD OPEN PURE AUDIO LISTENING MODE AUDIO SELECTOR TONE TUNING MODE MEMORY DIMMER ZONE 2 SETUP SELECT/ PRESET ON PHONES DIGITAL TV EXIT I PUSH TO ENTER S VIDEO VIDE
Connecting the Power/Basic Operations—Continued Changing the Audio Mode Using the Re-EQ Function The TX-NR1000/TX-NR5000E accepts analog, digital, i.LINK (AUDIO), and multichannel signals for audio input. You can choose the kind of signal to be played for a specific device. For Zone 2, the TX-NR1000/ TX-NR5000E accepts only analog and digital signals for audio input. This function corrects soundtracks with a strong treble level to the home theater level.
Using the Listening Modes Types of Listening Modes Listening modes on the TX-NR1000/TX-NR5000E enable you to enjoy movie theater or concert hall quality sounds in your room. The TX-NR1000/ TX-NR5000E provides the following listening modes. Before playing a source in optimal sound, be sure to complete the Speaker/Output Setup (See pages 88 - 91). Direct This mode allows you to enjoy pure sounds straight from an original source.
Using the Listening Modes—Continued DTS-ES Matrix This mode plays in 6.1 channels the music and movies recorded in DTS-ES. Sources recorded in DTS-ES include data for the surround back channel, and each channel is reproduced in 6.1 channels. This mode can be used with CDs, DVDs, and LDs with the mark. DTS NEO:6 This mode enables 6.1 channel playback of music and movies recorded in 2 channels. A broad frequency band is allocated to each channel, and every channel is kept very independent.
Using the Listening Modes—Continued TV Logic This mode is suitable for television programs broadcast from studios. You may feel as if you are sitting in a television studio. All of the surround sounds are enhanced, and conversations are output clearly. Listening Modes for Listeners Using Headphones Dolby Headphone This mode makes headphones reproduce dynamic surround sound effects like 5.1 channel speakers. The listening mode used before putting on headphones is applied to the headphones.
Using the Listening Modes—Continued Selecting the Listening Mode The TX-NR1000/TX-NR5000E provides various listening modes. Note: The available modes depend on the input signal you selected.
Listening to Radio Broadcasts Using the Tuner One of the features of the TX-NR1000/TX-NR5000E that is most frequently used is its ability to play FM and AM broadcast radio stations. The TX-NR1000/TX-NR5000E provides a number of listening modes perfect for listening to the radio and getting the most out of your audio system. Also, by presetting radio stations that you listen to frequently, you can select them easily by pressing the [CH/DISC +/–] button on the remote controller.
Listening to Radio Broadcasts—Continued Selecting a Preset Radio Station MASTER VOLUME STANDBY/ON When using the TX-NR1000/TX-NR5000E: STANDBY DISPLAY TAPE 1 TAPE 2 TUNER PHONO CD NET AUDIO VIDEO 2 VIDEO 3 VIDEO 4 VIDEO 5 VIDEO 6 VIDEO 7 REC / ZONE 3 ( RED ) MAIN ( BLUE ) ZONE 2 ( GREEN ) DVD VIDEO 1 OPEN PURE AUDIO LISTENING MODE AUDIO SELECTOR TONE ZONE 2 TUNING MODE MEMORY DIMMER LEVEL SELECT/ PRESET SETUP CONTROL / TUNING 1 TUNER VIDEO 7 INPUT REC/ ZONE 3 DIGITAL S VI
Listening to RDS Broadcasts (European models only) Listening to RDS Broadcasts RDS reception is available only on the European model and only in areas where RDS broadcasts are available. What is RDS? RDS stands for Radio Data System and is a type of FM broadcasting. RDS was developed within the European Broadcasting Union (EBU) and is available in most European countries. Many FM broadcasting stations now transmit the RDS signals, which provide the additional information required.
Listening to RDS Broadcasts (European models only)—Continued 4 TUNER SELECT/PRESET MASTER VOLUME STANDBY/ON STANDBY POWER DISPLAY TAPE 1 TAPE 2 TUNER PHONO CD NET AUDIO VIDEO 2 VIDEO 3 VIDEO 4 VIDEO 5 VIDEO 6 VIDEO 7 REC / ZONE 3 ( RED ) MAIN ( BLUE ) ZONE 2 ( GREEN ) ON DVD OFF VIDEO 1 OPEN PURE AUDIO LISTENING MODE AUDIO SELECTOR TONE ZONE 2 TUNING MODE MEMORY RT/ PTY/ TP LEVEL SELECT/ PRESET SETUP CONTROL / TUNING REC/ ZONE 3 VIDEO 7 INPUT DIGITAL S VIDEO VIDEO L
Enjoying Multichannel Playback To the TX-NR1000/TX-NR5000E, you can be connected up to two devices, such as a DVD player, that deal with multichannel sounds (5.1-7.1 channels). To use multichannel connections, you need to specify settings on the Input Setup menu. In addition, you can set listening modes as you prefer. Enjoy multichannel playback in the main room. How to Set Up Specify the input source type. At default, DVD is “1,” CD is “2,” and others are “No.
Enjoying Multichannel Playback—Continued Playing Back in Multichannel Sound @. / ABC DEF 5 6 - JKL MNO INPUT 7 8 9 PQRS TUV +10 0 WXYZ You can specify detailed settings for the decode mode and the speaker environment for multichannel playback (Listening Mode Setup). See page 102 for details.
Enjoying Movies and Music in the Remote Zone (Zone 2/3) You can connect speakers and amplifiers for the remote zone, and enjoy different sources in a remote zone (Zone 2 or Zone 3). There are three ways to enjoy in a remote zone: Connecting and Setup When Connecting Only Speakers (Zone 2) When Connecting the Pre-main Amplifier or Receiver (Zone 2 or Zone 3) • You can enjoy a different source in a remote zone while a 7.1 channel source is being played in the main room.
Enjoying Movies and Music in the Remote Zone (Zone 2/3)—Continued When Connecting the Power Amplifier (Zone 2 or Zone 3) • You can enjoy a different source in a remote zone while a 7.1 channel source is being played in the main room. • Adjust the volume level on the TX-NR1000/ TX-NR5000E (not on the power amplifier). Main Room TV TX-NR1000/TX-NR5000E Enjoying Movies and Music in a Remote Zone • The sleep timer in the main room also works in Zone 2 and Zone 3.
Enjoying Movies and Music in the Remote Zone (Zone 2/3)—Continued Operating with the Remote Controller Operating on the TX-NR1000/TX-NR5000E When operating with the remote controller, how to operate depends on the location of Zone 2 or Zone 3, or the distance from the TX-NR1000/TX-NR5000E. • Point the remote controller at the infrared receiver on the TX-NR1000/TX-NR5000E, and then operate the controller. • Install a remote controller sensor in Zone 2 or Zone 3 through an IR connection (See page 45).
Enjoying Movies and Music in the Remote Zone (Zone 2/3)— Continued • When not using Zone 2 or Zone 3, press the [ZONE 2] (or [REC/ZONE 3]) button, and then press the [STANDBY/ON] button. Or press the [ZONE 2] (or [REC/ZONE 3]) button, and then turn the [SELECT/PRESET] dial to select “Off.” In the case of Zone 2, the green indicator on the input source button is turned off, and in the case of Zone 3, the red indicator is turned off.
Recording a Source—Continued Some steps can also be operated on the remote controller, but described here are operations on the TX-NR1000/TX-NR5000E. Notes: • No surround effects can be recorded. • No DVD or any sources whose copyright is protected can be recorded. • There are some restrictions on recording of digital audio/video signals. Refer to the manual of your recording component.
Recording a Source—Continued 3 Press the [REC/ZONE3] button, and within 3 seconds, select “Rec Sel:SOURCE” with the [CONTROL/TUNING] dial. Pressing the [REC/ZONE 3] button makes the [STANDBY] indicator blink for 3 seconds. Select the target sources while the indicator is blinking. The name of the source to be recorded is indicated in the display window. Audio/video recording is enabled on the component for which “Rec Out” was specified in step 2.
Enjoying Net Audio About Net-Tune With Internet radio you can: • Listen to stations that use MP3 or WMA format streaming. • Select stations by genre, location, or language. • Preset up to 30 Internet radio stations. The computer requirements necessary for running the Net-Tune Central server software are as follows: • Operating system: Windows XP or 2000 (Mac OS not supported).
Enjoying Net Audio—Continued Notes: • To use Internet radio with the TX-NR1000/ TX-NR5000E, your broadband Internet connection needs to be up and running and able to access the Web. Please consult your ISP if you have any problems with your Internet connection. • The TX-NR1000/TX-NR5000E uses DHCP and AutoIP to configure its network settings automatically. If you want to configure these settings manually, see page 121.
Enjoying Net Audio—Continued Scroll wheel Using the Remote Controller To select Net-Tune mode, press the [MODE] button, and then roll the scroll wheel until “NET-T” appears on the display. Note: While neither the [INPUT] button nor [MODE] button is illuminated, the scroll wheel changes the input source and remote controller mode simultaneously (when you enter the Net-Tune mode, be sure that the LCD display shows “MSRV” or “IRD” in the top line and “NET-T” in the bottom line).
Enjoying Net Audio—Continued 1 Number/letter buttons These buttons are used to enter numbers and letters when searching for music in your Net-Tune server. 2 MODE button This button is used with the scroll wheel to select the remote controller modes. Press this button first, and then roll the scroll wheel until “NET-T” appears on the display. 3 Up/Down/Left/Right / / / & ENTER buttons These buttons are used to navigate Internet radio and Net-Tune server menus.
Enjoying Net Audio—Continued NET AUDIO 4 MASTER VOLUME STANDBY/ON STANDBY DISPLAY TAPE 1 TAPE 2 TUNER PHONO CD NET AUDIO VIDEO 2 VIDEO 3 VIDEO 4 VIDEO 5 VIDEO 6 VIDEO 7 ENTER REC / ZONE 3 ( RED ) MAIN ( BLUE ) ZONE 2 ( GREEN ) DVD VIDEO 1 OPEN PURE AUDIO LISTENING MODE AUDIO SELECTOR TONE ZONE 2 TUNING MODE MEMORY DIMMER LEVEL SETUP SELECT/ PRESET VIDEO 7 INPUT REC/ ZONE 3 CONTROL / TUNING DIGITAL S VIDEO VIDEO L AUDIO R PHONES CLEAR LEVEL EXIT PUSH TO ENTER ON
Enjoying Net Audio—Continued 7 Press the [ENTER] button. Buffering starts with the following message displayed. Choosing a Preset Internet Radio Station 1 While neither the [INPUT] button nor [MODE] button is illuminated, roll the scroll wheel to select IRD (Internet Radio). 2 Use the remote controller’s [CH DISC +/– ] button to select the preset. When you choose a preset station, the station name is displayed for 5 seconds, and then the progress of buffering is displayed instead.
Enjoying Net Audio—Continued ON “Disconnected” The Net-Tune server may not start or the server connected to previously may not be found. Confirm the connections between router, the Net-Tune server, and the TX-NR1000/TX-NR5000E. Start the Net-Tune server or select another server referring to “Select Server” on “Music Server Sub-menu” (See page 95). STANDBY TV I Number/letter buttons INPUT 3 + DEF TV CH 4 5 6 - GHI JKL MNO 7 8 9 PQRS TUV +10 0 1 2 @.
Enjoying Net Audio—Continued Selecting a Track List You can use the music file data saved on the Net-Tune server to select which tracks to play.
Enjoying Net Audio—Continued Configuring the Music Server 4 ENTER The music server settings can be made while you select the music server as an input source. ON Use the [ ]/[ ] buttons to select the “Music Server” sub-menu, then press the [ENTER] button. The setup screen for the sub-menu appears. STANDBY TV I 1 2 @.
Enjoying Net Audio—Continued Music Server Memo Internet Radio Memo 81
Setup Menu When making the various settings required to configure your TX-NR1000/TX-NR5000E for optimum performance, you can use either the OSD Menu that appears on your television monitor or you can use the display on the front of the TX-NR1000/TX-NR5000E. The OSD Menu is a settings menu that is displayed on your TV monitor.
Setup Menu—Continued Reference pages Main A Setup ===================== 0.Hardware Setup 1.Speaker/Output Setup 2.Input Setup 3.Listening Mode Setup 4.Audio Adjust 5.Preference 6.i.LINK Setup 7.Network Setup 8.Lock/Version 4.Audio Adjust ===================== 1.Tone Control 118 5.Preference ===================== 1.Volume Setup 2.Headphone Level Setup 119 3.OSD Setup 4.OSD Position 6.i.LINK Setup ===================== 1.Wakeup Setup 2.OSD for DVD 3.OSD for DVD (Zone 2) 4.DVD Output Synchro 7.
Setup Menu—Continued OSD Map (MAIN B) Reference pages Main menu Main B Setup ===================== 0.Hardware Setup 1.Speaker Setup 2.Input Setup 3.Audio Adjust 4.Preference 0.Hardware Setup ===================== 1.TV Format Setup 87 1.Speaker Setup ===================== 1.Speaker Impedance 2.Speaker Crossover 3.Speaker Distance 4.Level Calibration 5.THX Audio Setup 89 90 91 2.Input Setup ==Input:XXXXXXXXX==== 96 1.Listening Mode Preset 2.Delay 98 3.Audio Adjust ===================== 1.
Setup Menu—Continued OSD Map (ZONE 2) The Zone 2 settings shown on this page can be made when you perform either of the following settings in the “MAIN A” setup menu. • Under the “Speaker/Output Setup → Speaker Configuration” menu, when you select the surround back setting to “Powered Zone 2.” (The main menu 1 below) • Under the “Speaker/Output Setup → Audio (Video) Output Assign” menu, when you select the output terminal setting to “Zone 2 Out.” (The main menu 2 below) Reference pages 0.
Setup Menu—Continued Navigating the Setup Menu You can change Setup Menu settings using the buttons on the front panel and on the remote controller. The illustrations here represent the remote controller. OSD Main A Setup ===================== 0.Hardware Setup 1.Speaker/Output Setup 2.Input Setup 3.Listening Mode Setup 4.Audio Adjust 5.Preference 6.i.LINK Setup 7.Network Setup 8.Lock/Version Front panel dispaly 1.Speaker/Output Setup ===================== 1.Speaker Configuration 2.Speaker Impedance 3.
Hardware Setup In this section, you will perform the initial settings for the following scenarios. • When you want to change the TX-NR1000/TX-NR5000E’s remote control ID. • When you want to fix the TV Format setting to PAL or NTSC. • When you want to fix the AM Frequency Step setting to 9 kHz or 10 kHz. Remote Control Setup Sub-menu Remote ID This section explains how to change the TX-NR1000/ TX-NR5000E’s remote control ID.
Speaker/Output Setup The TX-NR1000/TX-NR5000E provides a wide range of variations in speaker connections and speaker settings, so you have to specify speaker settings according to conditions of each variation. For proper selection of an AV device connected at switching of the input type, you also need to allocate “audio output” and “video output” to each input type. If this allocation is incorrect, the desired component will not play a selected input source.
Speaker/Output Setup—Continued Bi-Amp for Front: This setting can be made only when you set the “(Speaker B) Front L/R” setting to “Main A” or “Main B.” Select this when using the front speaker in main room B by connecting the front channel and the surround back channel to the speaker via Bi-Amp (See page 28). Not Used (default): Select this when not using surround back speakers. Note: If (Speaker A) Surr Back is set to “Main A 1ch,” you cannot select “Main A 2ch” and “Main B 2ch” here.
Speaker/Output Setup—Continued Perform the setup procedure below following the operating instructions described on page 86. 1. Select the unit of distance from “Unit.” You can select either “feet” or “meters.” The default varies depending on the region. 2. Set the distance you measured. Enter all the values for every speaker you connected. • For any speaker that is not available or set to “Not Used” in the Speaker Configuration sub-menu, no associated setting item is displayed.
Speaker/Output Setup—Continued THX Audio Setup Sub-menu This is for setting up a home theater with a THX-Ultra2 compliant speaker system. These settings will be effective in the listening mode for the THX Ultra2 Cinema and THX Music Mode. The settings in the THX Audio Setup sub-menu can be configured for both “Main A” and “Main B.” THX Ultra2 Subwoofer A/ THX Ultra2 Subwoofer B This is for setting the connected subwoofer. Select “Yes” or “No” according to your subwoofer’s specification.
Speaker/Output Setup—Continued Zone 2 Out, Zone 3 Out This item is displayed when “Zone 2 Out” or “Zone 3 Out” is specified for Analog 1-5 above. The default setting for “Zone 2 Out” is “Pre Out (variable)” and for “Zone 3 Out” is “Line Out (fixed).” Pre Out (variable): Select this when you want to set “variable” for output to a device connected to Zone 2 or Zone 3. You should operate the TX-NR1000/ TX-NR5000E to adjust the sound volume from the device in Zone 2 or Zone 3.
Input Setup Items described here are set when you press the input source buttons. The TX-NR1000/TX-NR5000E is equipped with several types of jacks in addition to the standard audio and video jacks, and multiple jacks are provided for each type. You may freely assign input sources such as CD, PHONO, TUNER, TAPE 1, TAPE 2, and VIDEO 1-7 to these jacks.
Input Setup—Continued Follow procedures below to change any setting: 1 Press the [INPUT] button, and then roll the scroll wheel to select the input source that you want to set. 2 Press the scroll wheel, and then press the [SETUP] button. The Main Menu appears onscreen. 3 Use the [ ]/[ ] buttons to select “Input Setup,” and then press the [ENTER] button. The sub-menu is displayed. 2.Input Setup ==Input:XXXXXX======= 1.Audio Assign 2.Video Assign 3.Listening Mode Preset 4.Character Edit 5.
Input Setup—Continued Subwoofer Sensitivity The following are also settings for “Multichannel 1” or “Multichannel 2” (cannot be specified separately for each input source). Some DVD decks output the LFE channel at –15 dB lower than the other channels in the multichannel output. The level setting under the Level Calibration sub-menu is applied to the analog and digital inputs as well as the multichannel input.
Input Setup—Continued Listening Mode Preset Sub-menu You can specify a listening mode you frequently use for each input source. When a picture you like and frequently watch is a Dolby Digital source, for example, you may specify “Dolby Digital,” and if a CD of classical music you are fond of is a PCM source, you can specify “Pure Audio.” Selecting “Last” will set the same listening mode as the one you last specified for that source.
Input Setup—Continued D.F. Mono Character Here, you can specify the listening mode for playing digital signals such as Dolby Digital and AAC recorded in monaural. This option can be set for Main B and Zone 2 as well as for Main A. You can select from the listening modes listed below: (Main A/B) Pure Audio, Direct, Stereo, Mono (Default), Mono Movie, Enhance, Orchestra, Unplugged, Studio-Mix, TV Logic, All Ch Stereo, Full Mono, Dolby VS, and Last. (Zone 2) Direct, Stereo, Mono, Dolby VS, and Last.
Input Setup—Continued IntelliVolume Sub-menu When multiple devices are connected to the TX-NR1000/TX-NR5000E, the volume may vary for a device even when volume settings on the TX-NR1000/ TX-NR5000E are identical. Reducing the variance in the volume level will allow you to enjoy sounds at the same volume level without adjusting the volume control on the TX-NR1000/ TX-NR5000E. IntelliVolume Use the [ ] button when the volume is louder than other devices, and the [ ] button when the volume is quieter.
Listening Mode Setup This menu allows you to configure the listening mode settings including audio effect and playback options. Mono Setup Sub-menu This sub-menu allows you to configure the audio effect and playback options when you play a source in the Mono listening mode. a. Re-EQ/Academy This option allows you to configure whether the Re-EQ or Academy effect is applied or not. Use these effects when you do not want to overemphasize the treble sound. This option can also be set for Zone 2.
Listening Mode Setup—Continued Re-EQ On: Adjusts the soundtrack in which the treble is overemphasized, so that the sound is optimized for home theater. Academy On: Lowers the treble level and filters the noise when the source contains emphasized treble sound and too much hiss, such as an old mono audio movie recorded onto videotape. b. Multiplex Input Channel This option allows you to select the preferred audio channel when the input is the AAC/Dolby Digital sound multiplex signal.
Listening Mode Setup—Continued • When the impedance setting for “Front L/R A” or “Front L/R B” in the Speaker Impedance sub-menu is set to “6 ohms” or “4 ohms,” the available options will be “A” and “B.” A (Default): Outputs the source from the speakers connected to the FRONT L/R SPEAKERS A terminals. B: Outputs the source from the speakers connected to the FRONT L/R SPEAKERS B terminals. A+B: Outputs the source from the speakers connected to the FRONT L/R SPEAKERS A and FRONT L/R SPEAKERS B terminals.
Listening Mode Setup—Continued • When the settings for “(Speaker A) Surr Back” and “(Speaker B) Surr Back” in the Speaker Configuration sub-menu differ, the available options will be “A” and “B.” A (Default): Outputs the source from the speakers connected to the SURR BACK L/R SPEAKERS A terminals. B: Outputs the source from the speakers connected to the SURR BACK L/R SPEAKERS B terminals.
Listening Mode Setup—Continued A (Default): Outputs the source from the speaker connected to the CENTER SPEAKERS A terminal. B: Outputs the source from the speaker connected to the CENTER SPEAKERS B terminal. A+B: Outputs the source from the speakers connected to the CENTER SPEAKERS A and CENTER SPEAKERS B terminals. e. Surr L/R Sp This option configures the surround speakers to use when the TX-NR1000/TX-NR5000E plays an input source such as DVD-Audio and Super Audio CD.
Listening Mode Setup—Continued This option allows you to configure whether the Re-EQ effect is applied or not. Use this effect when you do not want to overemphasize the treble sound. Off (Default): The effect is not applied. On: Adjusts the soundtrack in which the treble is overemphasized, so that the sound is optimized for home theater. Audio. Select the speaker terminals to which the speakers you want to use are connected.
Listening Mode Setup—Continued A+B: Outputs the source from the subwoofers connected to the SUBWOOFER PRE OUT A and SUBWOOFER PRE OUT B terminals. Not Used: No subwoofers are used for playback. i.LINK(IEEE1394):SACD Input Setup Sub-menu This sub-menu allows you to configure the audio effect and playback options when you play a Super Audio CD input from the i.LINK (AUDIO) interface. a. LFE Level This option allows you to set the bass level for the i.LINK(IEEE1394):SACD listening mode.
Listening Mode Setup—Continued g. Surr Bk Speaker This option configures the surround back speakers to use when the TX-NR1000/TX-NR5000E plays a Super Audio CD. Select the speaker terminals to which the speakers you want to use are connected. This setting can be made when the “(Speaker B) Surr Back” is set to “Main A” in the Speaker Configuration sub-menu. However, when the “(Speaker A) Surr Back” is set to “BTL for Front,” “Bi-Amp for Front,” or “Not Used,” this setting will not be displayed.
Listening Mode Setup—Continued On: Adjusts the soundtrack in which the treble is overemphasized, so that the sound is optimized for home theater. f. Front Speaker This option configures the front speakers to use when playing the source in the Dolby Digital listening mode. Select the speaker terminals to which the speakers you want to use are connected. This setting can be made when the “(Speaker B) Front L/R” is set to “Main A” in the Speaker Configuration sub-menu.
Listening Mode Setup—Continued DTS Setup Sub-menu This sub-menu allows you to configure the audio effect and playback options when you play a source in the DTS listening mode. a. LFE Level This option allows you to set the bass level for the DTS listening mode. The LFE level setting made here will be applied to all of the DTS input signals. The available settings are –∞ dB, –20 dB, –10 dB, and 0 dB. The option defaults to “0.” This option can also be set for Zone 2. b.
Listening Mode Setup—Continued g. Surr Bk Speaker This option configures the surround back speakers to use when playing the source in the DTS listening mode. Select the speaker terminals to which the speakers you want to use are connected. This setting can be made when the “(Speaker B) Surr Back” is set to “Main A” in the Speaker Configuration sub-menu. However, when the “(Speaker A) Surr Back” is set to “BTL for Front,” “Bi-Amp for Front,” or “Not Used,” this setting will not be displayed.
Listening Mode Setup—Continued e. Center Speaker This option configures the center speaker to use when playing the source in the AAC listening mode. Select the speaker terminal to which the speaker you want to use is connected. This setting can be made when the “(Speaker B) Center” is set to “Main A” in the Speaker Configuration sub-menu. • When the impedance setting for “Center A” or “Center B” in the Speaker Impedance sub-menu is set to “6 ohms” or “4 ohms,” the available options will be “A” and “B.
Listening Mode Setup—Continued PLIIx Game: Plays a 2ch source as a 6.1 or higher channel source using the Dolby Pro Logic IIx Game mode. NEO:6 Cinema: Plays a 2ch source as a 6.1 or higher channel source using the DTS NEO:6NEO:6 Cinema mode. NEO:6 Music: Plays a 2ch source as a 6.1 or higher channel source using the DTS NEO:6 Music mode. b. PLIIx Music Panorama This option allows you to configure the panorama effect during the Dolby Pro Logic IIx Music mode.
Listening Mode Setup—Continued i. Surr L/R Sp This option configures the surround speakers to use when playing the source in the Dolby Pro Logic IIx or DTS NEO:6 listening modes. Select the speaker terminals to which the speakers you want to use are connected. This setting can be made when the “(Speaker B) Surr L/R” is set to “Main A” in the Speaker Configuration sub-menu.
Listening Mode Setup—Continued Games Mode: In this new mode for the THX Ultra2, the TX-NR1000/TX-NR5000E plays 5.1ch game source as a 7.1 or higher channel source. c. THX Mode (2ch) This option allows you to select which THX mode the TX-NR1000/TX-NR5000E will use when applying the THX effect to the signal. THX Cinema: This mode is suitable for theater movies that are recorded and edited so that they are optimized for playing in a large space such as a movie theater.
Listening Mode Setup—Continued B: Outputs the source only from the subwoofer connected to the SUBWOOFER PRE OUT B terminal. A+B: Outputs the source from the subwoofers connected to the SUBWOOFER PRE OUT A and SUBWOOFER PRE OUT B terminals. Not Used: No subwoofers are used for playback.
Listening Mode Setup—Continued • When the settings for “(Speaker A) Surr Back” and “(Speaker B) Surr Back” in the Speaker Configuration sub-menu differ, the available options will be “A” and “B.” A (Default): Outputs the source from the speakers connected to the SURR BACK L/R SPEAKERS A terminals. B: Outputs the source from the speakers connected to the SURR BACK L/R SPEAKERS B terminals.
Listening Mode Setup—Continued e. Surr Bk Speaker This option configures the surround back speakers to use when playing the source. Select the speaker terminals to which the speakers you want to use are connected. This setting can be made when the “(Speaker B) Surr Back” is set to “Main A” in the Speaker Configuration sub-menu. However, when the “(Speaker A) Surr Back” is set to “BTL for Front,” “BiAmp for Front,” or “Not Used,” this setting will not be displayed.
Listening Mode Setup—Continued A+B: Outputs the source from the speakers connected to the SURR L/R SPEAKERS A and SURR L/R SPEAKERS B terminals. e. Subwoofer This option configures the subwoofer to use when playing the source. Select the terminal to which the subwoofer you want to use is connected. This setting can be made when the “(Speaker A) Subwoofer” is set to an option other than “Not Used” in the Speaker Configuration sub-menu.
Audio Adjust Tone Control Sub-menu You can adjust bass, mid, and treble notes for each speaker set. • For any speaker set to “Not Used” in the Speaker Configuration sub-menu, no associated setting item is displayed. Front Bass Option for adjusting bass notes from front L/R speakers. Specify at 1 dB intervals in a range from –12 dB to +12 dB. The default is “0.” This option can also be set for Zone 2. Front Mid Option for adjusting mid notes from front L/R speakers.
Preferences This menu allows you to configure the listening mode settings including audio effects and playback options. Volume Setup Sub-menu a. Volume Display You can switch the volume indication between an absolute value and a relative value. Absolute (absolute value): Displayed in a range from 0 to 100. Relative (relative value) (Default): Displayed in a range of –∞ dB, –81.5 dB, –80 dB......18.0 dB. An absolute volume value of 82 is equivalent to a relative volume value of 0 dB. b.
i.LINK Setup This menu can be used when connecting to an Onkyo i.LINK (AUDIO)-ready device. Wakeup Setup a. Wakeup on i.LINK (IEEE1394) Specify connecting condition on standby of the TX-NR1000/TX-NR5000E. Enable: To be left connected. Disable (Default): To be disconnected while the TX-NR1000/TX-NR5000E is on standby to save electricity. OSD for DVD a.
Network Setup If using a broadband router (DHCP function), you need not perform “7. Network Setup” because the DHCP function on the TX-NR1000/TX-NR5000E is defaulted to “Enable.” When the DHCP function for the broadband router is set to “Disable,” network setup is required. In this case, you have to be knowledgeable about the network.
Network Setup—Continued Client Sub-menu While the system sending information is called a server, the machine receiving the data is called a “client.” Multiple clients can be connected to a single server. From the viewpoint of Net-Tune Central, the TX-NR1000/TX-NR5000E is a client. a. Client Name Confirm the client name used on the Net-Tune system. The client name is assigned by the TX-NR1000/ TX-NR5000E. You cannot change the assigned name. b.
Lock/Version Setup The following sub-menus allow you to lock your settings or display the software version of the TX-NR1000/ TX-NR5000E. Lock Setup Sub-menu a. Lock You can lock all of the setting menus to prevent settings from being changed by mistake. Locked: Powering on and off will resume the setting when it was locked, discarding any modification that was made after locking. Unlocked (Default): No lock on setting operations.
Operating Onkyo Products Using the Remote Controller The RC-557M/558M remote controller is a useful tool that can operate not only the TX-NR1000/TX-NR5000E, but also all the other components of your home theater. To operate any component other than the TX-NR1000/ TX-NR5000E with the RC-557M/558M remote controller, press the [MODE] button and use the scroll wheel to select the component to operate.
Operating Onkyo Products Using the Remote Controller—Continued 1 ON button F REPEAT button This button is used to turn on the DVD player. 2 STANDBY button This button is used to set the DVD player to Standby. 3 Number/letter buttons These buttons are used to enter title, chapter, and track numbers and to enter times for locating specific points in time. 4 MODE button This button is used with the scroll wheel to select the remote controller modes.
Operating Onkyo Products Using the Remote Controller—Continued Boxed numbers are for MiniDisc mode (See page 127). CD Mode CD mode is used to control an Onkyo CD player connected to the TX-NR1000/TX-NR5000E via . To select CD mode, press the [MODE] button, and then roll the scroll wheel until “CD” appears on the display.
Operating Onkyo Products Using the Remote Controller—Continued F Play [ ] button This button is used to start CD playback. G Stop [ ] button This button is used to stop CD playback. H RANDOM button This button is used with the random playback function. I MEMORY button This button is used with the memory playback function, which allows you to create a custom playlist of tracks. 9 REPEAT button This button is used to set the repeat playback functions.
Operating Onkyo Products Using the Remote Controller—Continued 1 MODE button Tape Mode Tape mode is used to control an Onkyo cassette recorder connected to the TX-NR1000/TX-NR5000E via . To select Tape mode, press the scroll wheel, placing your remote controller into “AMP” mode.
Using the Remote Controller with Other Components You can use the TX-NR1000/TX-NR5000E’s remote controller (RC-557M/558M) to control your other AV components, including those made by other manufacturers. To do this you can: • Enter a remote control code for the component that you want to control (e.g., DVD, TV, VCR). • Learn commands directly from the other component’s remote controller (see page 136). • Use the Macro function to learn a sequence of actions (see page 137). 5 1 2 3 @.
Using the Remote Controller with Other Components—Continued Remote Control Codes SAT (satellite tuner) SAT (satellite tuner) When two or more codes are given, try each one in turn, and choose the one that works best.
Using the Remote Controller with Other Components—Continued SAT (satellite tuner) VCR Manufacturer Control code Manufacturer Control code Manufacturer Control code Universum 4021, 4024 Aiwa 2012, 2046, 2047 Jensen 2013 Vortec 4017 Akai 2003, 2004, 2022 JVC Wela 4025 2033, 2041, 2044, 2045, 2047 2005, 2006, 2007, 2009, 2032, 2035, 2040, 2048 Alba Kaisui 2033 Anitech 2033 Kendo 2041, 2046 ASA 2034 Kenwood 2005, 2006, 2007, 2009 Baird 2036 Kodak 2010 Bell & Howell 2007 L
Using the Remote Controller with Other Components—Continued VCR TV Control code Manufacturer Control code Admiral 1026, 1040, 1062 RCA 2001, 2002, 2003, 2008, 2010, 2013, 2021, 2023, 2025, 2026, 2027 Akai 1002, 1067 Akura 1045 Alba 1035, 1043 Realistic 2007, 2008, 2010, 2011, 2012, 2017 Rex 2048 Amplivision 1063 Roadstar 2033, 2043 Amstrad 1035, 1067 Runco 2019 Amtron 1009 Saba 2040, 2048 Anam National 1003, 1009 Saisho 2028, 2041 Anitech 1035 Salora 2030 AOC 1004, 100
Using the Remote Controller with Other Components—Continued TV TV TV Manufacturer Control code Manufacturer Control code Manufacturer Control code Loewe 1014, 1040, 1055 Pioneer 1004, 1006, 1027, 1062 Siemens 1041, 1042, 1058, 1059 Luxman 1004, 1006 Portland 1004, 1005, 1006, 1025 Singer 1040 LXI 1001, 1006, 1010, 1014, 1016, 1017, 1034 Price Club 1022 Sinudyne Prism 1012 1036, 1040, 1043, 1067, 1068 M Electronic 1035, 1053, 1062, 1063 Profex 1035 Magnadyne 1040, 1067, 1068
Using the Remote Controller with Other Components—Continued Controlling a Satellite Tuner ON ON, STANDBY Controlling a VCR STANDBY ON ON, STANDBY TV I INPUT STANDBY TV I INPUT 1 2 3 + 1 2 3 + @. - ' / ABC DEF TV CH @.
Using the Remote Controller with Other Components—Continued Controlling a TV Controlling a Cable Receiver ON ON, STANDBY STANDBY TV I INPUT 1 2 3 + @. - ' / ABC DEF TV CH 4 5 6 - Number buttons GHI JKL * TV CH +/–* 8 9 TUV WXYZ +10 0 --/--- STANDBY TV I INPUT 1 2 3 + @.
Using the Remote Controller with Other Components—Continued Learning Commands from Another Remote Controller 5 You can teach the TX-NR1000/TX-NR5000E’s remote controller new commands simply by transmitting commands from another remote controller one at a time. For example, by transmitting the Play and Stop commands from your CD player’s remote controller, the TX-NR1000/TX-NR5000E’s remote controller can be taught to transmit those commands when its Play [ ] and Stop [ ] buttons are pressed in CD mode.
Using the Remote Controller with Other Components—Continued Using Macros 5 On the remote controller, press the buttons whose actions you want to program into the macro in the order you want them performed. To program the CD example in the left column into a macro: press the scroll wheel, press the [ON] button, roll the scroll wheel to select CD, press the scroll wheel, and then press the Play [ ] button. Actions are numbered from 1 to 8.
Using the Remote Controller with Other Components—Continued Running Macros Programmed macros can be run as follows. 1 Press the [MACRO] button. 2 Roll the scroll wheel to select the macro’s number, and then press the scroll wheel. The actions in the macro are performed in the order in which they were programmed. 5 Roll the scroll wheel to select a character, and then press the scroll wheel to set it. The following characters are available.
Other Settings for the Remote Controller Editing Remote Controller Modes Adding New Remote Controller Modes You can add additional modes (DVD, TV, VCR, CBL, SAT) to the remote controller. This is useful if, for example, you have several DVD players or TVs. Reordering the Remote Controller Modes You can change the order in which the remote controller modes appear when you roll the scroll wheel. The position of the AMP mode cannot be changed.
Other Settings for the Remote Controller—Continued Deleting Remote Controller Modes Assigning Remote Controller Modes You can delete remote controller modes that you don’t need, such as modes for components that you don’t have. The AMP mode cannot be deleted. You can change the combination in selecting the input source and remote controller mode simultaneously using the scroll wheel.
Other Settings for the Remote Controller—Continued Resetting the Remote Controller You can reset the remote controller to its default settings. 1 CUSTOM 2 3 4 Press and hold the [CUSTOM] button for more than three seconds. The remote controller enters Custom mode. 1 CUSTOM Press and hold the [CUSTOM] button for more than three seconds. The remote controller enters Custom mode. 2 Roll the scroll wheel to select “SETUP,” and then press the scroll wheel.
Other Settings for the Remote Controller—Continued Changing the Remote Controller’s Control ID This section explains how to change the remote controller’s ID. You may need to change this if the TX-NR1000/TX-NR5000E’s remote controller interferes with other Onkyo components located in the same room. Note: If you change the remote controller’s ID, be sure to select the same ID on the TX-NR1000/TX-NR5000E.
Relationship Between Input Source and Listening Mode Dolby Digital Input Signal Format PCM Button Type of source Listening mode Multichannel Multichannel (*/2) (Other than */2) CD, TV, LD, VHS, MD, Vinyl, Radio, Cassette, Cable, Satellite, etc. Dolby Digital/AAC 2ch 1/0 AAC 1+1 Analog Multichannel 5.1ch 7.1ch DVD-Audio, Super Audio CD DVD, Digital cable/sattellite, etc.
Relationship Between Input Source and Listening Mode—Continued DTS Input Signal Format Button Multichannel Multichannel (Other than (*/2) */2) DTS96/24 2/0 1/0 Type of source Listening mode Multichannel Multichannel (Other than (*/2) */2) Matrix 2ch 1/0 Discrete/ Matrix DVD, LD, CD, etc.
Relationship Between Input Source and Listening Mode—Continued i.LINK(IEEE1394):DVD-Audio i.LINK(IEEE1394): SACD Input Signal Format Multichannel Multichannel (*/2) (Other than */2) Button Type of source Listening mode 2/0 1/0 1+1 176.
Troubleshooting If you have any trouble using your TX-NR1000/TX-NR5000E, look for a solution in this section. If you can’t resolve the issue yourself, contact the dealer from whom you purchased this unit. Power Can’t turn on the TX-NR1000/TX-NR5000E? • Make sure that the power cord is properly plugged into the wall outlet. (USA, Canadian, and Australian models: make sure that the other end of the power cord is properly connected to the TX-NR1000/TX-NR5000E’s AC INLET).
Troubleshooting—Continued Can’t get 6.1 or 7.1 playback? • If no surround back speakers are connected, or Zone 2/3 is being used, 6.1 and 7.1 playback is not possible. • If the “SB Mode (5ch)” is available in any sub-menu of the “Listening Mode Setup” menu, make sure that it is not set to “Off” (pages 102-109). The volume cannot be set above 99? • When the levels of all speakers have been calibrated (page 90), the maximum volume setting may change.
Troubleshooting—Continued Can’t learn commands from other remote controllers? • Make sure that the transmitting ends of both remote controllers are pointing at each other. • Are you trying to learn from a remote controller that cannot be used for learning? Some commands cannot be learned, especially those that transmit several instructions with a single button press. Recording Can’t record? • On your recorder, make sure the correct input is selected (e.g., digital or analog).
Troubleshooting—Continued Error Messages “Not available with Headphones use” • Operation not allowed while a pair of headphones is connected. “Not available in this Sp Config” • Doesn’t work with the current speaker configuration. “Only available with Dolby D” • Can be used with only Dolby Digital. “Not available with this signal” • Doesn’t work with the current listening mode. “Not available with Muting” • Operation not allowed because the TX-NR1000/ TX-NR5000E is currently muted.
Specifications General Power Supply Rating North American and some Asian models: AC 120 V, 60 Hz European & Australian models: AC 230-240 V, 50 Hz Asian models: AC 220-230 volts, 50 Hz Consumption Power USA & Canadian models: 13.8 A European & Australian models: 1,200 W Asian models: 1,200 W Standby Power Consumption: 3.9 W Dimensions (W × H × D): 435 × 220 × 480.5 mm (17 1/8" × 8 11/16" × 18 15/16)" Weight: 33 kg (72.8 lbs) Inputs: Audio Multichannel (7.
Specifications—Continued Output Level and Impedance: Audio AUDIO 1-5: 200 mV, 470 Ω (Tape 1/2/ Video 1/2/3 Rec Out) 100 mV, 470 Ω (Zone 2/3 Out (fixed)) 1 V, 470 Ω (Zone 2/3 Out (variable)) PRE OUT A: 1 V, 470 Ω (Front L/R, CENTER, SURR L/R, SURR BACK or Zone 2 L/R, SUB WOOFER) PRE OUT B: 1 V, 470 Ω (SUB WOOFER) Video VIDEO 1-4 (Composite Video): 1 Vp-p 75 Ω (Monitor Out A/B, Video 1/2/3 Rec Out, Zone 2/3 Out) VIDEO 1-4 (S Video, Y signal): 1 Vp-p, 75 Ω (Monitor Out A/B, Video 1/2/3 Rec Out) VIDEO 1-4 (S Vi
Sales & Product Planning Div. : 2-1, Nisshin-cho, Neyagawa-shi, OSAKA 572-8540, JAPAN Tel: 072-831-8023 Fax: 072-831-8124 ONKYO U.S.A. CORPORATION 18 Park Way, Upper Saddle River, N.J. 07458, U.S.A. Tel: 201-785-2600 Fax: 201-785-2650 http://www.onkyousa.com ONKYO EUROPE ELECTRONICS GmbH Liegnitzerstrasse 6, 82194 Groebenzell, GERMANY Tel: +49-8142-4401-0 Fax: +49-8142-4401-555 http://www.onkyo.