SN29403233B_TX-8260_En.
SN29403233B_TX-8260_En.book 2 ページ > Before Start 2018年2月28日 水曜日 > Part Names 午後6時11分 > Install > Initial Setup > Playback Supplementary information | Advanced Setup | Others Table of Contents Before Start Before Start What's in the box ..................................................... 3 Part Names Part Names ............................................................. 4 Install Step1: Connect the Speakers ................................. 8 Step2: Connect an external device ...................
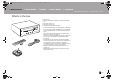
SN29403233B_TX-8260_En.book 3 ページ > Before Start 2018年2月28日 水曜日 > Part Names 午後6時11分 > Install > Initial Setup > Playback Supplementary information | Advanced Setup | Others What's in the box 1. Main unit (1) 2. Remote controller (RC-903S) (1), batteries (AAA/R03) (2) 3. FM indoor antenna (1) 4. AM indoor antenna (1) ≥ Instruction Manual (This document) 1 2 4 3 0 Connect speakers with 4 ≠ to 16 ≠ impedance.
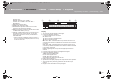
SN29403233B_TX-8260_En.book 4 ページ > Before Start 2018年2月28日 水曜日 > Part Names 午後6時11分 > Install > Initial Setup > Playback Supplementary information | Advanced Setup | Others Part Names Par t Names Front Panel 1. Í ON/STANDBY button 2. MENU button: Used to display the menu. MEMORY button: Used to register AM/FM radio stations. 3. Play (1)/Pause (;) button,TUNING MODE button: 0 Used for play operations when playing Music Server or USB.
SN29403233B_TX-8260_En.book 5 ページ > Before Start 2018年2月28日 水曜日 > Part Names 午後6時11分 > Install > Initial Setup > Playback Supplementary information | Advanced Setup | Others following order; BD/DVD#CBL/SAT#PC#GAME# TVTAPE#CD#PHONO#AM#FM#NET# BLUETOOTH 17.BASS dial: Adjusts the bass. 18.TREBLE dial: Adjusts the treble. 19.BALANCE dial: Adjusts the balance of the sounds output from the left and right speakers. 20.
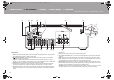
SN29403233B_TX-8260_En.book 6 ページ > Before Start 2018年2月28日 水曜日 > Part Names 午後6時11分 > Install > Initial Setup > Playback Supplementary information | Advanced Setup | Others 90° 180° Rear Panel 1. DIGITAL IN OPTICAL/COAXIAL jacks: Input digital audio signals from an external device with a digital optical cable or digital coaxial cable. 2. REMOTE CONTROL jack: An Onkyo product with RI jack can be connected and synchronized with this unit (P10). 3.
SN29403233B_TX-8260_En.book 7 ページ > Before Start 2018年2月28日 水曜日 > Part Names 午後6時11分 > Install > Initial Setup > Playback Supplementary information | Advanced Setup | Others Remote Controller 1. Í ON/STANDBY button 2. INPUT SELECTOR buttons: Switches the input to be played. 3. Play buttons: Used to control play of a Music Server or device connected via USB, or of RI connected devices.
SN29403233B_TX-8260_En.book 8 ページ > Before Start 2018年2月28日 水曜日 > Part Names 午後6時11分 > Install > Initial Setup > Playback Supplementary information | Advanced Setup | Others Step1: Connect the Speakers Install You can connect two systems, Speaker A and Speaker B, as the Speaker System. When connecting only one set, connect to the SPEAKERS A terminals. With one set, use speakers with 4 ≠ to 16 ≠ impedance.
SN29403233B_TX-8260_En.book 9 ページ > Before Start 2018年2月28日 水曜日 > Part Names 午後6時11分 > Install > Initial Setup > Playback Supplementary information | Advanced Setup | Others Step2: Connect an external device 1. DIGITAL IN connection Connect an external device with a digital optical cable or digital coaxial cable.
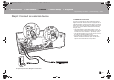
SN29403233B_TX-8260_En.book 10 ページ > Before Start 2018年2月28日 > Part Names 水曜日 午後6時11分 > Install > Initial Setup > Playback Supplementary information | Advanced Setup | Others 2. LINE IN connection Connect an external device with an analog audio cable. You can connect a turntable that has an MM-type cartridge to the PHONO jack. 0 If the turntable has a built-in audio equalizer, connect it to an LINE IN jack other than the PHONO jack.
SN29403233B_TX-8260_En.book 11 ページ > Before Start 2018年2月28日 > Part Names 水曜日 午後6時11分 > Install > Initial Setup > Playback Supplementary information | Advanced Setup | Others Step3: Multi-zone Connection You can enjoy audio in the separate room by, for example, playing a Blu-ray Disc player in the main room (where this unit is located) and listening to internet radio in the separate room (ZONE 2). 0 DSD format files cannot be output to ZONE 2.
SN29403233B_TX-8260_En.book 12 ページ > Before Start 2018年2月28日 > Part Names 水曜日 午後6時11分 > Install > Initial Setup > Playback Supplementary information | Advanced Setup | Others Step4: Connect Other Cables 1. Network Hookup Connect this unit to the network using wired LAN or Wi-Fi (wireless LAN). You can enjoy Network Functions such as internet radio by connecting to the network.
SN29403233B_TX-8260_En.book 13 ページ > Before Start 2018年2月28日 > Part Names 水曜日 午後6時11分 > Install > Initial Setup > Playback Supplementary information | Advanced Setup | Others Initial Setup with Auto Start-up Wizard Initial Setup 1 Starting up: When you press Í, "Now Initializing..." is displayed on the display. After this, when "Now Initializing..." goes out, you can start operating the unit.
SN29403233B_TX-8260_En.book 14 ページ > Before Start 2018年2月28日 > Part Names 水曜日 午後6時11分 > Install > Initial Setup > Playback Supplementary information | Advanced Setup | Others Down on the remote controller and press ENTER. Scan Networks Use iOS Device 0 To redo the initial settings, press SETUP on the remote controller, and set "6. Network" - "Wi-Fi" to "On". Select "Wi-Fi Setup" after this.
SN29403233B_TX-8260_En.book 15 ページ > Before Start 2018年2月28日 > Part Names 水曜日 午後6時11分 > Install > Initial Setup > Playback Supplementary information | Advanced Setup | Others Entering text Text entry, for passwords, etc., uses the following procedure. 1. Select the characters or symbols with Up/Down/Left/Right (a). a b cd e f g h i j k l m a 2. Press ENTER (a) to confirm the selected character. Repeat this to enter text.
SN29403233B_TX-8260_En.book 16 ページ > Before Start 2018年2月28日 > Part Names 水曜日 午後6時11分 > Install > Initial Setup > Playback Supplementary information | Advanced Setup | Others BLUETOOTH® Playback Playing audio from a connected device Playback 1 1 2 2 3 Onkyo TX-8260 XXX Basic Operations You can play the audio from external devices such as Blu-ray Disc players through this unit. Perform the following procedure when the unit is on. 1.
SN29403233B_TX-8260_En.book 17 ページ > Before Start 2018年2月28日 > Part Names 水曜日 午後6時11分 > Install > Initial Setup > Playback Supplementary information | Advanced Setup | Others Internet Radio 2 1 TuneIn Radio You can use internet radio services such as TuneIn Radio, Pandora, Deezer, and TIDAL by connecting this unit to a network that has an internet connection.
SN29403233B_TX-8260_En.book 18 ページ > Before Start 2018年2月28日 > Part Names 水曜日 午後6時11分 > Install > Initial Setup > Playback Supplementary information | Advanced Setup | Others Spotify 1 2 3 4 Wi-Fi Device Devices Available Spotify Connect play is possible by connecting this unit to the same network as a smart phone or tablet. 0 To play Spotify Connect, you need to install the Spotify application on your smartphone or tablet. You also need to create a Spotify premium account.
SN29403233B_TX-8260_En.book 19 ページ > Before Start 2018年2月28日 > Part Names 水曜日 午後6時11分 > Install > Initial Setup > Playback Supplementary information | Advanced Setup | Others AirPlay® 1 2 Wi-Fi 3 2 4 iPhone Onkyo TX-8260 XXXXXX e.g., iOS 10 Basic Operations You can wirelessly enjoy the music files on an iPhone®, iPod touch®, or iPad® connected to the same access point as this unit. 0 Update the OS version on your iOS device to the latest version.
SN29403233B_TX-8260_En.book 20 ページ > Before Start 2018年2月28日 > Part Names 水曜日 午後6時11分 > Install > Initial Setup > Playback Supplementary information | Advanced Setup | Others USB Storage Device 1 2 3 4 USB Front Basic Operations You can play music files stored on a USB storage device. Perform the following procedure when the unit is on. 1. Plug your USB storage device with the music files into the USB port either on the front panel or rear panel of this unit. 2.
SN29403233B_TX-8260_En.book 21 ページ > Before Start 2018年2月28日 > Part Names 水曜日 午後6時11分 > Install > Initial Setup > Playback Supplementary information | Advanced Setup | Others digital audio. 0 Supported sampling rates: 44.1 kHz, 48 kHz, 88.2 kHz, 96 kHz, 176.4 kHz, 192 kHz 0 Quantization bit: 8 bit, 16 bit, 24 bit AIFF (.aiff/.aif/.AIFF/.AIF): AIFF files include uncompressed PCM digital audio. 0 Supported sampling rates: 44.1 kHz, 48 kHz, 88.2 kHz, 96 kHz, 176.
SN29403233B_TX-8260_En.book 22 ページ > Before Start 2018年2月28日 > Part Names 水曜日 午後6時11分 > Install > Initial Setup > Playback Supplementary information | Advanced Setup | Others Listening to the AM/FM Radio 1 2 You can receive AM/FM radio stations on this unit with the built-in tuner. Perform the following procedure when the unit is on. ∫ Tuning into a Radio Station Tuning Automatically 1. Repeatedly press TUNER (a) on the remote controller and select "AM" or "FM". 2.
SN29403233B_TX-8260_En.book 23 ページ > Before Start 2018年2月28日 > Part Names 水曜日 午後6時11分 > Install > Initial Setup > Playback Supplementary information | Advanced Setup | Others Tuning into Stations by Frequency It allows you to directly enter the frequency of the radio station you want to listen to. 1. Press the TUNER button (a) of the remote controller repeatedly to select either "AM" or "FM". 2. Press D.TUN button (c) on the remote controller. 3.
SN29403233B_TX-8260_En.book 24 ページ > Before Start 2018年2月28日 > Part Names 水曜日 午後6時11分 > Install > Initial Setup > Playback Supplementary information | Advanced Setup | Others Registering AM/FM Radio stations 1 2 You can register up to 40 of your favorite radio stations. Registering After tuning into the radio station you want to register, perform the following procedure. 1. Press MEMORY on the main unit so that the preset number on the display flashes. FM 87.5 MHz 1 2.
SN29403233B_TX-8260_En.book 25 ページ > Before Start 2018年2月28日 > Part Names 水曜日 午後6時11分 > Install > Initial Setup > Playback Supplementary information | Advanced Setup | Others Music Server 1 2 3 Music Server It is possible to stream music files stored on PCs or NAS devices connected to the same network as this unit.
SN29403233B_TX-8260_En.book 26 ページ > Before Start 2018年2月28日 > Part Names 水曜日 午後6時11分 > Install > Initial Setup > Playback Supplementary information | Advanced Setup | Others ∫ Controlling Remote Playback from a PC You can use this unit to play music files stored on your PC by operating the PC inside your home network. The unit supports remote playback with Windows Media® Player 12. 1. Turn on your PC and start Windows Media® Player 12. 2.
SN29403233B_TX-8260_En.book 27 ページ > Before Start 2018年2月28日 > Part Names 水曜日 午後6時11分 > Install > Initial Setup > Playback Supplementary information | Advanced Setup | Others Multi-zone 1 Basic operations You can enjoy audio in the separate room by, for example, playing a Blu-ray Disc player in the main room (where this unit is located) and listening to internet radio in the separate room (ZONE 2). 0 DSD format files cannot be output to Zone 2.
SN29403233B_TX-8260_En.book 28 ページ > Before Start 2018年2月28日 > Part Names 水曜日 午後6時11分 > Install > Initial Setup > Playback Supplementary information | Advanced Setup | Others To turn off the function: Press the Í button while the remote controller is in the mode for controlling ZONE 2. Alternatively press OFF on the main unit.
SN29403233B_TX-8260_En.book 29 ページ > Before Start 2018年2月28日 > Part Names 水曜日 午後6時11分 > Install > Initial Setup > Playback Supplementary information | Advanced Setup | Others AUDIO Menu By pressing AUDIO on the remote controller during play, you can adjust frequently used settings, such as the sound quality. 1. Press AUDIO (c) on the remote controller. 2. Select the item with the Up/Down buttons (a) on the remote controller. 3.
SN29403233B_TX-8260_En.book 30 ページ > Before Start 2018年2月28日 > Part Names 水曜日 午後6時11分 > Install > Initial Setup > Playback Supplementary information | Advanced Setup | Others Supplementary information for player functions Supplementary information Due to firmware (the software for the system) updates after you make your purchase or firmware changes during production of the product, there may be additions or changes to the features available compared to what is in the instruction manual.
SN29403233B_TX-8260_En.book 31 ページ > Before Start 2018年2月28日 > Part Names 水曜日 午後6時11分 > Install > Initial Setup > Playback Supplementary information | Advanced Setup | Others Setup Menu Advanced Setup 1 The unit allows you to configure advanced settings to provide you with an even better experience. 1. Press SETUP (b) on the remote controller. 1.DigitalAudio 2. Select the item with the Up/Down buttons (a) on the remote controller and press ENTER (a) to confirm your selection. 3.
SN29403233B_TX-8260_En.book 32 ページ > Before Start 2018年2月28日 > Part Names 水曜日 午後6時11分 > Install > Initial Setup > Playback Supplementary information | Advanced Setup | Others COAX2 "BD/DVD", "CBL/SAT", "GAME", "PC", "CD", "TV/TAPE", "PHONO": Allocate an input selector to the DIGITAL IN COAXIAL 2 jack. (Default Value is "CBL/SAT") OPT1 "BD/DVD", "CBL/SAT", "GAME", "PC", "CD", "TV/TAPE", "PHONO": Allocate an input selector to the DIGITAL IN OPTICAL 1 jack.
SN29403233B_TX-8260_En.book 33 ページ > Before Start 2018年2月28日 > Part Names 水曜日 午後6時11分 > Install > Initial Setup > Playback Supplementary information | Advanced Setup | Others BT Wakeup Opt1Wkup AM/FM This function wakes up the unit on standby by connecting a BLUETOOTH wireless technology enabled device.
SN29403233B_TX-8260_En.book 34 ページ > Before Start 2018年2月28日 > Part Names 水曜日 午後6時11分 > Install > Initial Setup > Playback Supplementary information | Advanced Setup | Others "DHCP" to "Disable" and assign an address to this unit in "IP Address" as well as set information related to your LAN, such as Subnet Mask and Gateway. 34 Wi-Fi Connect the unit to network via wireless LAN router.
SN29403233B_TX-8260_En.book 35 ページ > Before Start 2018年2月28日 > Part Names 水曜日 午後6時11分 > Install > Initial Setup > Playback Supplementary information | Advanced Setup | Others Pairing Info You can initialize the pairing information saved on this unit. Pressing ENTER when "Clear" is displayed initializes the pairing information stored in this unit. 0 This function does not initialize the pairing information on the BLUETOOTH wireless technology enabled device.
SN29403233B_TX-8260_En.book 36 ページ > Before Start 2018年2月28日 > Part Names 水曜日 午後6時11分 > Install > Initial Setup > Playback Supplementary information | Advanced Setup | Others Web Setup You can make the settings for network features for this unit in an internet browser on a PC, smartphone, etc. 1. Press SETUP on the remote controller to display the Setup menu. 2. Select "6. Network" - "IP Address" with the cursors and take a note of the IP address displayed. 3.
SN29403233B_TX-8260_En.book 37 ページ > Before Start 2018年2月28日 > Part Names 水曜日 午後6時11分 > Install > Initial Setup > Playback Supplementary information | Advanced Setup | Others Firmware Update The updating function on this unit How to update Updating the Firmware via Network This unit has functionality to update the firmware (the system software) over a network or by the USB port. This enables us to make improvements to a variety of operations and to add features.
SN29403233B_TX-8260_En.book 38 ページ > Before Start 2018年2月28日 > Part Names 水曜日 午後6時11分 > Install > Initial Setup > Playback Supplementary information | Advanced Setup | Others the unit and router. This may solve the problem. If you are still unable to connect to the Internet, the DNS server or proxy server may be temporarily down. Check the service status with your ISP provider. 0 Others: Disconnect then reconnect the power cord, then repeat from the beginning.
SN29403233B_TX-8260_En.book 39 ページ > Before Start 2018年2月28日 > Part Names 水曜日 午後6時11分 > Install > Initial Setup > Playback Supplementary information | Advanced Setup | Others Troubleshooting Others Before starting the procedure Problems may be solved by simply turning the power on/off or disconnecting/connecting the power cord, which is easier than working on the connection, setting and operating procedure. Try the simple measures on both the unit and the connected device.
SN29403233B_TX-8260_En.book 40 ページ > Before Start 2018年2月28日 > Part Names 水曜日 午後6時11分 > Install > Initial Setup > Playback Supplementary information | Advanced Setup | Others no sound is output from the speakers. No sound from a connected external device 0 Change the input selector on this unit to the position of the terminal to which the external device is connected. 0 Check the digital audio output setting on the connected component.
SN29403233B_TX-8260_En.book 41 ページ > Before Start 2018年2月28日 > Part Names 水曜日 午後6時11分 > Install > Initial Setup > Playback Supplementary information | Advanced Setup | Others this unit. 0 Depending on ISP, setting the proxy server is necessary. 0 Make sure that the router and/or modem you are using is supported by your ISP. Cannot access the network server 0 This unit needs to be connected to the same router as the network server.
SN29403233B_TX-8260_En.book 42 ページ > Before Start 2018年2月28日 > Part Names 水曜日 午後6時11分 > Install > Initial Setup > Playback Supplementary information | Advanced Setup | Others ∫ Others Strange noises can be heard from the unit 0 If you have connected another unit to the same wall outlet as this unit, this noise may be an effect from the other unit. If the symptoms improve by unplugging the power cord of the other unit, use different wall outlets for this unit and the other unit.
SN29403233B_TX-8260_En.book 43 ページ > Before Start 2018年2月28日 > Part Names 水曜日 午後6時11分 > Install > Initial Setup > Playback Supplementary information | Advanced Setup | Others General Specifications Amplifier (Audio) section Tuner Section General Rated Output Power (FTC) With 8 ohm loads, both channels driven, from 2020,000 Hz; rated 70 watts per channel minimum RMS power, with no more than 0.08% total harmonic distortion from 250 milliwatts to rated output.
SN29403233B_TX-8260_En.book 44 ページ 2018年2月28日 水曜日 The Wi-Fi CERTIFIED Logo is a certification mark of Wi-Fi Alliance®. AirPlay, iPad, iPhone, iPod, iPod classic, iPod nano and iPod touch are trademarks of Apple Inc., registered in the U.S. and other countries. iPad Air and iPad mini are trademarks of Apple Inc.
SN29403233B_TX-8260_Es.book 48 ページ 2018年2月28日 水曜日 午後6時16分 1-10-5 Yokoami, Sumida-ku, Tokyo 130-0015 JAPAN http://www.onkyo.com/ 18 Park Way, Upper Saddle River, N.J. 07458, U.S.A. For Dealer, Service, Order and all other Business Inquiries: Tel: 201-785-2600 Fax: 201-785-2650 http://www.us.onkyo.com/ For Product Support Team Only: 1-800-229-1687 http://www.us.onkyo.com/ Gutenbergstrasse 3, 82178 Puchheim, Germany Tel: +49-8142-4401-0 Fax: +49-8142-4208-213 http://www.eu.onkyo.
2017 NEW PRODUCT RELEASE TX-8260 Network Stereo Receiver BLACK Refresh Your Home Media Experience with Hi-fi Sound Classic stereo amplification is rejuvenated with network functions that simplify audio streaming from personal devices, while adding convenient ways to cast music around the home. The TX-8260 has Chromecast built-in, FireConnect™, and DTS Play-Fi®* multi-room technologies over 5 GHz/2.4 GHz Wi-Fi® for stable connection.
TX-8260 Network Stereo Receiver Driving Big Speakers with Boundless Energy Match your TX-8260 with stereo loudspeakers and add genuine hi-fi sound to all your entertainment sources. Discrete high-current amplifiers, massive transformer, and custom-made capacitors assure effortless driving power with very low distortion. High current grips the speaker cones for more accurate control, restoring vitality and detail to music.
• English Chromecast built-in You can enjoy music wirelessly with your smartphone or tablet PC connecting to the same network as this unit. As an initial setting, before starting to use Chromecast built-in, you need to accept the PRIVACY POLICY on our smartphone application "Onkyo Controller". • If you have accepted the privacy policy during the initial setup of this unit, the following initial setup of the app is unnecessary. Initial Setup 1. Download Onkyo Controller to the smartphone. 2.
• English Play-Fi support A future firmware update is planned to provide support for Play-Fi. Until this update is completed, Play-Fi will not be available for this unit. • Details on the firmware update will be posted on our website and through other means at a later date. • Fran~ais Assistance pour Play-Fi Une prochaine mise a jour du micrologiciel est prevue pour fournir une assistance au service Play-Fi. Play-Fi n'est pas disponible sur cet appareil avant le deploiement de Ia mise a jour.
• Suomi Play-Fi tuki Tulevan laiteohjelmapaivityksen suunnitellaan antavan tuen toiminnolle Play-Fi. Kunnes kyseista paivitysta ei ole suoritettu, Play-Fi ei ole saatavilla tassa laitteessa. • Tarkempia tietoja laiteohjelmiston paivityksesta julkaistaan verkkosivullamme seka muilla tavoin myohemmin. • PyccKMH st3biK noAQep>KKa Play-Fi 8 6yAyi..LieM nnaH~pyeTCH 06HOB~Tb BCTpOeHHOe nporpaMMHOe 06eCne<-~eH~e AflH o6ecne<-~eH~H nOMep>KK~ CI1Y>K6e Play-Fi.
Enter a new world of hi-res music downloads. Service available in USA/UK/Germany at www.onkyomusic.com.
Network Audio Platforms ~cfo~~e~ Powered by ~ BLACKFIRE db ~ :\\ .J Chromecast built-in -.,.
YOUR HOME. YOUR MUSIC. NO LIMITS. NC~P-302 Wireless Audio System NCP-302(B) NCP-302(W) SIMPLE CONTROL, GREAT MUSICALITY CWDFi) CERTIFIED 0 Bluetooth~ Gspotity ~ TIDAL =-- = sDEEZER -i·tunein pandora Music Anywhere Tap your touchscree n to play sources connected to your main system on NCP-302 speakers. Use Onkyo Controller to play to individual speakers or share sources in multiple rooms. Intuitive Control Application On kyo Controller for iDS and Android ~ is easy to navigate.
·~"'>~l~I"P~IIOII"'*'-'!P_....,_ """""'"OO!l!U'IU'Il'~O!uo:Q~~"'>.......,.,oi!UIIIIul"!ffbbln:) _""'_.. ....... _.._.,... .. ... -~-"'>~I~IIOFlloV"A~~O!UOO_...,..,.. ~ l,ledwo:).,""""""""'-""~ g~-.-o-·._...,....~"1>~0~~ ·~~"'>~O!-U!I'"'>~ ..... ti'JIO""''ItItO!PIIH"'>IOjlltiii'IIIOI"'>IUIUOO"'_"'>_ .IOd~eJ IJJt\I .. IIUIOdo.uo:)O!~IU'to\llfi\MIIfi"'>~PIAto"i""'PP" ~'lueollopum:o.,.._o~mlOCI~--o"""""""'~..., "'>osti!"P-OWO>O'.._UQIOeiWOIUI~uo:Q'-'QIHIICIO ....
(C) Copyright 2017 Onkyo&PionMr Corporation Japan. All rights reserved.
Garantie d'Onkyo USA Corporation (Canada) ONKYO VEUILLEZ CONSERVERVOTRE FACTURE ORIGINALE PUISQUE VOUS DEVREZ LA PRESENTER POURVOUS PREVALOIR DU SERVICE AUX TERMES DE LA PRESENTE GARANTIE.
Onkyo USA Corporation Limited Consumer Warranty (USA) On kyo USA Corporation Consumer Warranty (Canada) PLEASE RETAIN YOUR ORIGINAL BILL OF SALE AS YOU WILL NEED TO PRESENT IT SHOULD YOU REQUIRE SERVICE UNDER THIS WARRANTY.