TX-8011_E.book Page 1 Friday, July 30, 2004 10:33 AM Contents Introduction ..................................... 2 Stereo Receiver TX-8011 Connection .................................... 11 Playing Your Components ........... 17 Using the Tuner ............................. 19 Instruction Manual Recording ...................................... 21 Thank you for purchasing an Onkyo Stereo Receiver. Please read this manual thoroughly before making connections and plugging in the unit.
TX-8011_E.book Page 2 Friday, July 30, 2004 10:33 AM WARNING: TO REDUCE THE RISK OF FIRE OR ELECTRIC SHOCK, DO NOT EXPOSE THIS APPLIANCE TO RAIN OR MOISTURE. CAUTION: TO REDUCE THE RISK OF ELECTRIC SHOCK, DO NOT REMOVE COVER (OR BACK). NO USER-SERVICEABLE PARTS INSIDE. REFER SERVICING TO QUALIFIED SERVICE PERSONNEL.
TX-8011_E.book Page 3 Friday, July 30, 2004 10:33 AM Important Safeguards—Continued 17. Overloading—Do not overload wall outlets, extension cords, or integral convenience receptacles as this can result in a risk of fire or electric shock. 18. Object and Liquid Entry—Never push objects of any kind into the appliance through openings as they may touch dangerous voltage points or short-out parts that could result in a fire or electric shock. Never spill liquid of any kind on the appliance. 19.
TX-8011_E.book Page 4 Friday, July 30, 2004 10:33 AM Precautions 1. Recording Copyright—Unless it’s for personal use only, recording copyrighted material is illegal without the permission of the copyright holder. 2. AC Fuse—The AC fuse inside the TX-8011 Receiver is not user-serviceable. If you cannot turn on the TX-8011 Receiver, contact your Onkyo dealer. 3. Care—Occasionally you should dust the TX-8011 Receiver all over with a soft cloth.
TX-8011_E.book Page 5 Friday, July 30, 2004 10:33 AM Features Contents • 50 W/ch min. RMS at 8 ohms, both channels driven from 20 Hz to 20 kHz, with no more than 0.08% THD. • Discrete output stage circuits for true high-current, low-impedance drive. • Expensive, high-quality parts, such as high-power transistors, an oversized power transformer, and heavy duty extruded heatsink, make it possible to accurately and effortlessly drive 4-ohm speakers.
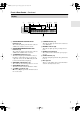
TX-8011_E.book Page 6 Friday, July 30, 2004 10:33 AM Front & Rear Panels Front Panel 2 34 1 M N 5 6 O For detailed information, refer to the pages in parentheses. A STANDBY/ON button (16) This button is used to set the TX-8011 to On or Standby. B STANDBY indicator (16) This indicator lights up when the TX-8011 is in Standby mode, and it flashes while a signal is being received from the remote controller. C Remote control sensor (10) This sensor receives control signals from the remote controller.
TX-8011_E.book Page 7 Friday, July 30, 2004 10:33 AM Front & Rear Panels—Continued Display 1 23 STEREO MODE 4 5 SPEAKERS A B T-2 MONITOR AUDIO MUTE 6 78 FM MUTE ON OFF TUNED STEREO MEMORY 9J GROUP A B C SLEEP AUTO kHz MHz MONO CH MIN K A STEREO MODE AUTO/FM MUTE ON B C D E F indicators (19) These indicators light up when the tuner is tuned to an FM station and Stereo mode is selected.
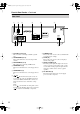
TX-8011_E.book Page 8 Friday, July 30, 2004 10:33 AM Front & Rear Panels—Continued Rear Panel 1 3 2 5 4 6 AM REMOTE CONTROL ANTENNA GND FM 75 SPEAKERS R IN IN OUT IN OUT L L AC OUTLET IN A A B B R R PHONO CD 78 TAPE 1 TAPE 2 C D E F 8 J 9 A Grounding screw (14) B AC 120V 60Hz SWITCHED 120W 1A MAX. L This screw is for connecting a turntable’s ground wire. AM ANTENNA (12, 13) These push terminals are for connecting an AM antenna.
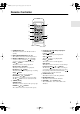
TX-8011_E.book Page 9 Friday, July 30, 2004 10:33 AM Remote Controller 1 TAPE-1 2 SLEEP POWER INPUT SELECTOR TUNER PHONO 6 CD TAPE-2 DECK-A DECK-B 3 4 GROUP TUNER PRESET MUTING 7 CD 5 DISC VOLUME 8 REMOTE CONTROLLER RC-330S A POWER button (16) E CD (works only with Onkyo CD players This button is used to set the TX-8011 to On or standby. B INPUT SELECTOR buttons (17, 19) These buttons are used to select the input sources.
TX-8011_E.book Page 10 Friday, July 30, 2004 10:33 AM Remote Controller—Continued Installing the Batteries 1 Open the battery compartment, as shown. Using the Remote Controller To use the remote controller, point it at the TX-8011’s remote control sensor, as shown below. Remote control sensor 2 3 Insert the two supplied batteries (AA/R6) in accordance with the polarity diagram inside the battery compartment. Close the battery compartment.
TX-8011_E.book Page 11 Friday, July 30, 2004 10:33 AM Connections • If you want to connect a single speaker instead of a pair, connect it to either the left or right speaker terminals, not both. Connecting Speakers Before you connect your speakers, read the following: • Disconnect the power cord from the wall outlet. • Read the instructions supplied with your speakers. • Pay close attention to speaker wiring polarity.
TX-8011_E.book Page 12 Friday, July 30, 2004 10:33 AM Connections—Continued Connecting the Supplied FM & AM Indoor Antennas ANTENNA AM REMOTE CONTROL ANTENNA GND FM 75 SPEAKERS R IN IN OUT IN OUT L L AC OUTLET IN A A B B L R AC 120V 60Hz SWITCHED 120W 1A MAX. R PHONO CD TAPE 1 TAPE 2 Adjusting the Position of the FM Indoor Antenna The FM indoor antenna is for indoor use only. Extend the antenna fully and point it in various directions to find the best reception.
TX-8011_E.book Page 13 Friday, July 30, 2004 10:33 AM Connections—Continued Connecting an Outdoor FM Antenna Connecting an Outdoor AM Antenna If you cannot achieve good reception with the supplied indoor FM antenna, try a commercially available outdoor FM antenna instead. If good reception cannot be achieved using the supplied AM loop antenna, an outdoor AM antenna can be used in addition to the loop antenna, as shown.
TX-8011_E.book Page 14 Friday, July 30, 2004 10:33 AM Connections—Continued TAPE 2 Connecting a CD Player Use an RCA audio cable to connect the TX-8011’s CD IN L/R jacks to the analog audio output jacks on your CD player, as shown.
TX-8011_E.book Page 15 Friday, July 30, 2004 10:33 AM Connections—Continued Connecting Components With (Remote Interactive) you can control your -compatible Onkyo CD player and cassette recorder with the TX-8011’s remote controller, and use the following special functions: Direct Change When playback is started on a component connected via , the TX-8011 automatically selects that component as the input source.
TX-8011_E.book Page 16 Friday, July 30, 2004 10:33 AM Connections—Continued Connecting the Power Cord Notes: • Before connecting the power cord, connect all of your speakers and components. • Turning on the TX-8011 may cause a momentary power surge that might interfere with other electrical equipment on the same circuit. If this is a problem, plug the TX-8011 into a different branch circuit.
TX-8011_E.book Page 17 Friday, July 30, 2004 10:33 AM Playing Your Components This chapter explains how to use the TX-8011 with your other components. TUNING SPEAKERS A/B VOLUME Input selector Using a Graphic Equalizer You can use a graphic equalizer by connecting it to the TAPE 2 IN/OUT jacks and selecting TAPE 2. 1 Press the [TAPE 2 MONITOR] button to select TAPE 2. The T-2 MONITOR indicator lights up. 2 Start playback on the selected component. See the graphic equalizer’s manual for details.
TX-8011_E.book Page 18 Friday, July 30, 2004 10:33 AM Playing Your Components—Continued Using the Sleep Timer With the sleep timer, you can set the TX-8011 so that it automatically turns off after a specified period. 1 SLEEP Press the remote controller’s [SLEEP] button repeatedly to select the required sleep time. You can set the sleep time from 90 to 10 minutes in 10-minute steps. The SLEEP indicator appears on the display when the sleep timer has been set, as shown.
TX-8011_E.book Page 19 Friday, July 30, 2004 10:33 AM Using the Tuner With the built-in tuner, you can enjoy AM and FM radio stations, and you can store your favorite stations as presets for quick selection. TUNING Manual Tuning Mode 1 Number MEMORY VOLUME Press the TUNING Up or Down [ ]/[ ] button. Press the buttons repeatedly to change the frequency one step at a time. The FM frequency changes in 0.1 MHz steps; 10 kHz steps for AM.
TX-8011_E.book Page 20 Friday, July 30, 2004 10:33 AM Using the Tuner—Continued Presetting Radio Stations Deleting Presets You can store up to 30 of your favorite radio stations as presets, 10 in each group (A, B, C). 1 Tune into the station that you want to store as a preset. 2 Press the [MEMORY] button. The MEMORY indicator appears. MEMORY CH MHz 3 While the MEMORY indicator is displayed (about eight seconds), press the [GROUP] button repeatedly to select a group.
TX-8011_E.book Page 21 Friday, July 30, 2004 10:33 AM Recording This chapter explains how to record the selected input source to an audio component with recording capability, and how to dub from one cassette recorder to another. Recording the Input Source The effect of a graphic equalizer connected to the TAPE 2 IN/OUT jacks will not be recorded. 1 Use the input selector buttons to select the component that you want to record. • You can connect your recorder to the TAPE 1 or TAPE 2 OUT jacks.
TX-8011_E.book Page 22 Friday, July 30, 2004 10:33 AM Troubleshooting If you have any trouble using your TX-8011, look for a solution in this section. If you can’t resolve the issue yourself, contact your Onkyo dealer. Power Can’t turn on the TX-8011? • Make sure that the power cord is properly plugged into the wall outlet. • Unplug the power cord from the wall outlet, wait five seconds or more, then plug the cable in again.
TX-8011_E.book Page 23 Friday, July 30, 2004 10:33 AM Specifications Amplifier Section General Power Output Power Supply AC 120 V, 60 Hz Power Comsumption 180 W Stand-by Power Comsumption 1.35 W Dimensions(W x H x D) 17-1/8" x 5-7/8" x 12-11/16" inches 435 x 150 x 322 mm Weight 16.3 lbs 7.
TX-8011_E.book Page 24 Friday, July 30, 2004 10:33 AM Sales & Product Planning Div. : 2-1, Nisshin-cho, Neyagawa-shi, OSAKA 572-8540, JAPAN Tel: 072-831-8023 Fax: 072-831-8124 ONKYO U.S.A. CORPORATION 18 Park Way, Upper Saddle River, N.J. 07458, U.S.A. Tel: 201-785-2600 Fax: 201-785-2650 http://www.onkyousa.com ONKYO EUROPE ELECTRONICS GmbH Liegnitzerstrasse 6, 82194 Groebenzell, GERMANY Tel: +49-8142-4401-0 Fax: +49-8142-4401-555 http://www.onkyo.