Contents DAB/FM Tuner Introduction ..................................En-2 T-4030 Instruction Manual Connections .............................. En-10 Enjoying Audio Sources...... En-14 Thank you for purchasing an Onkyo Tuner. Please read this manual thoroughly before making connections and plugging in the unit. Following the instructions in this manual will enable you to obtain optimum performance and listening enjoyment from your new Tuner. Please retain this manual for future reference.
WARNING: TO REDUCE THE RISK OF FIRE OR ELECTRIC SHOCK, DO NOT EXPOSE THIS APPARATUS TO RAIN OR MOISTURE. CAUTION: TO REDUCE THE RISK OF ELECTRIC SHOCK, DO NOT REMOVE COVER (OR BACK). NO USER-SERVICEABLE PARTS INSIDE. REFER SERVICING TO QUALIFIED SERVICE PERSONNEL.
Precautions 1. Recording Copyright—Unless it’s for personal use only, recording copyrighted material is illegal without the permission of the copyright holder. 2. AC Fuse—The AC fuse inside the unit is not userserviceable. If you cannot turn on the unit, contact your Onkyo dealer. 3. Care—Occasionally you should dust the unit all over with a soft cloth. For stubborn stains, use a soft cloth dampened with a weak solution of mild detergent and water. Dry the unit immediately afterwards with a clean cloth.
Features ❑ ❑ ❑ ❑ ❑ ❑ ❑ ❑ ❑ ❑ ❑ ❑ ❑ ❑ En-4 DAB+/DAB Capability Digital Outputs (Optical/Coaxial) 40 FM and 40 DAB+/DAB Preset FM Digital Output Capability RDS Preset Station Naming (Up to 8 Characters) Automatic/Manual Tuning FM Mono Mode for Weak Signals Hi-Rigidity, Anti-Resonant Full Flat Chassis to Prevent Vibrations Aluminum Front Panel Audiophile Grade Capacitor Remote Interactive (R) System Compatible Battery-Free Memory Back-Up Supplied accessories include DAB antenna, audio and R cables
Contents Important Safety Instructions............................ 2 Precautions ......................................................... 3 Features ............................................................. 4 Supplied Accessories ........................................ 6 Installing the Batteries............................................... 6 Aiming the Remote Controller.................................. 6 Getting to Know the Tuner ................................ 7 Front Panel ......................
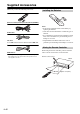
Supplied Accessories Make sure you have the following accessories: Installing the Batteries Remote controller (RC-852T) and two batteries (AAA/R03) Audio cable R cable To use R, T-4030 must be connected with an R cable. Notes: • If the remote controller doesn’t work reliably, try replacing the batteries. • Don’t mix new and old batteries or different types of batteries. • If you intend not to use the remote controller for a long time, remove the batteries to prevent damage from leakage or corrosion.
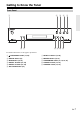
Getting to Know the Tuner Front Panel a 2 3 4 5 8 9 jk 67 For detailed information, see the pages in parentheses.
Getting to Know the Tuner—Continued Rear Panel 1 2 3 4 5 For detailed information, see the pages in parentheses. a AUDIO OUTPUT jacks (11, 12) b R REMOTE CONTROL jack (11, 12, 13) c DIGITAL OUT COAXIAL and OPTICAL jacks See “Connecting Antennas”, “Connecting Your Components” for connection (J pages 10 to 13). (11, 12) d DAB/FM ANTENNA jack (10) e POWER CODE Display 1 For detailed information, see the pages in parentheses.
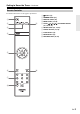
Getting to Know the Tuner—Continued Remote Controller For detailed information, see the pages in parentheses. a 2 9 3 4 a b c d e k button (13) f g h i j SETUP button (16, 19, 21) DIMMER button (21) DISPLAY button (18) BAND button (14, 18) Arrow [D]/[F]/[A]/[S] and ENTER buttons (14, 16, 18, 21) Number buttons (15, 16) D.
Connecting Antennas This section explains how to connect the supplied DAB/FM antenna. The tuner won’t pick up any radio signals if no antenna is connected, so you must connect the antenna to use the tuner. Connecting the DAB/FM Antenna 1 Screw the supplied DAB/FM antenna’s plug onto the DAB/FM ANTENNA jack. Once your tuner is ready for use, you’ll need to tune into a FM radio station or a DAB station and adjust the position of the DAB/FM antenna to achieve the best possible reception.
Connecting Your Components Before Making Any Connections • Refer to the instructions that came with the component you are connecting. • Do not plug in the power cord until all other connections are complete. • Do not bind audio cables with power cords and speaker cables. Doing so may adversely affect the sound quality. • To prevent interference, keep power cords and speaker cables as far away as possible from the antennas.
Connecting Your Components—Continued Connecting to an Amplifier R Connection T-4030 Analog Connection T-4030 Supplied R cable Supplied audio cable Amplifier Amplifier Use the supplied audio cable to connect the T-4030’s AUDIO OUTPUT L/R jacks to the LINE IN jacks on your amplifier, as shown. Digital (Optical or Coaxial) Connection T-4030 Connect either of them.
Connecting Your Components—Continued Connecting Onkyo R Components If you connect the T-4030 to another Onkyo R-capable component with the supplied R cable and audio cable, you can use the following system functions. R cables are special cables solely for use with Onkyo products. Auto Power On When you turn on the T-4030, your Onkyo amplifier will turn on automatically. (The amplifier’s POWER switch must be set to ON for this to work.
Listening to the Radio Manual Tuning To activate this mode, press the [TUNING MODE] button to turn off the “AUTO” indicator. In this mode, you will receive the broadcast in monaural sound. Listening to FM Stations With the built-in tuner, you can enjoy FM radio stations. BAND 3 TUNING MODE TUNING MODE / Use the tuner’s [BAND] button, or the remote controller’s [BAND] button to select FM. Band Frequency (Actual display depends on the country.
Listening to the Radio—Continued ■ Tuning into Stations by Frequency You can tune to FM stations directly by entering the appropriate frequency. Presetting FM Stations PRESET AUTO SCAN MEMORY TUNING MODE TUNING Number buttons &,(,#,5, ENTER D.TUN 1 Press the remote controller’s [D.TUN] button. SETUP Number buttons (Actual display depends on the country.) 2 Within 8 seconds, use the number buttons to enter the frequency of the radio station. For example, to tune to 87.50 (FM), press 8, 7, 5, 0.
Listening to the Radio—Continued ■ Selecting Presets To select a preset, use the number buttons on the remote controller, the remote controller’s arrow [A]/[S] buttons or the tuner’s PRESET [a]/[s] buttons. 4 When you’ve finished editing the name and want to store it, be sure to use the arrow [D]/[F]/[A]/[S] button to select “OK” and then press [ENTER]. If you fail to do this, the name won’t be saved. ■ Deleting Presets 1 Select the preset that you want to delete.
Listening to the Radio—Continued Using RDS RDS only works in areas where RDS broadcasts are available. When tuned into an RDS station, the RDS indicator appears. RDS indicator ■ What is RDS? RDS stands for Radio Data System and is a method of transmitting data embedded in FM radio signals. It was developed by the European Broadcasting Union (EBU) and is available in most European countries. Many FM stations use it these days.
Listening to the Radio—Continued Listening to DAB Digital Radio Using the Scan Function Manually With the built-in tuner, you can enjoy DAB digital radio. BAND TUNING 1 &,(,#,5, ENTER SETUP RETURN Press the tuner’s [BAND] button, or the remote controller’s [BAND] button to select “DAB”. When tuned into a DAB station, the station name will be displayed. 1 Press and hold the [AUTO SCAN] button for 3 seconds to start Auto Tuning function. To cancel Auto Tuning, press the [ENTER] button.
Listening to the Radio—Continued ■ DAB Scan This setting determines which DAB bands are scanned by the Auto Tuning function (see page 18). U.K: Band III (11B–12D). W.W (default):Band III (5A–13F). 2. Program Type Displays the type of program. 3. Bit Rate and Audio Mode Displays the station’s bit rate and audio mode (stereo, mono, or joint stereo). 4. Signal Quality Displays the signal quality.
Listening to the Radio—Continued Displaying Radio Text (RT) PS/RT/PTY When tuned to an RDS station that’s broadcasting text information, the text can be displayed. 1 Press the [PS/RT/PTY] button once. The RT information scrolls across the display. Notes: • The message “Waiting” may appear while the tuner waits for the RT information. • If the message “No Text Data” appears on the display, no RT information is available.
Advanced Setup Setting the Display Brightness You can adjust the brightness of the display. 4 Press the [ENTER] button on the remote controller to complete the setting. Note: • Press [RETURN] to return to the previous menu. Advanced Setup Menu DIMMER Auto Standby 1 Press the remote controller’s [DIMMER] button repeatedly to select: dim, dimmer, or normal brightness.
Troubleshooting If you have any trouble using the tuner, look for a solution in this section. If you can’t resolve the issue yourself, try resetting the tuner before contacting your Onkyo dealer. To reset the tuner to its factory defaults, turn it on and, while holding down the [TUNING MODE] button, press the [k ON/STANDBY] button. Note that resetting the tuner will delete your radio presets and custom settings.
Specifications Tuner Section ■ FM Tuning Frequency Range 87.5 MHz– 108.0 MHz RDS Preset Channel 40 Signal-to-noise ratio Stereo: 60 dB (IHF-A) Mono: 74 dB (IHF-A) THD (total harmonic distortion) Stereo: 1.0 % (1 kHz) Mono: 0.2 % (1 kHz) Frequency response 20 Hz–15 kHz / +1.5 dB, -4.0 dB Stereo Separation 40 dB (1 kHz) ■ DAB/DAB+ Tuning Frequency Range Band III: 174.928 MHz–239.200 MHz Preset Channel 40 General Power Supply AC 230 V, 50 Hz Power Consumption 8W Stand-by Power Consumption 0.
2-1, Nisshin-cho, Neyagawa-shi, OSAKA 572-8540, JAPAN Tel: 072-831-8023 Fax: 072-831-8163 http://www.onkyo.com/ 18 Park Way, Upper Saddle River, N.J. 07458, U.S.A. Tel: 800-229-1687, 201-785-2600 Fax: 201-785-2650 http://www.us.onkyo.com/ Liegnitzerstrasse 6, 82194 Groebenzell, GERMANY Tel: +49-8142-4401-0 Fax: +49-8142-4208-213 http://www.eu.onkyo.