Preamplifier P-3000R Instruction Manual En
Introduction WARNING: TO REDUCE THE RISK OF FIRE OR ELECTRIC SHOCK, DO NOT EXPOSE THIS APPARATUS TO RAIN OR MOISTURE. CAUTION: TO REDUCE THE RISK OF ELECTRIC SHOCK, DO NOT REMOVE COVER (OR BACK). NO USER-SERVICEABLE PARTS INSIDE. REFER SERVICING TO QUALIFIED SERVICE PERSONNEL.
Precautions 1. Recording Copyright—Unless it’s for personal use only, recording copyrighted material is illegal without the permission of the copyright holder. 2. AC Fuse—The AC fuse inside the unit is not userserviceable. If you cannot turn on the unit, contact your Onkyo dealer. 3. Care—Occasionally you should dust the unit all over with a soft cloth. For stubborn stains, use a soft cloth dampened with a weak solution of mild detergent and water. Dry the unit immediately afterwards with a clean cloth.
For British models Replacement and mounting of an AC plug on the power supply cord of this unit should be performed only by qualified service personnel.
Features • DIDRC (Dynamic Intermodulation Distortion Reduction Circuitry) • Separate Digital/Analog Circuitry • Separate Massive Transformers for Digital/Analog Circuitry (Toroidal Transformer for Analog Circuitry) • Separate Anti-Vibration Aluminum Panels for Top, Front, and Sides • Side-mounted Circuit Board Construction to Reduce Vibration • PLL Ultra-Low Jitter Technology • Sampling Rate Converter (Up to 192 kHz) • Separate TI (Burr-Brown) 192 kHz/32-Bit DACs (PCM1795) for L/R Channels • Direct Mode • T
Technologies DIDRC (Dynamic Intermodulation Distortion Reduction Circuitry) Since the advent of digital audio, the values of S/N (signal-to-noise) ratio have risen significantly. However, it is also recognized that in terms of perceived S/N, analog audio sources are not inferior to digital sources. Generally, S/N measures the ratio when sound is and not produced, but takes no account of the noise generated during sound reproduction.
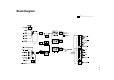
Block Diagram DIDRC (Dynamic Intermodulation Distortion Reduction Circuitry) En 7
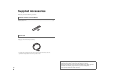
Supplied Accessories Make sure you have the following accessories: Remote controller and two batteries Remote controller (RC-797S) . . . . . . . . . . . . . . . . . . . . . . . . . . . . . . . . . . . . . . . . . . . . . (1) Batteries (R03/AAA) . . . . . . . . . . . . . . . . . . . . . . . . . . . . . . . . . . . . . . . . . . . . . . . . . . . . (2) Power cord Power cord (1.8 m/5.9 ft) . . . . . . . . . . . . . . . . . . . . . . . . . . . . . . . . . . . . . . . . . . . . . . . . .
Contents Introduction Important Safety Instructions .................................................................................2 Precautions...............................................................................................................3 Features ....................................................................................................................5 Technologies ............................................................................................................
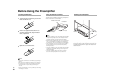
Before Using the Preamplifier Installing the Batteries 1 To open the battery compartment, press the small hollow and slide the cover. Using the Remote Controller Installing the Preamplifier To use the remote controller, point it at the preamplifier’s remote control sensor, as shown below. Remote control sensor Preamplifier 20 cm (8") 2 30° off center (Left/Right) Insert the two supplied batteries (R03/AAA) in accordance with the polarity diagram inside the battery compartment. Approx. 16 ft.
Getting to Know the Preamplifier Front Panel The page numbers in parentheses show where you can find the main explanation for each item. ON/STANDBY button (➔ 25) Sets the preamplifier to On or Standby. Standby LED (➔ 25) Lights when the preamplifier is in Standby mode. Multi jog dial (➔ 29) Selects the input sources in sequence. The input sources are “CD”, “LINE 1”, “LINE 2”, “LINE 3”, “COAX1”, “COAX2”, “OPT1”, “OPT2”, “AES/EBU”, “USB”*, “PHONO”. It is also used for various settings.
Display For detailed information, see the pages in parentheses. PCM indicator Lights when it detects digital audio signal input. It blinks when nothing is detected. fs indicator (➔ 28) Lights when sampling rate is displayed. Message area Displays various information. En 12 MUTING indicator (➔ 27) Flashes while the preamplifier is muted. Headphone indicator (➔ 29) Lights when a pair of headphones are plugged into the PHONES jack.
Rear Panel GND screw This screw is for connecting a turntable’s ground wire. PHONO IN L/R jacks These analog audio inputs are for connecting a turntable (MM). CD IN L/R jacks These analog audio inputs are for connecting a compact disc player. LINE 1/2 IN L/R jacks These analog audio inputs are for connecting a playback device. To input audio output (preout) to the preamplifier from the AV receiver, set “L2 OUT” to “THROUGH”. The PRE OUT output of the preamplifier is fixed at 0 dB.
Remote Controller For detailed information, see the pages in parentheses. button (➔ 25) Sets the preamplifier to On or Standby. DIMMER button (➔ 28) Adjusts the display brightness. INPUT SELECTOR buttons (CD, PHONO, LINE 1, LINE 2, LINE 3, COAXIAL, OPTICAL, AES/EBU, USB) (➔ 26) Selects an input source. / / / and ENTER buttons Used to select and adjust settings. VOLUME / button (➔ 26) Adjusts the volume of the preamplifier. SETUP button Used to start the setup.
Connections Connections Cable and Jacks Balanced AES/EBU This is a professional digital audio interface. Balanced AES/EBU cables are used for better noise immunity and longer cable runs. The maximum sampling rate for PCM input is 192 kHz/24 bit, 2ch. USB digital audio Optical digital audio USB USB digital connections allow you to enjoy digital sound. The preamplifier supports high-speed USB 2.0. Use Type A-B USB cable. The maximum sampling rate for PCM input is 192 kHz/32 bit, 2ch.
Connecting the Power Cord AC INLET Preamplifier P-3000R Supplied power cord To an AC wall outlet (Plug type varies from country to country.) 1 En 16 Make sure that the main power of the preamplifier is turned off. 2 Connect all of your components. 3 Connect the supplied power cord to the preamplifier’s AC INLET. 4 Plug the power cord into an AC wall outlet. Tip • To reduce noise, do not tie the signal cable and power cable together. Wire them so that they are away from each other.
Connecting a Compact Disc Player Analog Connection Digital (Optical or Coaxial) Connection Preamplifier P-3000R Preamplifier P-3000R L R Connect either of them.
Digital AES/EBU Connection Preamplifier P-3000R Connecting the Onkyo Dock Preamplifier P-3000R Connect either of them. OPTICAL COAXIAL Compact Disc Player C-7000R ON /ST AN DB Y ST AN DB Y iP o d PC UN SYN SY C/ NC Digital Media Transport Note • You need to change the selector name to use • Use only cables for connections. function (➔ 33). cables are supplied with Onkyo Docks. • Connect only Onkyo Dock to jacks. Connecting other manufacturer’s components may cause a malfunction.
Connecting a Turntable Connecting a Cassette Tape Deck Preamplifier P-3000R Preamplifier P-3000R L L R R L R AUDIO OUTPUT L Turntable (MM) without a built-in phono preamp Remove the short pins plugged into the jacks before connecting a turntable to the PHONO inputs. R AUDIO OUT Cassette tape deck Connecting a Recording Component Preamplifier P-3000R Tip • If your turntable (MM) has a phono built-in preamp, you can connect to other analog inputs such as CD IN or LINE 1 IN.
Connecting a Power Amplifier Stereo Connection Preamplifier P-3000R Power Amplifier M-5000R Right speaker This is an example of the stereo connection using the power amplifier M-5000R.
Bi-amping Connection Preamplifier P-3000R Power Amplifier M-5000R Power Amplifier M-5000R Tweeter (high) Tweeter (high) Woofer (low) Woofer (low) Right speaker Left speaker This is an example of the bi-amping connection using the power amplifier M-5000R. Important: • When making the bi-amping connections, be sure to remove the jumper bars that link the speakers’ tweeter (high) and woofer (low) terminals. • Bi-amping can be used only with speakers that support bi-amping. Refer to your speaker manual.
Stereo Connection (Optional) Preamplifier P-3000R ■ Connecting an AV Receiver If you connect analog audio to an AV receiver, the output will be stereo. Connect either of them. Power Amplifier M-5000R Digital optical input L R Analog audio input Right speaker Left speaker This is an example of the stereo connection using the power amplifier M-5000R. Note • If you make a digital audio connection between the preamplifier and AV receiver, analog input signal is not output from DIGITAL OUT.
Using Stereo Speakers as the Front Speakers for Your Surround Sound System Preamplifier P-3000R Note L L R R • To adjust the volume of the front speakers by the AV receiver, you must set the “L2 OUT” setting to “THROUGH” (➔ 35). • When plugging other components such as compact disc players into the LINE 2 jack, change the “L2 OUT” setting to “NORMAL” (➔ 35).
Connecting the Powered Subwoofers ■ 2.1 channel system (2 speakers and 1 subwoofer) ■ 2.2 channel system (2 speakers and 2 subwoofers) Preamplifier P-3000R Preamplifier P-3000R Power Amplifier M-5000R Power Amplifier M-5000R Right speaker Left speaker Right speaker LINE INPUT MONO Left speaker LINE INPUT MONO LINE INPUT R L Powered subwoofer Powered subwoofer This connection is not available for subwoofers that handle only mono input. A separate conversion cable is required.
Turning On & Basic Operations Basic Operations Turning On/Off the Preamplifier Turning On the Preamplifier ON/STANDBY 1 Set POWER to the ON position ( ) on the front panel. 2 Press to turn on the preamplifier. The preamplifier comes on, the display lights, and the Standby LED goes off. Turning Off the Preamplifier 1 You can also use preamplifier’s ON/STANDBY. 2 POWER You can also use preamplifier’s ON/STANDBY.
Adjusting the Volume Selecting the Input Source Hiding the Digital Source Display INPUT SELECTOR VOLUME / DIGITAL 1 Use VOLUME / to adjust the volume. You can also use preamplifier’s volume controller. 1 Use INPUT SELECTOR to select the input source. The COAXIAL and OPTICAL toggle every time they are pressed in the sequence of COAXIAL (COAX1 → COAX2) and OPTICAL (OPT1 → OPT2) respectively. You can also use preamplifier’s Multi jog dial to switch input sources in sequence.
Adjusting the Bass, Treble and Balance , ENTER Muting the Sound 3 Press ENTER. 4 Press / to adjust the value. The setting has been established. `BASS `TREBLE The value changes by 2 dB and can be set from – 8 dB to +8 dB. MUTING SETUP You can adjust the bass, treble and balance. 1 Press SETUP. 2 Press / to select “BASS”, “TREBLE” or “BALANCE”. 1 `BALANCE The left and right output balance can be adjusted. Press MUTING to mute the out of the preamplifier.
Using the Direct Function Adjusting the Display Brightness Changing the Display information Display Off LED Direct LED DIRECT DISPLAY You can display the selected selector or the setting value. DIMMER 1 1 Press DISPLAY to switch the display in sequence. Selector Press DIRECT on the preamplifier to turn the Direct function on or off. When the Direct function is off, the tone controls can be used to adjust the sound.
Using Headphones Using MODE button Multi jog dial MODE 1 Connect a pair of stereo headphones with a standard plug (1/4 inch or 6.3 mm) to the PHONES jack. The Headphone indicator lights on the display. indicator You can adjust the volume and mute the sound, by using VOLUME / . While headphones are connected, the PRE OUT output no sound. Settings with SETUP of the remote controller can be also operated with the preamplifier. 1 Press MODE repeatedly to select the item.
Playing the Onkyo Compact Disc Player Playback CD ■ To Select Songs Press to select the next song or previous song. to select the ■ To Fast-Forward or Fast-Reverse During playback or while playback is paused, hold down to fast-forward or to fast-reverse. For MP3/WMA CDs, fast-reverse only works within the MP3/WMA file that’s currently playing. Playback mode buttons The Onkyo compact disc player connected to the preamplifier is played from its remote controller.
Playing Music Files on the PC Connecting the PC Installing a USB Driver Playing Music Files on the PC To playback the audio data stored on your PC by using the preamplifier via USB port connection, you must install the driver on your PC from the Onkyo website. For the installation procedure, see the Onkyo Web site. USB USB 1 Press USB to switch the input to the USB selector. You can also use preamplifier’s Multi jog dial. PC 2 Play music files on the PC.
Controlling iPod & Other Components Using an Onkyo Dock Playing Music Files on iPod Onkyo Dock ■ To Start Playback Press / or ENTER to start playback. , , ENTER , , ■ To Select a music file Use / to select a music file. ■ To Select Songs Press to select the next song or song. Dock control buttons Connect an Onkyo Dock to the preamplifier, and play music files on iPod.
Advanced Operations Custom Setup Changing the Selector Name Selecting the Sampling Rate Conversion Setting the Bi-amp Level DISPLAY , ENTER You can switch the selector name to DC/DIG to run as the DOCK selector. SETUP SRC 1 2 Select the Digital input source (COAX1, COAX2, OPT1, OPT2) to change the selector name. Press DISPLAY for 3 seconds. “DC/DIG” is displayed on the display. ■ To cancel the assignment Press DISPLAY again for 3 seconds.
Setting the Headphone Level Selecting the Analog Audio Out See “Using MODE button” to perform this procedure on the preamplifier (➔ 29). , , ENTER ENTER Tip Usage example of RECOUT: • Perform recording by connecting the turntable to P-3000R (PHONO IN jack), and the cassette tape deck to LINE 3 (IN/OUT jack) of P-3000R. Note SETUP You can set the volume when using headphones. 1 Press SETUP.
Setting ASb (Auto Standby) 5 Press ENTER. “FINISH” appears on the display. 4 Press / to switch between “NORMAL” and “THROUGH”. `NORMAL: You can adjust the PRE OUT volume by the preamplifier’s volume controller when the signal coming from the LINE 2 IN is output from the PRE OUT. `THROUGH: The PRE OUT output of the preamplifier is fixed. 5 Press ENTER. “FINISH” appears on the display. Display Off LED You can also use preamplifier’s MODE and Multi jog dial.
Others Troubleshooting If you have any trouble using the preamplifier, look for a solution in this section. ■ How to reset to factory default? 1. After setting the volume higher than the minimum level, press ON/STANDBY while holding down MODE on the preamplifier. 2. “CLEAR” appears on the display, then the preamplifier will automatically go Standby. Do not operate the preamplifier while “CLEAR” is displayed. Note that resetting the preamplifier will delete your custom settings.
PC Playback Can’t playing the music files on the PC. • Make sure that the USB cable is plugged in firmly (➔ 15). • Make sure that the USB driver is installed successfully (➔ 31). Can’t control properly by using the remote controller. • Make sure that the cable is connected to the preamplifier correctly. You need to change the selector name to use function (➔ 33). External Components Can’t display the sampling rate correctly. No sound is heard from a connected component.
Specifications P-3000R THD+N (Total Harmonic Distortion+Noise) Input Sensitivity and Impedance (Unbalance) Rated RCA Output Level and Impedance Maximum RCA Output Level and Impedance Phono Overload Frequency Response Tone Control Characteristies Signal to Noise Ratio Power Supply Power Consumption Standby Power Consumption Dimensions (W × H × D) Weight 0.005 % (20 Hz - 20 kHz, Power Rated) 200 mV/47 kΩ (LINE) 2.7 mV/47 kΩ (PHONO MM) 1 V/330 Ω (PRE OUT) 5.0 V/ 330 Ω (PRE OUT) 80 mV (MM 1 kHz 0.
Memo En 39
2-1, Nisshin-cho, Neyagawa-shi, OSAKA 572-8540, JAPAN Tel: 072-831-8023 Fax: 072-831-8163 http://www.onkyo.com/ 18 Park Way, Upper Saddle River, N.J. 07458, U.S.A. Tel: 800-229-1687, 201-785-2600 Fax: 201-785-2650 http://www.us.onkyo.com/ Liegnitzerstrasse 6, 82194 Groebenzell, GERMANY Tel: +49-8142-4401-0 Fax: +49-8142-4401-555 http://www.eu.onkyo.