Contents Network Stereo Receiver Introduction ..................................En-2 TX-8050 Instruction Manual Connections .............................. En-10 Enjoying Audio Sources...... En-18 Thank you for purchasing an Onkyo Network Stereo Receiver. Please read this manual thoroughly before making connections and plugging in the unit. Following the instructions in this manual will enable you to obtain optimum performance and listening enjoyment from your new Stereo Receiver.
WARNING: TO REDUCE THE RISK OF FIRE OR ELECTRIC SHOCK, DO NOT EXPOSE THIS APPARATUS TO RAIN OR MOISTURE. CAUTION: TO REDUCE THE RISK OF ELECTRIC SHOCK, DO NOT REMOVE COVER (OR BACK). NO USER-SERVICEABLE PARTS INSIDE. REFER SERVICING TO QUALIFIED SERVICE PERSONNEL.
Precautions 1. Recording Copyright—Unless it’s for personal use only, recording copyrighted material is illegal without the permission of the copyright holder. 2. AC Fuse—The AC fuse inside the unit is not userserviceable. If you cannot turn on the unit, contact your Onkyo dealer. 3. Care—Occasionally you should dust the unit all over with a soft cloth. For stubborn stains, use a soft cloth dampened with a weak solution of mild detergent and water. Dry the unit immediately afterwards with a clean cloth.
Features Precautions—Continued For British models Replacement and mounting of an AC plug on the power supply cord of this unit should be performed only by qualified service personnel.
Contents Important Safety Instructions............................ 2 Precautions ......................................................... 3 Features ............................................................. 4 Supplied Accessories ........................................ 6 Installing the Batteries............................................... 6 Aiming the Remote Controller.................................. 6 Getting to Know the Receiver ........................... 7 Front Panel ........................
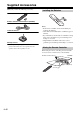
Supplied Accessories Make sure you have the following accessories: Installing the Batteries Remote controller and two batteries (AAA/R03) Indoor FM antenna AM loop antenna * In catalogs and on packaging, the letter at the end of the product name indicates the color. Specifications and operation are the same regardless of color. Notes: • If the remote controller doesn’t work reliably, try replacing the batteries. • Don’t mix new and old batteries or different types of batteries.
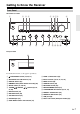
Getting to Know the Receiver Front Panel North American model a 2 3 4 j k l m 5 6 78 n o p q rst 9 u European model v For detailed information, see the pages in parentheses.
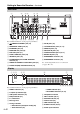
Getting to Know the Receiver—Continued Rear Panel a 8 9 b c4 j kl 5 6 mn o p 7 q r For detailed information, see the pages in parentheses.
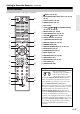
Getting to Know the Receiver—Continued Remote Controller For detailed information, see the pages in parentheses.
Connecting the Receiver Disconnect the power cord from the electrical outlet before making any connections. Speaker Connection Precautions The receiver allows you to connect two sets of speakers. When two sets of speakers are connected, you can select which speaker set outputs sound or use both sets to output sound simultaneously.
Connecting the Receiver—Continued Connecting a Powered Subwoofer Using a suitable cable, connect the receiver’s PRE OUT: SUBWOOFER to the input on your powered subwoofer. If your subwoofer is unpowered and you’re using an external amplifier, connect the PRE OUT: SUBWOOFER to the amp’s input.
Connecting the Receiver—Continued Configuring the Speaker Impedance On the receiver, the factory default for speaker impedance is “6 Ω”. If you need to change the speaker impedance setting, read “Speaker Connection Precautions” on page 10 carefully before performing the procedure below. Note: Be sure to minimize the volume level on the receiver before configuring the speaker impedance. 1 2 Press the [] button to turn on the power. 3 Use the arrow []/[] buttons to select “3.
Connecting Antennas This section explains how to connect the supplied indoor FM antenna and AM loop antenna. The receiver won’t pick up any radio signals if no antenna is connected, so you must connect the antenna to use the tuner. Insert the plug fully into the jack. Nortn american model Push Insert wire Release European model AM loop antenna (supplied) Indoor FM antenna (supplied) Assembling the AM loop antenna Thumbtacks, etc.
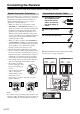
Connecting Your Components About AV Connections Connecting AV components Video Receiver Audio Blu-ray Disc/ DVD player TV, projector, etc. Game console • Before making any AV connections, read the manuals supplied with your AV components. • Don’t connect the power cord until you’ve completed and double-checked all AV connections. • Push plugs in all the way to make good connections Right! (loose connections can cause noise or malfunctions).
Connecting Your Components—Continued . No. Jack/Port Connectable components 1 USB 2 3 DIGITAL IN iPod/iPhone, MP3 player, USB flash drive OPTICAL 1 (GAME) 2 (CD) TV, CD player COAXIAL 1 (BD/DVD) Blu-ray Disc/DVD player 2 (CBL/SAT) Satellite/cable set-top box, RI dock, etc. UNIVERSAL PORT Game console Universal port option dock (UP-A1 etc.) 4 ETHERNET Router 5 MONITOR OUT TV, projector, etc.
Connecting Your Components—Continued Connecting Onkyo Components Analog audio cable Analog audio cable e.g., CD player cable 1 Make sure that each Onkyo component is connected with an analog audio cable (connection 6 in the hookup examples) ( page 15). 2 Make the connection (see the illustration).
Connecting Your Components—Continued Connecting a Recording Component See “Recording” for an explanation of recording ( page 22). Analog audio cable Analog audio cable Cassette tape deck, CDR, etc. Composite video cable VCR, DVD recorder, etc. Notes: • The receiver must be turned on for recording. Recording is not possible while it’s in Standby mode.
Turning On the Receiver MON/STANDBY M VCR/DVR GAME Turning On and Standby Press the [ON/STANDBY] button. Alternatively, press the remote controller’s [] button. The receiver comes on, and the display lights up. To turn the receiver off, press the [ON/STANDBY] button, or press the remote controller’s [] button. The receiver will enter Standby mode. To prevent any loud surprises when you next turn on the receiver, always turn down the volume before you turn it off.
Enjoying Audio Sources INPUT SELECTOR SPEAKERS A, B PHONES VOLUME INPUT VOLUME F/H MUTING 1 2 Rotate the receiver’s [INPUT] selector, or press the remote controller’s INPUT SELECTOR buttons to select the source you want to hear. Use the [SPEAKERS A] and [SPEAKERS B] buttons on the receiver to select the speaker set that you want to use. The A and B speaker indicators show whether each speaker set is on or off.
Enjoying Audio Sources—Continued MODE SLEEP BASS TREBLE BALANCE DIMMER Setting the Display Brightness You can adjust the brightness of the display. Press the remote controller’s [DIMMER] button repeatedly to select: dim, dimmer, or normal brightness. You can also use the receiver’s [DIMMER] button (not European model). Using the Sleep Timer (remote controller only) With the sleep timer, you can set the receiver so that it turns off automatically after a specified period.
Enjoying Audio Sources—Continued AUDIO PURE AUDIO Selecting the Listening Mode Press the remote controller’s [AUDIO] button repeatedly to select the listening mode. The setting will change as follows each time you press the [AUDIO] button. Stereo Direct Stereo (M.Opt: ON) Pure Audio Mono When the Stereo indication is shown, pressing the [AUDIO] button will make the display indicate “Music Optimizer: On” for several seconds, and the “M.Opt” indicator will also light.
Recording Unless you have the full consent of the copyright holder, copyright laws prohibit using your recordings for anything other than personal enjoyment! This section explains how to record the selected input source to a component with recording capability, and how to record audio and video from different sources. INPUT SELECTOR INPUT Recording the Input Source video signal audio signal Audio sources can be recorded to a recorder (e.g., cassette tape deck, CDR, MD recorder).
Listening to the Radio &/( TUNING F/H Number buttons INPUT TUNING MODE Listening to AM/FM Stations With the built-in tuner, you can enjoy AM and FM radio stations. 1 Use the receiver’s [INPUT] selector, or the remote controller’s INPUT SELECTOR buttons to select AM or FM. In this example, FM has been selected. Band Frequency (Actual display depends on the country.) 2 Press the [TUNING MODE] button so that the AUTO indicator appears or disappears from the display. D.
Listening to the Radio—Continued ■ Tuning into Stations by Frequency You can tune to AM and FM stations directly by entering the appropriate frequency. 1 Presetting AM/FM Stations Press the remote controller’s [D.TUN] button. MEMORY TUNING MODE (Actual display depends on the country.) 2 Within 8 seconds, use the number buttons to enter the frequency of the radio station. CH/ALBUM +/– For example, to tune to 87.5 (FM), press 8, 7, 5.
Listening to the Radio—Continued ■ Selecting Presets To select a preset, use the number buttons on the remote controller, the remote controller’s CH/ALBUM [+]/[–] buttons or the receiver’s PRESET []/[] buttons. Shift*1: Switches the displayed character. (Left)/(Right): Select these to move the cursor within the Name input area. Space: Enters a space character. ■ Deleting Presets 1 Select the preset that you want to delete. 2 While holding down the [MEMORY] button, press the [TUNING MODE] button.
Listening to the Radio—Continued Using RDS (European model only) RDS only works in areas where RDS broadcasts are available. When tuned into an RDS station, the RDS indicator appears. RDS indicator ■ What is RDS? RDS stands for Radio Data System and is a method of transmitting data embedded in FM radio signals. It was developed by the European Broadcasting Union (EBU) and is available in most European countries. Many FM stations use it these days.
Listening to the Radio—Continued Displaying Radio Text (RT) Listening to Traffic News (TP) RT/PTY/TP RT/PTY/TP INPUT When tuned to an RDS station that’s broadcasting text information, the text can be displayed. Press the [RT/PTY/TP] button once. The RT information scrolls across the display. Notes: • The message “Waiting” may appear while the receiver waits for the RT information. • If the message “No Text Data” appears on the display, no RT information is available.
Using the USB/Network Device Connecting the iPod/iPhone Directly to the USB Port 3 A list of your iPod model’s contents appears. To open a folder, use []/[] to select it, and then press [ENTER]. • With the default settings, the iPod/iPhone can be manipulated as Standard Mode*2. • Pressing [MODE] again switches back to Standard Mode. USB can be used to play music files stored on iPod/ iPhone, which can be plugged into the receiver’s USB port.
Using the USB/Network Device—Continued Playing the USB Device This section explains how to play music files from a USB device (e.g., USB flash drives and MP3 players). See also: “Network/USB Features” ( page 34). USB port USB REPEAT MODE U, J, I, Q, R, W, K RANDOM &, (, ENTER 1 Press [USB] button to select the “USB” input. 2 Plug your USB device into the receiver’s USB port. The USB appears in the display. It will flash if the receiver cannot read the USB device. 3 Press [ENTER].
Using the USB/Network Device—Continued Listening to the Internet Radio 3 You need to connect the receiver to your home network; see “Network/USB Features” ( page 34) You can select Internet radio stations by connecting to the receiver from your computer and selecting stations in your web browser. Internet radio URLs in the following formats are supported: PLS, M3U, and podcast (RSS).
Using the USB/Network Device—Continued Registering Presets*1 Playing Music Files on a Server You can add the currently playing song or station to “My Favorites”. You can preset up to 40 Internet radio stations. Once you’ve added a station to the list, simply select it in the “My Favorites” menu, and then press [ENTER] to start playback. *1 From the search results you can preset the stations and songs but cannot listen to them directly.
Using the USB/Network Device—Continued Tip: You can also use the receiver’s [MENU], [/], [] or [] buttons as follows. [MENU]: Hold down to move to the top menu. [/]: Start playback / Pause playback []: Select the beginning of the current song (hold down to fast reverse) []: Select the next song (hold down to fast forward) (These operations are available depending on the service and the items displayed.) 5 Use []/[] to select an item, and then press [ENTER] or [] to start playback.
Using the USB/Network Device—Continued 3 Use []/[] to select “DLNA”, and press [ENTER]. A list of media server appears. Note: Remote playback cannot be used while the music files of another media server are being played. You must stop their playback first. 4 On Windows Media Player 12, right-click on music file. Right-click menu appears. For selecting another media server, select media server from “Other Libraries” menu on Windows Media Player 12. 5 Select the receiver from right-click menu.
Network/USB Features Connecting to the Network The following diagram shows how you can connect the receiver to your home network. In this example, it’s connected to a LAN port on a router, which has a 4-port 100 Base-TX switch built-in. Internet radio Modem Router Computer or media server Network Requirements ■ Ethernet Network For the best results, a 100 Base-TX switched Ethernet network is recommended.
Network/USB Features—Continued Minimum system requirements for Windows Media Player 11 on Windows XP Operating system Windows XP Home Edition (SP2), Windows XP Professional (SP2), Windows XP Tablet PC Edition (SP2), Update Rollup 2 for Windows XP Media Center Edition 2005 (KB900325), October 2006 Update Rollup for Windows XP Media Center Edition (KB925766) Processor: 233 MHz Intel Pentium II, Advanced Micro Devices (AMD), etc. Memory: 64 MB Hard disk: 200 MB of free space Drive: CD or DVD drive Modem: 28.
iPod/iPhone Playback via Onkyo Dock Using the Onkyo Dock Dock is sold separately. Models sold are different depending on the region. For the latest information on Onkyo Dock components, see the Onkyo web site at: http://www.onkyo.com Before using an Onkyo Dock, update your iPod/ iPhone with the latest software, available from the Apple web site. For supported iPod/iPhone models, see the instruction manual of the Onkyo Dock.
iPod/iPhone Playback via Onkyo Dock—Continued RI Dock With the RI Dock, you can easily play the music stored on your Apple iPod/iPhone through the receiver and enjoy great sound. You can even use the receiver’s remote controller to operate your iPod/iPhone. Notes: • Connect the RI Dock to the receiver with an cable ( page 16). • Set the RI Dock’s RI MODE switch to “HDD” or “HDD/DOCK”. • Set the receiver’s Input Display to “DOCK” ( page 18).
iPod/iPhone Playback via Onkyo Dock—Continued Press the appropriate INPUT SELECTOR first. are used as the page jump buttons. With the page modes, you can quickly locate your favorite songs even when your song lists, artist lists, and so on are very long. *2 [DISPLAY] turns on the backlight for 30 seconds.
Controlling Other Components You can use the receiver’s remote controller to control your other AV components. 1 , , , , , Cassette tape deck *1 Buttons CD player Use the REMOTE MODE buttons to select the zone of the component you want to control (MAIN or ZONE 2). Then press the INPUT SELECTOR button of the component you want to control.
Advanced Setup Changing the Advanced Setup Settings Here’s how to change the Advanced Setup settings. 1 2 Press the [SETUP] button on the remote controller. The setup menu appears in the display. Example: Intelli volume setting procedure Intelli Volume With IntelliVolume, you can set the input level for each input selector individually. This is useful if one of your source components is louder or quieter than the others. Use the arrow []/[] buttons to set the level.
Advanced Setup—Continued Advanced Setup Menu Speaker Impedance 1. Digital Audio Input If you connect a component to a digital audio input, you must assign that input to an input selector. For example, if you connect your CD player to the OPTICAL IN 1, you must assign “OPTICAL1” to the “CD” input selector. Here are the default assignments. Input selector BD/DVD VCR/DVR CBL/SAT GAME TV/TAPE CD PHONO PORT 3.
Advanced Setup—Continued 4. Zone2 Setup Zone2 Out If you have connected your Zone 2 speakers to an amp with no volume control, set the Zone 2 Out setting to Variable so that you can set the zone’s volume, balance, and tone on the receiver. Fixed: The Zone 2 volume must be set on the amp in that zone. Variable: The Zone 2 volume can be set on the receiver. Default setting: Fixed Z2 Bass With this setting, you can boost or cut low-frequency sounds output from the speakers for Zone 2.
Advanced Setup—Continued If you’ve made a change to any item, the display will indicate “SAVE [ENTER]: [SELECT]” when you exit Network Setup. If you want to apply the changes you made, press [ENTER]. If you want to re-do the setup, press [RETURN] to re-do the procedure from the beginning. Note: When the “Network Control” setting is set to “Disable”, this setting cannot be selected. 6. Firmware Update See “Firmware Update” for the update procedure.
Zone 2 In addition to your main listening room, you can also enjoy playback in a second room referred to as Zone 2. In addition, you can select a different source for each room. Connecting Zone 2 Zone 2 Out Settings This setup allows 2-channel playback (with the speaker set A and B) in your main listening room and 2-channel stereo playback in Zone 2, with a different source in each room.
Zone 2—Continued • While Zone 2 is on, the Auto Power On and Direct Change RI functions do not work. Using Zone 2 This section explains how to turn Zone 2 on and off, how to select an input source for Zone 2, and how to adjust the volume for Zone 2. Controlling Zone 2 from the receiver Controlling Zone 2 with the Remote Controller To control Zone 2, you must press the remote controller’s [ZONE 2] button first.
Zone 2—Continued 3 To turn off Zone 2, press the [ZONE 2] button, followed by the [] button. Adjusting the Volume of Zone 2 Press the receiver’s [ZONE 2] button, and then use the [VOLUME] control, or remote controller’s [ZONE 2] button, and then use the VOLUME []/[] buttons. Muting Zone 2 ZONE 2 MUTING On the remote controller, press the [ZONE 2] button, and then press the [MUTING] button. To unmute Zone 2, press the remote controller’s [ZONE 2] button, and then press the [MUTING] button again.
Connecting Components Not Reached by the Remote Controller Signals (IR IN/OUT) In order to use the remote controller to control the receiver from a remote location, you will need to prepare a multiroom kit (sold separately) such as one listed below: • Multiroom A/V distribution and control system such as those from Niles® and Xantech® * Xantech is a registered trademark of Xantech Corporation. * Niles is a registered trademark of Niles Audio Corporation.
Firmware Update To update the firmware of the receiver, you can choose from the following two methods: update via network, or update via USB storage. Choose the one that best suits your environment. Before proceeding with the update, please read the corresponding explanations carefully. ■ Update via network You need a wired Internet connection to update the firmware. ■ Update via USB storage ( page 49) Please prepare a USB storage device such as a USB flash memory stick.
Firmware Update—Continued Troubleshooting Updating the Firmware via USB Case 1: If “No Update” is displayed on the receiver’s display, it means that the firmware has already been updated. You do not need to do anything further. Case 2: If an error occurs, “Error!! *-** No media” is displayed on the receiver’s display. (Alpha-numeric characters on the front display are denoted by asterisks.) Refer to the following table and take appropriate action.
Firmware Update—Continued 6 7 Select the USB input source. “Now Initializing” is displayed on the front display and then the name of the USB device is displayed. It takes 20 to 30 seconds to recognize the USB device. 8 Select “Update” and press [ENTER]. 9 Select “Via USB” and press [ENTER]. 10 Select “Update” and press [ENTER]. The update process will begin. During the update process, you can still view the update progress on the front display of the receiver.
Troubleshooting If you have any trouble using the receiver, look for a solution in this section. If you can’t resolve the issue yourself, try resetting the receiver before contacting your Onkyo dealer. To reset the receiver to its factory defaults, turn it on and, while holding down the [TUNING MODE] button, press the [ON/STANDBY] button. audio performance; do not bundle audio cables together with power cords or speaker cables. • An audio cable may be picking up interference.
Troubleshooting—Continued Can’t control other components • Make sure that REMOTE MODE is set correctly ( page 9). • If you are unable to control another component, make sure that you selected an input source. • If you have connected an -capable Onkyo DS- A1 Remote Interactive Dock to the TAPE IN or VCR/ DVR IN jacks, you must set the input display to DOCK for the remote controller to work correctly ( page 17).
Troubleshooting—Continued Can’t connect to the receiver from a Web browser • If you’re using DHCP, your router may not always allocate the same IP address to the receiver, so if you find that you can’t connect to a server or Internet radio station, recheck the receiver’s IP address. • Check the “Network Setup”. USB Device Playback Can’t access the music files on a USB device • Make sure the USB device is plugged in properly.
Specifications Amplifier Section General Rated Output Power Power Supply (North American) 80 watts minimum continuous power per channel, 8 Ω loads, 2 channels driven from 20 Hz to 20 kHz with a maximum total harmonic distortion of 0.08 % (FTC) 100 watts minimum continuous power per channel, 6 Ω loads, 2 channels driven at 1 kHz with a maximum total harmonic distortion of 0.
Memo
2-1, Nisshin-cho, Neyagawa-shi, OSAKA 572-8540, JAPAN Tel: 072-831-8023 Fax: 072-831-8163 http://www.onkyo.com/ 18 Park Way, Upper Saddle River, N.J. 07458, U.S.A. Tel: 800-229-1687, 201-785-2600 Fax: 201-785-2650 http://www.us.onkyo.com/ Liegnitzerstrasse 6, 82194 Groebenzell, GERMANY Tel: +49-8142-4401-0 Fax: +49-8142-4401-555 http://www.eu.onkyo.