Contents Hard Disk Music Library Before using 2 Facilities and connections 7 MB-S1 Instruction Manual Thank you for purchasing the Onkyo Hard Disk Music Library. Please read this manual thoroughly before making connections and plugging in the unit. Following the instructions in this manual will enable you to obtain optimum performance and listening enjoyment from your new Hard Disk Music Library. Please retain this manual for future reference.
WARNING: TO REDUCE THE RISK OF FIRE OR ELECTRIC SHOCK, DO NOT EXPOSE THIS APPLIANCE TO RAIN OR MOISTURE. CAUTION: TO REDUCE THE RISK OF ELECTRIC SHOCK, DO NOT REMOVE COVER (OR BACK). NO USER-SERVICEABLE PARTS INSIDE. REFER SERVICING TO QUALIFIED SERVICE PERSONNEL.
Precautions 1. Recording Copyright Recording of copyrighted material for other than personal use is illegal without permission of the copyright holder. 2. Power WARNING BEFORE PLUGGING IN THE UNIT FOR THE FIRST TIME, READ THE FOLLOWING SECTION CAREFULLY. The voltage of the available power supply differs according to country or region. Be sure that the power supply voltage of the area where this unit will be used meets the required voltage (e.g.
Precautions For Canadian model NOTE: THIS CLASS B DIGITAL APPARATUS COMPLIES WITH CANADIAN ICES-003. For models having a power cord with a polarized plug: CAUTION: TO PREVENT ELECTRIC SHOCK, MATCH WIDE BLADE OF PLUG TO WIDE SLOT, FULLY INSERT. Modele pour les Canadien REMARQUE: CET APPAREIL NUMÉRIQUE DE LA CLASSE B EST CONFORME À LA NORME NMB-003 DU CANADA.
Contents Before using Setup and operation Important Safeguards ......................................... 2 Setup menus ..................................................... 26 Precautions ......................................................... 3 Navigating through the Setup menu .............................. 27 Contents .............................................................. 4 Hardware Setup ................................................. 28 Features .....................................
Main Features ■ Encoding the music files on an audio CD in MP3 format(*1) and decoding the MP3 music files • You can record tracks on an audio CD in MP3 format. The tracks are compressed approximately 1/10 in data size when using the standard 128kbps bitrate(*2). • Available encoding bitrates are no compression (PCM), 96kbps, 128kbps, and 192kbps. • You can display and edit the ID3 tag(*3) information including song title, album title and artist name.
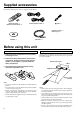
Supplied accessories Check that the following accessories are supplied with the MB-S1. Remote controller × 1 Batteries (AA, R6 or UM-3) × 2 Audio connection cables × 2 cable × 1 Instruction manual × 1 Warranty card × 1 CD-ROM × 1 USB cable × 1 Before using this unit Installing the remote controller batteries Using the remote controller 1. Remove the battery compartment cover by pressing and sliding the cover. Point the remote controller toward the remote control sensor.
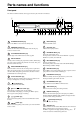
Parts names and functions Front panel The numbers within the brackets are the pages where the part or function is introduced. 3 5 2 4 6 1 PLAY MODE STANDBY/ON ON EDIT/CLEAR STOP MULTI JOG YES PLAY / 8 7 PLAY LIST MENU/EXIT PUSH TO ENTER STANDBY USB DISPLAY TEXT CD DUBBING FAVORITE IT HDD REC REC MODE EXTERNAL INPUT OPERATION CD HDD HARD DISK MUSIC LIBRARY J IH G K 1 STANDBY/ON button [xx] Turns on the MB-S1 or lets it enter the standby state.
Parts names and functions Front panel display The numbers within the brackets are the pages where the part or function is introduced. 1 2 4 5 6 7 3 8 9 0 1 A FAVORITE indicator [xx] ALL indicator [xx] CD mode indicator [xx] HDD mode indicator [xx] DIGITAL 1 2, ANALOG indicators [xx] Lights when the DIGITAL 1 (optical), DIGITAL 2 (coaxial), or ANALOG (analog) is selected for input source. 7 NAVI indicator [xx] Lights when the display shows the current position of the track played.
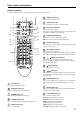
Parts names and functions Remote controller The numbers within the brackets are the pages where the part or function is introduced. 1 4 5 2 6 DISPLAY button [xx] Press to change the display mode. 7 CLOCK button [xx] Press to display the current day of the week and time. 3 6 9 8 7 A 0 B D C E G I 8 EXT INPUT button [xx] Press to select the input source. With each press of the button, the input source switches in the order of DIGITAL 1, DIGITAL 2, and ANALOG.
Parts names and functions The numbers within the brackets are the pages where the part or function is introduced. 18 21 ADD TO PLAY LIST button [xx] Press to add the current track to the play list. 19 20 Press to mark the current track as your favorite. Press again to unmark the track. SELECT button [xx] Select the track using / FAVORITE IT button [xx] 22 buttons. FAVORITE MODE button [xx] Press to turn the favorite mode on and off.
Connecting the MB-S1 Here is an explanation of how to connect the main components to the MB-S1 in the standard manner. There are many ways that any one component can be connected, and it is up to you to decide which method best fits your situation. The directions given here are only one option and should only be thought of as such. It is best to fully understand the nature of each connector and terminal as well as each of your components and their features to ascertain which method of connection is best.
Connecting the MB-S1 Connecting to other components Here is detailed explanation of how to connect the main components to the MB-S1. When connecting, refer to the diagram on page 14. 4. Connecting an analog audio device such as AM/FM tuner or cassette tape deck 1. Connecting to an amplifier When connecting the audio output from an analog audio device such as AM/FM tuner, cassette tape deck, or video deck to the MBS1, you can record the audio signal onto the HDD.
Notes on CD and the internal hard disk drive Notes on discs ■ Cautions for disc storage ■ Notes on playing discs Do not store discs in locations exposed to direct sunlight, near heat emitting devices, and other locations of excessive heat, or locations of extremely low temperatures. Also, always store discs properly in their protective cases. Use the discs compatible with IEC standards such as the CD with the logo (right) printed on it. You can also use the CD-ROM containing MP3 audio data.
Rules for recording digital input The digital source connected to the MB-S1 is protected by copy guard systems. These limitations are intended for protecting the copyright and restricting the behavior which violates the copyright. SCMS (Guide to the serial copy management system) This system is designed for permitting only one generation of digitalto-digital copying (the recording of the original digital signals as they are) between digital audio devices.
Understanding the basic operations before using the MB-S1 The MB-S1 allows you to play audio CDs or CD-R discs containing MP3 music files just like ordinary CD players. In addition, the MBS1 can store the music data on its hard disk drive (HDD), allowing you to enjoy the various playback functions such as long-hour playback or play list playback. ■ Managing the music information on the MB-S1 The MB-S1 manages the music information in groups and tracks.
Understanding the basic operations before using the MB-S1 ■ Understanding the play list You can create a play list compiled by choosing your favorite tracks from those on the HDD. You can also name the play list and easily switch the play list when playing. The track information registered in the play list is just a reference to the actual track information stored on the HDD. Therefore, editing or deleting a play list will not change or delete the track information stored on the HDD.
Understanding the basic operations before using the MB-S1 ON button STANDBY button STANDBY/ON button PLAY MODE STANDBY/ON ON EDIT/CLEAR STOP MULTI JOG YES PLAY / OPERATION buttons PAUSE NO PLAY LIST MENU/EXIT PUSH TO ENTER STANDBY USB DISPLAY TEXT CD DUBBING FAVORITE IT HDD REC REC MODE EXTERNAL INPUT OPERATION CD HDD HARD DISK MUSIC LIBRARY (open/close) button OPERATION buttons Turning on the power Switching the CD player and HDD Press the STANDBY/ON button on the MB-S1 to turn
Setting date and time CLOCK button MULTI JOG dial YES button EDIT/CLEAR PLAY MODE STANDBY/ON ON STOP MULTI JOG YES PLAY / PAUSE NO PLAY LIST MENU/EXIT PUSH TO ENTER STANDBY USB DISPLAY TEXT CD DUBBING FAVORITE IT HDD REC REC MODE EXTERNAL INPUT OPERATION CD HDD HARD DISK MUSIC LIBRARY DISPLAY button MB-S1 MENU button / buttons Setting date and time Set the month, day, hour and minute using the same procedure above. The day of the week will be automatically set. 1.
Listening to an audio CD or CD-ROM PLAY / MULTI JOG Dial PAUSE button STOP button PLAY MODE STANDBY/ON ON EDIT/CLEAR STOP MULTI JOG YES PLAY / PAUSE NO MENU/EXIT PLAY LIST PUSH TO ENTER STANDBY USB DISPLAY TEXT CD DUBBING FAVORITE IT HDD REC REC MODE EXTERNAL INPUT OPERATION CD HDD HARD DISK MUSIC LIBRARY MB-S1 DISPLAY button (open/close) button / OPERATION button buttons Listening to an audio CD or CD-ROM Selecting the track While playing or pausing, pressing the button locate
Listening to an audio CD or CD-ROM Switching the display information Each press of the COUNTER button on the remote controller switches the information displayed in the display area.
Recording Notice: Available recording modes and speeds depend on the data or format for recording source. For more information, see table on page 24.
Recording Dubbing all tracks on a CD (CD dubbing) 1. Set the CD on the CD tray. Dubbing a track on a CD. 1. Set the CD on the CD tray. For setting the CD, see page 19. 2. Stop the CD or HDD. STOP Press the STOP button For setting the CD, see page 19. 2. Activate the CD player. OPERATION CD Press the CD button. HDD 3. Select a recording mode (see step 3 on the previous page). 3. Select a recording mode (see step 3 on the previous page).
Recording PLAY / REC MODE button PAUSE button MULTI JOG PLAY MODE STANDBY/ON ON EDIT/CLEAR STOP MULTI JOG YES PAUSE MENU/EXIT PLAY LIST PUSH TO ENTER STANDBY USB PLAY / NO DISPLAY TEXT CD DUBBING FAVORITE IT HDD REC REC MODE EXTERNAL INPUT OPERATION CD HDD HARD DISK MUSIC LIBRARY MB-S1 HDD REC button EXTERNAL INPUT Recording audio signals from external devices 1. Confirm the connections between the MBS1 and an external device to the HDD. 4.
Recording Using the remote controller Adjusting the recording level (Analog input only) Do the following steps in numeric order. 1. Call the menu mode. 1. Select an input source. MENU/EXIT 3. Put the MBS1 into the recording standby state. 4. Select a target group for recording. 2. Select a recording mode. 5. Start recording. Press the MENU/EXIT button. A menu item appears in the display area. 2. Select the menu for adjusting recording level.
Listening to tracks recorded on the HDD PLAY / PAUSE button STOP button PLAY MODE STANDBY/ON ON EDIT/CLEAR STOP MULTI JOG YES PLAY / PAUSE NO MENU/EXIT PLAY LIST PUSH TO ENTER STANDBY USB DISPLAY TEXT CD DUBBING FAVORITE IT HDD REC REC MODE EXTERNAL INPUT OPERATION CD HDD HARD DISK MUSIC LIBRARY MB-S1 DISPLAY button OPERATION button Listening to tracks recorded on the HDD OPERATION During playback, hold down the or button for 0.
Listening to tracks recorded on the HDD Switching the display information Each press of the COUNTER button on the remote controller switches the information displayed in the display area. While the text information is displayed using the DISPLAY button, the information below will not be displayed.
Naming tracks recorded on the HDD MULTI JOG dial PLAY MODE/ EDIT/CLEAR/NO button YES button PLAY MODE STANDBY/ON ON EDIT/CLEAR STOP MULTI JOG YES PLAY / PAUSE NO MENU/EXIT PLAY LIST PUSH TO ENTER STANDBY USB DISPLAY TEXT FAVORITE IT CD DUBBING HDD REC REC MODE EXTERNAL INPUT OPERATION CD HDD HARD DISK MUSIC LIBRARY MB-S1 DISPLAY button TEXT button Entering the name of a track For the tracks recorded on the HDD, you can enter the track information such as track title, album title and
Naming tracks recorded on the HDD 2. Selecting a letter you want to enter 4. Deleting a letter EDIT/CLEAR MULTI JOG Press the EDIT/CLEAR button to delete the current letter. NO Turning the MULTI JOG dial displays each letter for the current character type. PUSH TO ENTER MULTI JOG Pressing the MULTI JOG dial confirms the letter and you can enter the next digit. Selecting a genre MULTI JOG PUSH TO ENTER 3. Moving to a digit Pressing the button focuses the button previous letter.
Erasing tracks recorded on the HDD MULTI JOG dial PLAY MODE/ YES button EDIT/CLEAR/NO button PLAY MODE STANDBY/ON ON EDIT/CLEAR STOP MULTI JOG YES PLAY / MENU/EXIT PLAY LIST PUSH TO ENTER STANDBY USB DISPLAY TEXT CD DUBBING FAVORITE IT HDD REC REC MODE EXTERNAL INPUT OPERATION CD HDD HARD DISK MUSIC LIBRARY OPERATION button Erasing a track MB-S1 / buttons 5. Press the jog dial. 1. Activate the HDD section. MULTI JOG The erase confirmation message appears. Press the HDD button.
Erasing tracks recorded on the HDD Erasing an entire group 1. Activate the HDD section. Press the HDD button. OPERATION CD HDD 2. Select a group you want to record. MULTI JOG Turn the jog dial to select a group you want to record. PUSH TO ENTER 3. Call the edit/clear mode. EDIT/CLEAR Press the EDIT/CLEAR button. NO 4. Select the group erase mode. MULTI JOG Turn the jog dial to select “All Tr Erase?” and press the jog dial to confirm the selection. The MB-S1 enters the group erase mode.
Creating a play list MULTI JOG dial PLAY MODE/YES button PLAY MODE STANDBY/ON ON EDIT/CLEAR STOP MULTI JOG YES PLAY / MENU/EXIT PLAY LIST PUSH TO ENTER STANDBY USB DISPLAY TEXT CD DUBBING FAVORITE IT HDD REC REC MODE EXTERNAL INPUT OPERATION CD HDD HARD DISK MUSIC LIBRARY OPERATION button Creating a play list When the blinking play list is the one you want to add a track, press the jog dial to confirm. When you want to select other play list, turn the jog dial to select a play list.
Creating a play list ■ Understanding the indication on play lists When creating a play list When you create a play list first time, “1P-New” appears. “1P” means the first play list and “New” means that the play list contains no track. After second play list, the indication will be like “2P-New”. “2P” means the second play list and “New” means that the play list contains no track. * If you delete a play list, the play list number is reserved until other new play list is created.
Listening to tracks using a play list STOP button PLAY / MULTI JOG dial PLAY MODE STANDBY/ON ON PAUSE button EDIT/CLEAR STOP MULTI JOG YES PLAY / PAUSE NO MENU/EXIT PLAY LIST PUSH TO ENTER STANDBY USB DISPLAY TEXT CD DUBBING FAVORITE IT HDD REC REC MODE EXTERNAL INPUT OPERATION CD HDD HARD DISK MUSIC LIBRARY MB-S1 PLAY LIST button / buttons OPERATION button Listening to tracks using a play list 1. Activate the HDD section. Press the HDD button. OPERATION CD HDD 2.
Listening to tracks using a play list Playing tracks in a play list in random order Remote controller only Pressing the RANDOM button on the remote controller displays the current setting for random playback. Each press of the RANDOM button switches the setting between “RANDOM ON” and “RANDOM OFF.” RANDOM ON: Plays the tracks in the current play list in random order. When you select RANDOM ON, the “RANDOM” indicator lights. RANDOM OFF: Disable the random playback function.
Editing the play lists EDIT/CLEAR/NO button PLAY LIST button PLAY MODE/ YES button MULTI JOG dial PLAY MODE STANDBY/ON ON EDIT/CLEAR STOP MULTI JOG YES PLAY / PAUSE NO MENU/EXIT PLAY LIST PUSH TO ENTER STANDBY USB STOP button DISPLAY TEXT CD DUBBING FAVORITE IT HDD REC REC MODE EXTERNAL INPUT OPERATION CD HDD HARD DISK MUSIC LIBRARY TEXT button MB-S1 MENU/EXIT button / buttons OPERATION button Naming a play list 1. Activate the play list mode.
Editing the play lists Moving a track within a play list Deleting a track in a play list 1. Activate the play list mode. PLAY LIST 1. Activate the play list mode. Press the PLAY LIST button. 2. Select a play list. MULTI JOG Press the PLAY LIST button. 2. Select a play list. Turn the jog dial to select a play list number for which you want to move a track position. PUSH TO ENTER MULTI JOG Turn the jog dial to select a play list number in which a track you want to delete is contained.
Editing the play lists EDIT/CLEAR/NO button MULTI JOG dial PLAY LIST button PLAY MODE/ YES button PLAY MODE STANDBY/ON ON EDIT/CLEAR PLAY / PAUSE NO MENU/EXIT PLAY LIST PUSH TO ENTER STANDBY USB STOP MULTI JOG YES DISPLAY TEXT CD DUBBING FAVORITE IT HDD REC REC MODE EXTERNAL INPUT OPERATION CD HDD HARD DISK MUSIC LIBRARY MB-S1 Deleting a play list 1. Activate the play list mode. PLAY LIST Press the PLAY LIST button. 2. Select a play list you want to delete.
Using various playback features PLAY / MULTI JOG dial PAUSE button PLAY MODE button PLAY MODE STANDBY/ON ON EDIT/CLEAR PLAY / PAUSE NO MENU/EXIT PLAY LIST PUSH TO ENTER STANDBY USB STOP MULTI JOG YES DISPLAY TEXT CD DUBBING FAVORITE IT HDD REC REC MODE EXTERNAL INPUT OPERATION CD HDD HARD DISK MUSIC LIBRARY Playing track in sorted order You can use the information registered in track on the HDD to sort the playback order.
Using various playback features PLAY / MULTI JOG dial PAUSE button PLAY MODE button PLAY MODE STANDBY/ON ON EDIT/CLEAR PLAY / PAUSE NO MENU/EXIT PLAY LIST PUSH TO ENTER STANDBY USB STOP MULTI JOG YES DISPLAY TEXT CD DUBBING FAVORITE IT HDD REC REC MODE EXTERNAL INPUT OPERATION CD HDD HARD DISK MUSIC LIBRARY MB-S1 FAVORITE IT Marking a track as you favorite (FAVORITE IT function) When you have your favorite tracks, you can mark them as you favorite to register with the track infor
Using various playback features About combination of play modes ■ When you combine the sorted tracks mode and the favorite mode Plays only favorite tracks from sorted tracks in sorted order. ■ When you select a play list and enable the favorite mode Plays only favorite tracks from tracks in the play list. ■ When you use the random and repeat playback feature Plays tracks in random order and repeatedly. Using the remote controller 1. Mark a track as your favorite. 2. Activate the favorite mode.
Using timer functions MULTI JOG dial PLAY MODE/YES button PLAY MODE STANDBY/ON ON EDIT/CLEAR PLAY / DISPLAY TEXT CD DUBBING FAVORITE IT HDD REC REC MODE EXTERNAL INPUT OPERATION CD HDD HARD DISK MUSIC LIBRARY MENU/EXIT button Setting a timer 1. Call the menu mode MENU/EXIT PAUSE NO MENU/EXIT PLAY LIST PUSH TO ENTER STANDBY USB STOP MULTI JOG YES / buttons 4. Set the timer function. MULTI JOG Press the MENU button. The menu appears in the display area.
Using timer functions 6. Set the start time and end time for the timer setting. 10. Select a play list. (Only when you select “HDD PLAY” for timer function in step 4) MULTI JOG MULTI JOG PUSH TO ENTER MULTI JOG • Turn the jog dial to select hour for the start time. Press the jog dial to confirm the hour and the highlight moves to the minute. MULTI JOG • After setting the start time for the timer setting, the time one hour passed from the start time appears as the end time.
Specifications CD-ROM Dreive Unit Hard Disk Drive Unit D/A Converter A/D Converter Connections Frequency Response Playback Harmonic distortion Playback Dynamic range Playback Signal to noise ratio Recording Harmonic distortion Recording Dynamec range Recording Signal to Noise ratio Channel Separation Wow and Flutter Output Level Power Supply Rating & Power Consumption Dimension (W.H.D,) Weight ATA Packet Interface (specified in SFF-8020). (E-IDE) Industry Standard 5.25" Half Height Form Factor.
Carry Tunes 44
Overview of the supplied Carry Tunes software The supplied Carry Tunes software is designed for transferring MP3 music files. Though MP3 music files have been able to play only on PC, Carry Tunes allows you to enjoy the music files easily and in high quality on the MB-S1. ■ Plays MP3 music files You can play MP3 music files with easy operation. ■ MP3 track information edit feature You can add and edit the track information such as track title and album title.
System Requirements To transfer music files connecting to the MB-S1, following configurations are required.
Setting the PC When connecting the MB-S1 to PC first time, you need to install the device driver. Installing the device driver 1. Turn on the PC. Make sure the operating system starts and runs. 2. Connect the MB-S1 to the PC using a USB cable. Connect the flat side of the USB cable to the USB connector on PC and the other side of the USB cable to the USB connector on the front panel of the MB-S1. STANDBY / ON ON Flat side.
Setting the PC Confirming the installation of the device driver 1. Click Start, point to Settings, and double-click Control Panel. 2. Double-click the System icon. 3. Click Hardware. (Windows 2000 only) 4. Click the Device Manager tab. When using Windows 98SE/Me Confirm these device drivers are installed. 5. Confirm the installed device drivers are displayed in the dialog box. • Find “USB Audio Device” under the “***” • Find “USB Root Hub”, “*USB Compatible Device*,” “***,” and “UE205DRV Device.
Installing the Carry Tunes Install Procedure 1. Insert the supplied CD-ROM into the CDROM drive on the PC. The setup menu automatically appears. If the setup menu does not appear automatically, double-click the “CtStart.exe” file. 2. Click Install. Carry Tunes setup screen appears. 3. Click Next. The license agreement screen appears. 4. Click Yes. Selecting the Destination Folder screen appears. 5. Click Next. Selecting the Program Folder screen appears.
Installing the Carry Tunes 6. Click Next. Setup completion screen appears. 7. Click Finish. The installation procedures for Carry Tunes complete.
Playing MP3 files using Carry Tunes Registering MP3 files with Carry Tunes 1. Start Carry Tunes. Click Start, point to “Programs,” point to Carry Tunes, and click Carry Tunes. 2. Drag the MP3 files you want to register and drop them onto Carry Tunes. The supplied CD-ROM contains sample MP3 files. To use the sample MP3 files, insert the CD-ROM into the CDROM drive on the PC. Click Open Sample music folder in the Carry Tunes Installation CD dialog box to open the folder containing the sample MP3 files.
Transferring MP3 files to the MB-S1 Connecting the MB-S1 to PC 1. Make sure the MB-S1 is connected to the PC properly. When the connection is properly made, the display in the MBS1 shows as below. 2. Make sure the PC is properly configured. The MB-S1 can be connected to the PC running on Windows 98SE/Me/2000. You can use the dedicated Carry Tunes music file transfer software to transfer the MP3 music files on PC to the HDD on the MB-S1.
53
54
55
56
Sales & Product Planning Div. : 2-1, Nisshin-cho, Neyagawa-shi, OSAKA 572-8540, JAPAN Tel: 072-831-8111 Fax: 072-833-5222 ONKYO U.S.A. CORPORATION 18 Park Way, Upper Saddle River, N.J. 07458, U.S.A. Tel: 201-785-2600 Fax: 201-785-2650 http://www.onkyousa.com ONKYO EUROPE ELECTRONICS GmbH Industriestrasse 20, 82110 Germering, GERMANY Tel: 089-849-320 Fax: 089-849-3265 E-mail: info@onkyo.de ONKYO CHINA LIMITED Units 2102-2107, Metroplaza Tower I, 223 Hing Fong Road, Kwai Chung, N.T.