E52_LS3100_120910.book 1 ページ 2012年9月10日 月曜日 午後4時30分 Contents Living Speaker System Before Use .........................2 LS3100 Sound System Controller (LAP-301) Front Speakers (SLM-301) Wireless Subwoofer (SLW-301) Connections ....................14 Operations .......................17 Instruction Manual Useful Function...............21 Appendix..........................22 Thank you for purchasing an Onkyo product.
E52_LS3100_120910.book 2 ページ 2012年9月10日 月曜日 午後4時30分 Before Use WARNING: TO REDUCE THE RISK OF FIRE OR ELECTRIC SHOCK, DO NOT EXPOSE THIS APPARATUS TO RAIN OR MOISTURE. CAUTION: TO REDUCE THE RISK OF ELECTRIC SHOCK, DO NOT REMOVE COVER (OR BACK). NO USER-SERVICEABLE PARTS INSIDE. REFER SERVICING TO QUALIFIED SERVICE PERSONNEL.
2012年9月10日 午後4時30分 Precautions 1. 2. 3. 4. Recording Copyright—Unless it’s for personal use only, recording copyrighted material is illegal without the permission of the copyright holder. AC Fuse—The AC fuse inside the unit is not user-serviceable. If you cannot turn on the unit, contact your Onkyo dealer. Care—Occasionally you should dust the unit all over with a soft cloth. For stubborn stains, use a soft cloth dampened with a weak solution of mild detergent and water.
E52_LS3100_120910.book 7. 8. 4 ページ 2012年9月10日 Never Touch this Unit with Wet Hands— Never handle this unit or its power cord while your hands are wet or damp. If water or any other liquid gets inside this unit, have it checked by your Onkyo dealer. Handling Notes • If you need to transport this unit, use the original packaging to pack it how it was when you originally bought it. • Do not leave rubber or plastic items on this unit for a long time, because they may leave marks on the case.
2012年9月10日 月曜日 午後4時30分 Modèle pour les Canadien IMPORTANT REMARQUE: The plug is fitted with an appropriate fuse. If the fuse needs to be replaced, the replacement fuse must approved by ASTA or BSI to BS1362 and have the same ampere rating as that indicated on the plug. Check for the ASTA mark or the BSI mark on the body of the fuse. If the power cord’s plug is not suitable for your socket outlets, cut it off and fit a suitable plug. Fit a suitable fuse in the plug.
Šiuo Onkyo Corporation deklaruoja, kad šis LAP-301 atitinka esminius reikalavimus ir kitas 1999/5/EB Direktyvos nuostatas. A Onkyo Corporation ezzennel kijelenti, hogy a LAP-301 típusú beren-dezés teljesíti az alapvető követelményeket és más 1999/5/EK irányelvben meghatározott vonatkozó rendelkezéseket. Hierbij verklaart Onkyo Corporation dat het toestel l LAP-301 in overeenstemming is met de essentiële eisen en de andere relevante bepalingen van richtlijn 1999/5/EG.
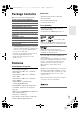
E52_LS3100_120910.book 7 ページ 2012年9月10日 Package Contents Make sure you have the following items: Sound system controller (LAP-301) Remote controller (RC-858S) 月曜日 午後4時38分 Subwoofer • Wireless Design for Free Setting and Powerful Sound • Powered Bass Reflex Design • 6-1/2 inch (16 cm) Cone AC adapter and Power cord*1 (➔ page 16) Stereo mini plug cable 5 ft. (1.5 m) Front Speakers Optical digital audio cable 5 ft. (1.5 m) Front speakers (SLM-301) Speaker stand × 2 Speaker cable 10 ft. (3.
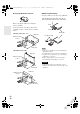
E52_LS3100_120910.book 8 ページ 2012年9月10日 ■ Using the Remote Controller 月曜日 午後4時30分 ■ Replacing the Battery Use only a battery of the same type (CR2025). Pull out firmly in the direction of the arrow pressing the tab in the direction of the arrow. Remove the plastic film before using the remote controller. To use the remote controller, point it at the controller’s remote control sensor, as shown below. (Placing on the floor, etc.
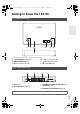
E52_LS3100_120910.book 9 ページ 2012年9月10日 月曜日 午後4時30分 Getting to Know the LS3100 Top Panel (LAP-301) a b c d e f For detailed information, see the pages in parentheses.
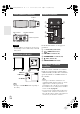
E52_LS3100_120910.book 10 ページ 2012年9月10日 Front Speakers (SLM-301) 月曜日 午後4時30分 Remote Controller Cabinet a e b (Front) Slit for stand (Side) c Speaker terminals d Hole for eye bolt f (Rear) Caution • The front grilles are not designed to be removed so do not attempt to remove them forcibly, as this will damage them. For detailed information, see the pages in parentheses.
E52_LS3100_120910.book 11 ページ 2012年9月10日 月曜日 午後5時9分 Placement This section explains how to mount/place the controller, the front speaker and the subwoofer. In this instruction manual, Sound System Controller (LAP-301) is described as “controller”. a b 5-11/16" (145 mm) Screw Keyhole slots for wall mounting c Bottom of the LAP-301 Tip • The controller can be mounted upside-down. Caution Mark the point of the wall by using WALL MOUNTING TEMPLATE.
E52_LS3100_120910.book 12 ページ 2012年9月10日 Mounting/Placing the Front Speakers Front speaker can be placed on the table top or mounted to the wall by using supplied stands. 月曜日 午後4時30分 ■ Attaching the stand Insert the stand into the stand slit on the rear of the front speaker. (Table top) Slit for stand ■ Using the rubber stoppers for a more stable platform We recommend to use the supplied rubber stoppers to achieve the best possible sound. Attach the rubber stoppers to the four corners of the bottom.
E52_LS3100_120910.book 13 ページ 2012年9月10日 ■ Wall mounting 1 Attach the supplied stand referring to the illustration for wall mounting. 2 Screw a commercially available wallmounting screw into the wall. 3 Insert the head of the screw into the keyhole slot on the bottom of the supplied stand and fix it firmly. Please confirm that the head of the screw is at the top of the hole.
E52_LS3100_120910.book 14 ページ 2012年9月10日 月曜日 午後4時30分 Connections Connections Connecting the Front Speakers Connect the supplied front speaker. Connect positive (+) terminal of the front speaker to positive (+) terminal of the controller (LAP-301) and negative (-) terminal of the front speaker to negative (-) terminal of the controller.
E52_LS3100_120910.book 15 ページ 2012年9月10日 月曜日 午後4時30分 ■ 1/8" (3.5 mm) Stereo mini plug This cable carries analog audio. Using the Subwoofer Corner position 1/3 of wall position To find the best position for your subwoofer, while playing a movie or some music with good bass, experiment by placing your subwoofer at various positions within the room, and choose the one that provides the most satisfying results.
E52_LS3100_120910.book 16 ページ 2012年9月10日 Connecting the Power cord (LAP-301) 1 Connect the supplied AC adapter and the power cord. 2 1 3 月曜日 午後4時30分 Note • Before connecting the power cord, connect all of your speakers and TV. • Turning on the unit may cause a momentary power surge that might interfere with other electrical equipment on the same circuit. If this is a problem, plug the unit into a different branch circuit. • Do not use the power cord other than the one supplied with the unit.
E52_LS3100_120910.book 17 ページ 2012年9月10日 月曜日 午後4時30分 Operations Operations Enjoying the sound ■ Operating with the remote controller / INPUT 1 2 Turn on the connected TV. 3 4 To adjust the volume, use VOLUME +/–. VOLUME +/- SOUND MODE SUBWOOFER +/- Press INPUT to select the TV selector.
E52_LS3100_120910.book 18 ページ 2012年9月10日 Adjusting the Subwoofer Level 1 Press SUBWOOFER +/– on the remote controller. You can adjust the volume of subwoofer while listening to an input source. Adjust the volume by 1 step in the –10 to 10 range. The default is 0. Muting the controller You can temporarily mute the output of the controller. 月曜日 Setting the Auto Power On This function switches between standby mode and ready mode.
2012年9月10日 Note • If your mobile phone supports A2DP protocol, its music will play through the controller. 1 Selecting Sound Modes You can switch the sound mode only with the remote controller. SOUND MODE button This button switches between the Normal Mode and Vocal Mode. The ON/STANDBY LED flashes white once by selecting the Normal Mode. When the mode is switched to the Vocal Mode, the ON/STANDBY LED flashes white twice.
E52_LS3100_120910.book 20 ページ 2012年9月10日 月曜日 午後4時30分 Tip • If you press and hold the /TV input button on the top panel or INPUT on the remote controller for three seconds with Bluetooth selector selected, the Bluetooth connection to the Bluetooth-enabled device is interrupted and start the pairing. Note • If there is no sound output even after the paring is done successfully, consult the user manual of the Bluetooth-enabled device, and then select the “Onkyo LS3100” as the audio output device.
E52_LS3100_120910.book 21 ページ 2012年9月10日 月曜日 午後4時30分 Useful Function Programming the controller for use of existing remote controller The controller can be operated with your existing TV remote controller or any other remote controller by programming the controller. This section explains how to program the controller to operate ON/STANDBY function on the controller by pressing the 5 (number button) on your TV remote controller as an example. This operation can be done only from the top panel.
E52_LS3100_120910.book 22 ページ 2012年9月10日 月曜日 午後4時30分 Appendix Troubleshooting If you have any trouble using the controller, look for a solution in this section. If you can’t resolve the issue yourself, contact your Onkyo dealer. Power ■ Can’t turn on the controller Make sure that the power cord is properly plugged into the wall outlet. — Unplug the power cord from the wall outlet, wait 10 seconds or more, then plug it in again.
E52_LS3100_120910.book 23 ページ 2012年9月10日 月曜日 If the controller is installed in a rack or — cabinet with colored-glass doors, the remote controller may not work reliably when the doors are closed. Audio ■ There’s no sound, or it’s very quiet Make sure that all audio connecting plugs are pushed in all the way. 15 Make sure that the input of TV is connected properly.
E52_LS3100_120910.book 24 ページ 2012年9月10日 月曜日 午後4時30分 Tip • If the controller is turned off or enters the standby mode, also the subwoofer enters the standby mode in 30 seconds. In this mode, the controller automatically detects a pairing point and reconnects. The subwoofer is automatically turned on when the link is recovered. Note • Depending on the reception condition, the sound might be stopped or interrupted while using. This is not a malfunction.
E52_LS3100_120910.book 25 ページ 2012年9月10日 月曜日 午後4時30分 Specifications Wireless Subwoofer 1 Front Speaker (SLM-301) Type Full Range Closed Box Impedance 4Ω Maximum input power 20 W Output sound pressure level 86 dB/W/m Frequency Response 200 Hz - 20 kHz Cabinet capacity 0.6 L (0.021 cubic feet) Dimensions (W × H × D) 169 mm × 78 mm × 108 mm 6-5/8" × 4-3/8" × 5-1/4" (incl. grille and projection) Weight 0.7 kg (1.5 lbs) Drivers unit 6.
E52_LS3100_120910.
E52_LS3100_120910.
E52_LS3100_120910.book 28 ページ 2012年9月10日 月曜日 午後4時30分 2-1, Nisshin-cho, Neyagawa-shi, OSAKA 572-8540, JAPAN Tel: 072-831-8023 Fax: 072-831-8163 http://www.onkyo.com/ 18 Park Way, Upper Saddle River, N.J. 07458, U.S.A. Tel: 800-229-1687, 201-785-2600 Fax: 201-785-2650 http://www.us.onkyo.com/ Liegnitzerstrasse 6, 82194 Groebenzell, GERMANY Tel: +49-8142-4401-0 Fax: +49-8142-4208-213 http://www.eu.onkyo.