
owners manual Home Theater Speaker System SKW-150X POWERED SUBWOOFER SKF-330XF FRONT SPEAKER SKC-330XC CENTER SPEAKER SKM-330XS SURROUND SPEAKER

6
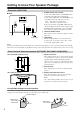
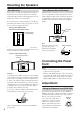
Mounting the Speakers
The speakers can easily be wall mounted by using the
keyhole slots. To prevent the speaker from vibrating
against the wall, attach four of the supplied spacers to the
keyhole fins on the rear of each speaker.
To mount the front or surround speakers vertically, use
the keyhole slot shown to hang each speaker on a screw
that’s securely screwed into the wall.
Front speaker (SKF-330XF)
Surround speaker (SKM-330XS)
To mount the center speaker horizontally, use the two
keyhole slots shown to hang each speaker on two screws
that are securely screwed into the wall.
Center speaker (SKC-330XC)
Caution:
A mounting screw’s ability to support a speaker depends
on how well it’s anchored to the wall. If you have hollow
walls, screw each mounting screw into a stud. If there are
no studs, or the walls are solid, use suitable wall anchors.
Use screws with a head diameter of 9 mm or less and a
shank diameter of 4 mm or less. With hollow walls, use
a cable/pipe detector to check for any power cables or
water pipes before making any holes.
Leave a gap of between 7 mm and 10 mm between the
wall and the base of the screw head, as shown.
(We recommend that you consult a home installation
professional.)
Threaded inserts for machine screws are provided on the
rear of each speaker for wall-mounting with commer-
cially available speaker mounts or brackets. The speak-
ers require M5 (5 mm) screws. Refer to the manual
supplied with your mounts or brackets for installation
details.
Note:
The portion of the screw that
goes into the speaker’s
threaded insert should be
between 5–8 mm long.
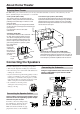
Connecting the Power
Cord
Notes:
• Before connecting the power cord, connect all of your
speakers and AV components.
• Turning on the SKW-150X may cause a momentary
power surge that might interfere with other electrical
equipment on the same circuit. If this is a problem,
plug the SKW-150X into a different branch circuit.
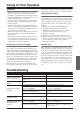
Adjustment
To set the level of the subwoofer, use the OUTPUT
LEVEL control. Set it so that bass sounds are evenly bal-
anced with the treble sounds from the other speakers.
Because our ears are less sensitive
to very low bass sounds, there’s a
temptation to set the level of the
subwoofer too high. As a rule of
thumb, set the subwoofer level to
what you think is the optimal level,
and then back it off slightly.
Wall Mounting
Keyhole slot for
wall mounting
150 mm
Keyhole slots for wall
mounting
Wall
7–10 mm
Using Speaker Mounts/Brackets
Setting the Subwoofer Level (SKW-150X)
Threaded
insert
5 mm
5–8 mm
Mount or bracket
OUTPUT
LEVEL
MAX
MIN