
Owner's Manual


19
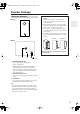
Connecting Speakers
—Continued
Before you connect the supplied speakers, read the fol-
lowing:
• Disconnect the power cord from the wall outlet.
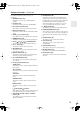
•Pay close attention to speaker wiring polarity. In other
words, connect positive (+) terminals only to positive (+)
terminals, and negative (–) terminals only to negative (–)
terminals. If you get them the wrong way around, the
sound will be out of phase and will sound odd.
• Only use speakers with an impedance of 8 ohms or
higher. If you use speakers with a lower impedance,
and use the amplifier at high volume levels for a long
period of time, the built-in protection circuit may be
activated.
• Unnecessarily long or very thin speaker cables may
affect the sound quality and should be avoided.
• Be careful not to short the posi-
tive and negative connections.
Doing so may damage the
HT-R820THX.
• Don’t connect more than one
cable to each speaker terminal.
Doing so may damage the
HT-R820THX.
• If you want to connect a single speaker instead of a
pair, connect it to either the left or right speaker termi-
nals, not both.
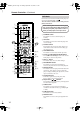
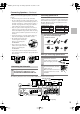
Connecting speaker Set A
The HT-R820THX’s positive (+) speaker terminals and
speaker’s positive (+) terminals are color-coded for ease
of identification. (The negative (–) speaker terminals are
all black.) Match the color of each cables to the corre-
sponding apeaker terminal.
When you Connecting Speaker Set B
The following illustration shows which speakers should be connected to which terminals.
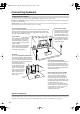
Connecting the Subwoofer
1
Using the supplied RCA cable, connect
the subwoofer’s LINE INPUT to your
HT-R820THX’s SUBWOOFER PRE OUT.
R
L
R
L
Speaker terminal Color Speaker terminal Color
Front left White Surround left Blue
Front right Red Surround right Gray
Center Green Surround back Brown
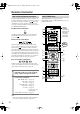
1
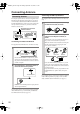
Unscrew the terminal. Fully insert the
wire. Screw the terminal tight.
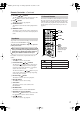
1
Strip 3/8" (10 mm) of insula-
tion from the ends of the
speaker cables, and twist the
bare wires tightly, as shown.
2
While pressing the lever, insert
the wire into the hole, and then
release the lever.
Make sure that the terminals are
gripping the bare wires, not the
insulation.
• On the AV receiver
• On the speakers
3/8" (10 mm)
L
R
AV RECEIVER
ANTENNA
FM
75
AM
OPTICAL COAXIAL
123
DIGITAL
IN
AC OUTLET
AC 120
V 60
Hz
SWITCHED
120
W 1
A
MAX.
R
L
R
L
FRONT
SPEAKERS A
Class 2 Wiring
SURROUND
SPEAKERS
CENTER
SPEAKER
SURROUND BACK
SPEAKER
REMOTE
CONTROL
IN
IN
IN
IN
IN IN
IN
IN
FRONT
SURR
CENTER
SUB
WOOFER
OUT
OUT
OUT
VIDEO 2
VIDEO 1
DVD MONITOR
OUT
VIDEO
S VIDEO
DVD
TAPE
CD
L
R
VIDEO 2
VIDEO 1
SUBWOOFER
PRE OUT
VIDEO 1
/2/3
IN
DVD
IN
COMPONENT VIDEO
Y
P
B
P
R
OUT
L
R
FRONT
SPEAKERS B
R
L
SUBWOOFER
PRE OUT
R
L
R
L
FRONT
SPEAKERS A
SURROUND
SPEAKERS
CENTER
SPEAKER
SURROUND BACK
SPEAKER
FRONT
SPEAKERS B
R
L
Front
right
speaker
Speaker set A (HTP-820)
(Sold separately)
Speaker set B
Powerd
Subwoofer
Front
left
speaker
Front
right
speaker
Front
left
speaker
Surround
right
speaker
Surround
left
speaker
Center
speaker
Surround
back
speaker
LINE INPUT
HT-S870_En.book Page 19 Monday, September 13, 2004 5:15 PM