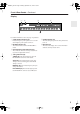
HT-S870_En.book Page 1 Monday, September 13, 2004 5:15 PM Contents Introduction ..................................... 2 6.1ch Home Theater System HT-S870 AV Receiver (HT-R820THX) 6.1ch Speaker System (HTP-820) Connection..................................... 18 Turning On & First Time Setup ..... 33 Instruction Manual Basic Operation Playing your AV components ....... 34 Using the Tuner ............................ 36 Enjoying the Listening Modes ..... 40 Thank you for purchasing an Onkyo 6.
HT-S870_En.book Page 2 Monday, September 13, 2004 5:15 PM WARNING: TO REDUCE THE RISK OF FIRE OR ELECTRIC SHOCK, DO NOT EXPOSE THIS APPARATUS TO RAIN OR MOISTURE. CAUTION: TO REDUCE THE RISK OF ELECTRIC SHOCK, DO NOT REMOVE COVER (OR BACK). NO USER-SERVICEABLE PARTS INSIDE. REFER SERVICING TO QUALIFIED SERVICE PERSONNEL.
HT-S870_En.book Page 3 Monday, September 13, 2004 5:15 PM Precautions 1. Recording Copyright—Unless it’s for personal use only, recording copyrighted material is illegal without the permission of the copyright holder. 2. AC Fuse—The AC fuse inside the HT-R820THX and SKW-820 is not user-serviceable. If you cannot turn on the HT-R820THX and SKW-820, contact your Onkyo dealer. 3. Care—Occasionally you should dust the HT-S870 all over with a soft cloth.
HT-S870_En.book Page 4 Monday, September 13, 2004 5:15 PM Speaker Precautions Features Placement Amp • The speaker cabinets are made out of wood and are therefore sensitive to extreme temperatures and humidity, do not put them in locations subject to direct sunlight or in humid places, such as near an air conditioner, humidifier, bathroom, or kitchen. • Do not put water or other liquids close to the speakers. If liquid is spilled over the speakers, the drive units may be damaged.
HT-S870_En.book Page 5 Monday, September 13, 2004 5:15 PM THX Select Before any home theater component can be THX Select certified, it must pass a rigorous series of quality and performance tests. Only then can a product feature the THX Select logo, which is your guarantee that the Home Theater products you purchase will give you superb performance for many years to come.
HT-S870_En.
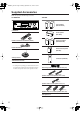
HT-S870_En.book Page 7 Monday, September 13, 2004 5:15 PM Before Using the HT-R820THX Installing the Batteries 1 To open the battery compartment, press the small hollow and slide off the cover. Using the Remote Controller To use the remote controller, point it at the HTR820THX’s remote control sensor, as shown below. Remote control sensor HT-R820THX 30˚ 3 Put the cover onto the remote controller and slide it shut.
HT-S870_En.book Page 8 Monday, September 13, 2004 5:15 PM Front & Rear Panels Front Panel 1 2 3 4 5 6 7 8 9 K J MASTER VOLUME TUNING STANDBY/ON PRESET ENTER STANDBY SETUP A SPEAKERS B LISTENING MODE THX TONE DISPLAY DIGITAL INPUT MEMORY RETURN TUNING MODE CLEAR VIDEO 3 INPUT PHONES MULTI CH DVD VIDEO 1 VIDEO 2 VIDEO 3 TAPE TUNER CD VIDEO S VIDEO L AUDIO R VCR HT-R820THX L M N O P For detailed information, refer to the pages in parenthesis.
HT-S870_En.book Page 9 Monday, September 13, 2004 5:15 PM Front & Rear Panels—Continued Display 1 2 3 5 4 6 For detailed information, refer to the pages in parenthesis. 1 A & B speaker indicators (34) Indicator A lights up when speaker set A is on. Indicator B lights up when speaker set B is on. 2 MUTING indicator (39) This indicator flashes when the HT-R820THX is muted. 5 SLEEP indicator (39) This indicator lights up when the Sleep function has been set.
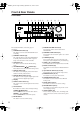
HT-S870_En.book Page 10 Monday, September 13, 2004 5:15 PM Front & Rear Panels—Continued Rear Panel 1 2 COMPONENT VIDEO VIDEO 1 / 2 / 3 IN DVD IN 3 ANTENNA OUT 4 5 FM 75 AM Class 2 Wiring Y FRONT SPEAKERS B OPTICAL 2 VIDEO 1 VIDEO 2 PR REMOTE CONTROL DIGITAL IN IN OUT IN DVD SURROUND SPEAKERS FRONT SPEAKERS A PB 3 6 L L R R AC OUTLET CENTER SPEAKER AC 120 V 60 Hz SWITCHED 120 W 1 A MAX.
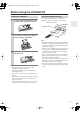
HT-S870_En.book Page 11 Monday, September 13, 2004 5:15 PM Speaker Package Subwoofer (SKW-820) ■ Attaching and detaching the speaker grilles Front and Center spakers have detachable grilles. Use the following method to attach or detach the grilles. 1. While holding the narrow edge of the speaker grille with your both hands, pull it gently toward you to remove the bottom of the grille. 2. In the same way, gently pull the other edge of the speaker grille toward you to remove it from the main unit. 3.
HT-S870_En.book Page 12 Monday, September 13, 2004 5:15 PM Remote Controller How to Use the Remote Controller Including the HT-R820THX, the remote controller can be used to control up to 10 different components, including Onkyo components connected via . The remote controller has a specific operating mode for use with each type of component. Modes are selected by using the nine REMOTE MODE buttons. ■ AMP/TUNER & TAPE Mode AMP/TUNER Mode AMP/TUNER mode is used to control the HT-R820THX.
HT-S870_En.book Page 13 Monday, September 13, 2004 5:15 PM Remote Controller—Continued For detailed information, refer to the pages in parenthesis. A STANDBY button (33) This button is used to set the HT-R820THX to Standby. B ON button (33) This button is used to turn on the HT-R820THX. C Input selector buttons (34) These buttons are used to select the input sources. N OR-EQ button (38) D MULTI CH button (35) P REMOTE MODE buttons (12) This button is used to select the multichannel DVD input.
HT-S870_En.book Page 14 Monday, September 13, 2004 5:15 PM Remote Controller—Continued DVD Mode DVD mode is used to control an Onkyo DVD player connected to the HT-R820THX via . To set the remote controller to DVD mode, press the [DVD] mode button.
HT-S870_En.book Page 15 Monday, September 13, 2004 5:15 PM Remote Controller—Continued N A-B button This button is used to set the A–B repeat playback function. O OPEN/CLOSE [ ] button This button is used to open and close the disc tray. P VIDEO OFF button This button is used to turn off the internal video circuitry, eliminating the possibility of interference when playing audio-only discs. Q CLEAR button CD Mode CD mode is used to control an Onkyo CD player connected to the HT-R820THX via .
HT-S870_En.book Page 16 Monday, September 13, 2004 5:15 PM Remote Controller—Continued MD Mode & CDR Mode ON STANDBY TV A I INPUT V1 V2 V3 1 2 3 DVD MULTI CH 4 5 6 CD TAPE TUNER 7 8 9 +10 --/--- 0 CLEAR B MD mode is used to control an Onkyo MiniDisc recorder connected to the HT-R820THX via . CDR mode is used to control an Onkyo CD recorder connected to the HT-R820THX via . To select MD mode, press the [MD] mode button. To select CDR mode, press the [CDR] mode button.
HT-S870_En.book Page 17 Monday, September 13, 2004 5:15 PM Remote Controller—Continued M FR & FF [ ]/[ ] buttons The FR [ ] button is used to start fast reverse. The FF [ ] button is used to start fast forward. N Stop [ ] button This button is used to stop playback. O RANDOM button This button is used with the random playback function. TV Control Buttons The remote controller has dedicated buttons for controlling a TV, which can be used regardless of which remote controller mode is currently selected.
HT-S870_En.book Page 18 Monday, September 13, 2004 5:15 PM Connecting Speakers Enjoying Home Theater You can use two sets of speakers with the HT-R820THX: speaker set A and speaker set B. Speaker set A (HTP-820) should be installed in your main listening room and can be used with THX, Dolby Digital and DTS surround material. Speaker set B can be installed in another room and used with stereo and mono material. Speakers can be positioned in the standard position for stereo speakers or however you like.
HT-S870_En.book Page 19 Monday, September 13, 2004 5:15 PM Connecting Speakers—Continued Connecting speaker Set A Before you connect the supplied speakers, read the following: • Disconnect the power cord from the wall outlet. • Pay close attention to speaker wiring polarity. In other words, connect positive (+) terminals only to positive (+) terminals, and negative (–) terminals only to negative (–) terminals. If you get them the wrong way around, the sound will be out of phase and will sound odd.
HT-S870_En.book Page 20 Monday, September 13, 2004 5:15 PM Connecting Antenna Connecting the AM Loop Antenna Connecting Antenna This chapter explains how to connect the supplied indoor FM antenna and AM loop antenna and how to connect commercially available outdoor FM and AM antennas. The HT-R820THX won’t pick up any radio signals without any antenna connected, so you must connect the antenna to use the tuner. The supplied indoor AM loop antenna is for indoor use only.
HT-S870_En.book Page 21 Monday, September 13, 2004 5:15 PM Connecting Antenna—Continued Connecting an Outdoor FM Antenna Connecting an Outdoor AM Antenna If you cannot achieve good reception with the supplied indoor FM antenna, try a commercially available outdoor FM antenna instead. If good reception cannot be achieved using the supplied AM loop antenna, an outdoor AM antenna can be used in addition to the loop antenna, as shown.
HT-S870_En.book Page 22 Monday, September 13, 2004 5:15 PM Connecting the HT-R820THX RCA AV Connection Color Coding Before Making Any Connections RCA-type AV connections are usually color coded: red, white, and yellow. Use red plugs to connect right-channel audio inputs and outputs (typically labeled “R”). Use white plugs to connect left-channel audio inputs and outputs (typically labeled “L”). And use yellow plugs to connect composite video inputs and outputs.
HT-S870_En.book Page 23 Monday, September 13, 2004 5:15 PM Connecting the HT-R820THX—Continued Video Connection Formats Connection Guide ■ Inputs Up to five AV components can be connected to the HT-R820THX’s rear panel inputs, and one to its front panel input. The following table lists the type of component that you can connect to each input. Input Type of component you can connect Page # for more info. DVD DVD player, etc. 25 VIDEO1 VCR, etc.
HT-S870_En.book Page 24 Monday, September 13, 2004 5:15 PM Connecting the HT-R820THX—Continued Connecting Your TV or Projector Monitor Out Audio Connections ■ Using Composite Video Use a composite video cable to connect the HT-R820THX’s VIDEO MONITOR OUT to a composite video input on your TV, as shown. The following connections will allow you to listen to audio from your TV via the HT-R820THX. If your TV has no audio outputs, connect the HT-R820THX to your VCR and use its tuner (see page 26).
HT-S870_En.book Page 25 Monday, September 13, 2004 5:15 PM Connecting the HT-R820THX—Continued Connecting a DVD player Video Connections Audio Connections You only need to use one of the following video connection methods. Note: Initially, the COAXIAL digital input is assigned to the DVD input source. If you connect your DVD player to a different digital input or only to an analog input, you’ll need to assign it to the DVD input source (see page 33).
HT-S870_En.book Page 26 Monday, September 13, 2004 5:15 PM Connecting the HT-R820THX—Continued DVD Multichannel Connection Connecting a VCR for Playback If your player supports multichannel audio formats such as DVD-Audio and Super Audio CD, and it has multichannel analog audio outputs, you can enjoy DVD-Audio and Super Audio CD playback. Use a multichannel analog audio cable to connect the HT-R820THX’s MULTI CH INPUT FRONT, SUBWOOFER, CENTER, and SURR sockets to the 5.
HT-S870_En.book Page 27 Monday, September 13, 2004 5:15 PM Connecting the HT-R820THX—Continued Connecting a VCR for Recording Video Connections • Use an S-Video cable to connect the HT-R820THX’s S VIDEO VIDEO 1 OUT to an S-Video input on your recording VCR. OR • Use a composite video cable to connect the HT-R820THX’s VIDEO VIDEO 1 OUT to a composite video input on your recording VCR.
HT-S870_En.book Page 28 Monday, September 13, 2004 5:15 PM Connecting the HT-R820THX—Continued Connecting Other Video Sources— Satellite, Cable, Set-top box, LD Player, etc. Video Connections ■ Using Component Video Use a component video cable to connect the HT-R820THX’s COMPONENT VIDEO 1/2/3 IN to the component video output on your video component, as shown. • Your TV must also be connected via component video. You only need to use one of the following video connection methods.
HT-S870_En.book Page 29 Monday, September 13, 2004 5:15 PM Connecting the HT-R820THX—Continued ■ Using Analog Connections If your video component doesn’t have digital audio outputs, or you want to record from it, you’ll need to make the following analog audio connections. Use an analog audio cable to connect the HT-R820THX’s VIDEO 2 IN L/R inputs to the analog audio outputs on your video component, as shown.
HT-S870_En.book Page 30 Monday, September 13, 2004 5:15 PM Connecting the HT-R820THX—Continued Connecting a CD Player Connecting a Cassette Recorder Note: Initially, the CD input source is assigned to the OPTICAL 1 digital input. If you connect your CD player to a different digital input, or you connect it to only the analog CD IN, you’ll need to change the input assignment (see page 33).
HT-S870_En.book Page 31 Monday, September 13, 2004 5:15 PM Connecting the HT-R820THX—Continued ■ Using a Coaxial or Optical Connection (playback only) • Use an optical digital audio cable to connect the HT-R820THX’s DIGITAL IN OPTICAL 3 to the optical output on your recorder, as shown. OR • Use a coaxial digital audio cable to connect the HT-R820THX’s DIGITAL IN COAXIAL to the coaxial output on your recorder, as shown.
HT-S870_En.book Page 32 Monday, September 13, 2004 5:15 PM Connecting the HT-R820THX—Continued Connecting Onkyo Components To use , you must make an analog audio connection (RCA) between the HT-R820THX and the other component, even if they are connected digitally.
HT-S870_En.
HT-S870_En.book Page 34 Monday, September 13, 2004 5:15 PM Playing Your AV Components This chapter explains how to use the HT-R820THX with your other AV components.
HT-S870_En.book Page 35 Monday, September 13, 2004 5:15 PM Playing Your AV Components—Continued Displaying Source Information You can display various information about the current input source as follows. DISPLAY Press the [DISPLAY] button repeatedly to cycle through the available information. Using the Multichannel Input The multichannel input is for connecting a component with individual 5.1-channel analog audio outputs, such as a DVD player or MPEG decoder.
HT-S870_En.book Page 36 Monday, September 13, 2004 5:15 PM Using the Tuner With the built-in tuner you can enjoy AM and FM radio stations. You can store your favorite stations as presets for quick selection.
HT-S870_En.book Page 37 Monday, September 13, 2004 5:15 PM Using the Tuner—Continued Presetting Radio Stations You can store up to 30 of your favorite radio stations as presets. 1 Tune into the station that you want to store as a preset. 2 Press the [MEMORY] button. The MEMORY indicator appears and the preset number flashes.
HT-S870_En.book Page 38 Monday, September 13, 2004 5:15 PM Common Functions This chapter explains functions that can be used with any input source. Before performing any of the procedures in this chapter, press the [AMP] button first to select AMP mode.
HT-S870_En.book Page 39 Monday, September 13, 2004 5:15 PM Common Functions—Continued Muting the HT-R820THX With this function you can temporarily mute the output of the HT-R820THX. MUTING Press the remote controller’s [MUTING] button. The output is muted and the MUTING indicator flashes on the display, as shown. To unmute the HT-R820THX, press the remote controller’s [MUTING] button again, or adjust the volume. The output is unmuted and the MUTING indicator goes off.
HT-S870_En.book Page 40 Monday, September 13, 2004 5:15 PM Using the Listening Modes With its built-in surround-sound decoders and DSP programs, the HT-R820THX can transform your home listening room into a movie theater or concert hall. To get the most from surround sound, it’s important that you install and configure your speakers correctly. See page 19, “Speaker Distance” on page 48 and “Speaker Levels” on page 49.
HT-S870_En.book Page 41 Monday, September 13, 2004 5:15 PM Using the Listening Modes—Continued Selecting with the Remote Controller Selecting Listening Modes See “About the Listening Modes” on page 42 for detailed information about the listening modes. DVD CD MD CDR TV VCR CABLE SAT DIMMER TV INPUT SLEEP PM TO EN U MEN U + • The Dolby Digital and DTS listening modes can only be selected if your DVD player is connected to the HT-R820THX with a digital audio connection (coaxial or optical).
HT-S870_En.book Page 42 Monday, September 13, 2004 5:15 PM Using the Listening Modes—Continued • Dolby Pro Logic IIx Game About the Listing Modes Use this mode with video games that feature stereo sound. The HT-R820THX’s surround indicators show which speakers are active in each listening mode.
HT-S870_En.book Page 43 Monday, September 13, 2004 5:15 PM Using the Listening Modes—Continued Onkyo Original DSP Modes DTS-ES DTS-ES supports up to 6.1 channels. The HT-R820THX supports both DTS-ES Discrete and DTS-ES Matrix. Discrete mode is for use with DTS 6.1 material. With an additional surround-back channel, each 6.1 channel is digitally recorded for a realistic sense of movement and space. Use it with CDs, DVDs, and LDs that bear the DTS-ES logo. Matrix mode creates 6.
HT-S870_En.book Page 44 Monday, September 13, 2004 5:15 PM Using the Listening Modes—Continued Dolby Digital/DTS setting (5.1 or 6.1-channel playback) 3 ENTER If the Surr Back setting is set to anything other than None in the Speaker Configuration (page 50), and if the surround information in the current input signal is “3/2.1” or “3/3.1” (you can check the format of a digital input signal on page 35, “Displaying Source Information.
HT-S870_En.book Page 45 Monday, September 13, 2004 5:15 PM Recording This chapter explains how to record the selected input source to an AV component with recording capability, and how to record audio and video from two different sources. Recording the Input Source You can record only to AV components that are connected to the TAPE OUT or VIDEO 1 OUT sockets. See pages 24–32 for information on connecting your AV components to the HT-R820THX.
HT-S870_En.book Page 46 Monday, September 13, 2004 5:15 PM Advanced Function Using the Audio Adjust Functions These functions only work with speaker set A. Audio Adjust provides various functions for adjusting the sound.
HT-S870_En.book Page 47 Monday, September 13, 2004 5:15 PM Advanced Function—Continued Adjusting the DTS Neo:6 Music Mode ■ Center Image DTS Neo:6 derives a center-channel signal from stereo material, either analog or digital. In Music mode, the center speaker is intended to augment the left and right speakers, allowing them to faithfully reproduce the original stereo mix. For this reason, the center channel sound is not fully subtracted from the left and right channels.
HT-S870_En.book Page 48 Monday, September 13, 2004 5:15 PM Advanced Setup Speaker Distance 4 To get the best from surround sound, it’s important that the sound from each speaker reaches the listener at the same time. To achieve this, you need to specify the distance from each speaker to the listening position. Speaker Distance cannot be set while headphones are connected, Speaker B is on, or the multi channel input is being used.
HT-S870_En.book Page 49 Monday, September 13, 2004 5:15 PM Advanced Setup—Continued Speaker Levels 2 With this function you can adjust the volume of each speaker so that all speakers can be heard equally at the listening position. ENTER Speaker levels cannot be set while the HT-R820THX is muted, headphones are connected, Speaker B is on, or the multichannel input is being used.
HT-S870_En.book Page 50 Monday, September 13, 2004 5:15 PM Advanced Setup—Continued Volume Setup With this preference you can choose how the volume level is displayed. Abs (Absolute): Display range is MIN, 1 through 79, MAX. Rel (Relative): Display range is –∞ dB, –93 dB, –92 dB through +18 dB. The absolute value 62 is equal to the relative value 0 dB. 1 AMP 2 ENTER Press the [AMP] button followed by the [SETUP] button.
HT-S870_En.book Page 51 Monday, September 13, 2004 5:15 PM Advanced Setup—Continued 3 ENTER While the Subwoofer setting is selected, use the Left and Right [ ]/[ ] buttons to select Yes or No. Yes: Select if a subwoofer is connected. No: Select if no subwoofer is connected. 7 ENTER ENTER 4 ENTER ENTER 5 ENTER ENTER 6 ENTER ENTER Use the Down [ ] button to select “Front,” and then use the Left and Right [ ]/[ ] buttons to select Small-THX or Large. Small: Select if the front speakers are small.
HT-S870_En.book Page 52 Monday, September 13, 2004 5:15 PM Controlling Other Components You can use the HT-R820THX’s remote controller (RC571M) to control your other AV components, including those made by other manufacturers. To do this you first need to enter the appropriate remote control code for your DVD player, TV, VCR, cable receiver, or satellite receiver. Then you need to select the corresponding remote controller mode (see page 12).
HT-S870_En.book Page 53 Monday, September 13, 2004 5:15 PM Controlling Other Components—Continued Remote Control Codes When two or more codes are given, try each one in turn, and choose the one that works best. Depending on the manufacturer and component, the remote controller may not work as expected.
HT-S870_En.
HT-S870_En.
HT-S870_En.
HT-S870_En.book Page 57 Monday, September 13, 2004 5:15 PM Controlling Other Components—Continued 1. Use the mode buttons to select the appropriate remote controller mode. 2. Point the remote controller at your AV component, and use the following buttons (you must enter the appropriate remote control code first).
HT-S870_En.book Page 58 Monday, September 13, 2004 5:15 PM Troubleshooting Power Symptom The HT-R820THX shuts down immediately after being turned on? Possible cause Remedy The amp protection system has been activated. Contact your Onkyo dealer. The HT-R820THX is muted and the MUTING indicator is on. Unmute the HT-R820THX (page 39). Make sure that all audio connecting plugs are pushed in all the way. And make sure that the inputs and outputs of all components are connected properly (page 22).
HT-S870_En.book Page 59 Monday, September 13, 2004 5:15 PM Troubleshooting—Continued Symptom Possible cause Remedy The level of the surround back speaker is set at minimum. Check the volume of the surround back speaker (page 49). The Surround Back setting is set to None in the Speaker Configuration. Check the Surround Back setting in the Speaker Configuration (page 50). The selected listening mode doesn’t use the surround back speakers. Select another listening mode.
HT-S870_En.book Page 60 Monday, September 13, 2004 5:15 PM Troubleshooting—Continued Symptom Remote controller The buttons on the HT-R820THX work OK but those on the remote controller don’t? Possible cause Remedy The wrong remote controller mode is selected. Select the correct mode (page 12). The batteries are installed incorrectly. Check the batteries and correct as necessary (page 7). You’re not pointing the remote controller at the HT-R820THX’s remote sensor.
HT-S870_En.book Page 61 Monday, September 13, 2004 5:15 PM Troubleshooting—Continued Recording Symptom Sound can be heard from the speakers, but it cannot be recorded? Possible cause Remedy From the VIDEO 1 OUT, you’re trying to record the signal being fed into the VIDEO 1 IN, or from the TAPE OUT, you’re trying to record the signal being fed into the TAPE IN. To prevent signal loops and damage to the HT-R820THX, input signals are not fed through to outputs with the same name (e.g.
HT-S870_En.book Page 62 Monday, September 13, 2004 5:15 PM Specifications AV Receiver HT-R820THX Amplifier Section General Power output: All channels: Dynamic power: Power supply: Power consumption: Standby power consumption: Dimensions (W x H x D): THD (total harmonic distortion): Damping factor: Input sensitivity and impedance: Output level and impedance: Frequency response: 130 W (8 Ω, 20 Hz–20 kHz, FTC) 2 x 260 W (3 Ω, front) 2 x 200 W (4 Ω, front) 2 x 150 W (8 Ω, front) 0.
HT-S870_En.book Page 63 Monday, September 13, 2004 5:15 PM Specifications—Continued 6.1ch Home Theater Speaker Package ■ Powered Subwoofer (SKW-820) Type: Input sensitivity/impedance: Maximum output power: Frequency response: Cabinet capacity: Dimensions (W × H × D): Weight: Drivers unit: Power supply: Power consumption: Other: Bass-reflex 300 mV / 100 kΩ 220 W (Dynamic Power) 23 Hz–150 Hz 1.59 (44.9 L) 11-5/16" × 21-1/8" × 16-3/16" (287 × 536 × 411 mm) 43.3 lbs. (19.
HT-S870_En.book Page 64 Monday, September 13, 2004 5:15 PM Sales & Product Planning Div. : 2-1, Nisshin-cho, Neyagawa-shi, OSAKA 572-8540, JAPAN Tel: 072-831-8023 Fax: 072-831-8124 ONKYO U.S.A. CORPORATION 18 Park Way, Upper Saddle River, N.J. 07458, U.S.A. Tel: 201-785-2600 Fax: 201-785-2650 http://www.onkyousa.com ONKYO EUROPE ELECTRONICS GmbH Liegnitzerstrasse 6, 82194 Groebenzell, GERMANY Tel: +49-8142-4401-0 Fax: +49-8142-4401-555 http://www.onkyo.