
Instruction Manual
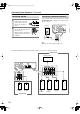
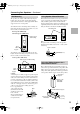
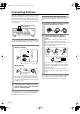
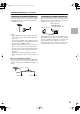
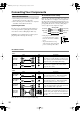
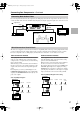
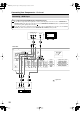
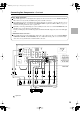
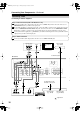
Table Of Contents
- Important Safety Instructions
- Precautions
- Speaker Precautions
- Features
- Contents
- Package Contents
- Front & Rear Panels
- Speakers
- Remote Controller
- Before Using the AV receiver
- Enjoying Home Theater
- Connecting Your Speakers
- Connecting Antenna
- Connecting Your Components
- About AV Connections
- Connecting Both Audio & Video
- Which Connections Should I Use?
- Connecting a DVD Player
- Connecting a VCR
- Connecting a Camcorder, Games Console, or Other Device
- Connecting a Satellite, Cable, Set-top Box, or Other Video Source
- Connecting a CD Player or Turntable
- Connecting the DS-A1XP RI Dock for the iPod (Audio Only)
- Connecting a Cassette, CDR, MiniDisc, or DAT Recorder
- Connecting Onkyo Components
- Connecting the Power Cord
- Turning On
- First Time Setup
- Playing Your AV Components
- Using the Tuner
- DS-A1XP RI Dock for the iPod
- Common Functions
- Using the Listening Modes
- Adjusting the Listening Modes
- Recording
- Advanced Setup
- Troubleshooting
- Specifications
22
Connecting Your Speakers
—Continued
Using a suitable cable, connect the AV receiver’s SUB-
WOOFER PRE OUT to an input on your powered sub-
woofer, as shown.
Note:
Make sure the cable is plugged all the way.
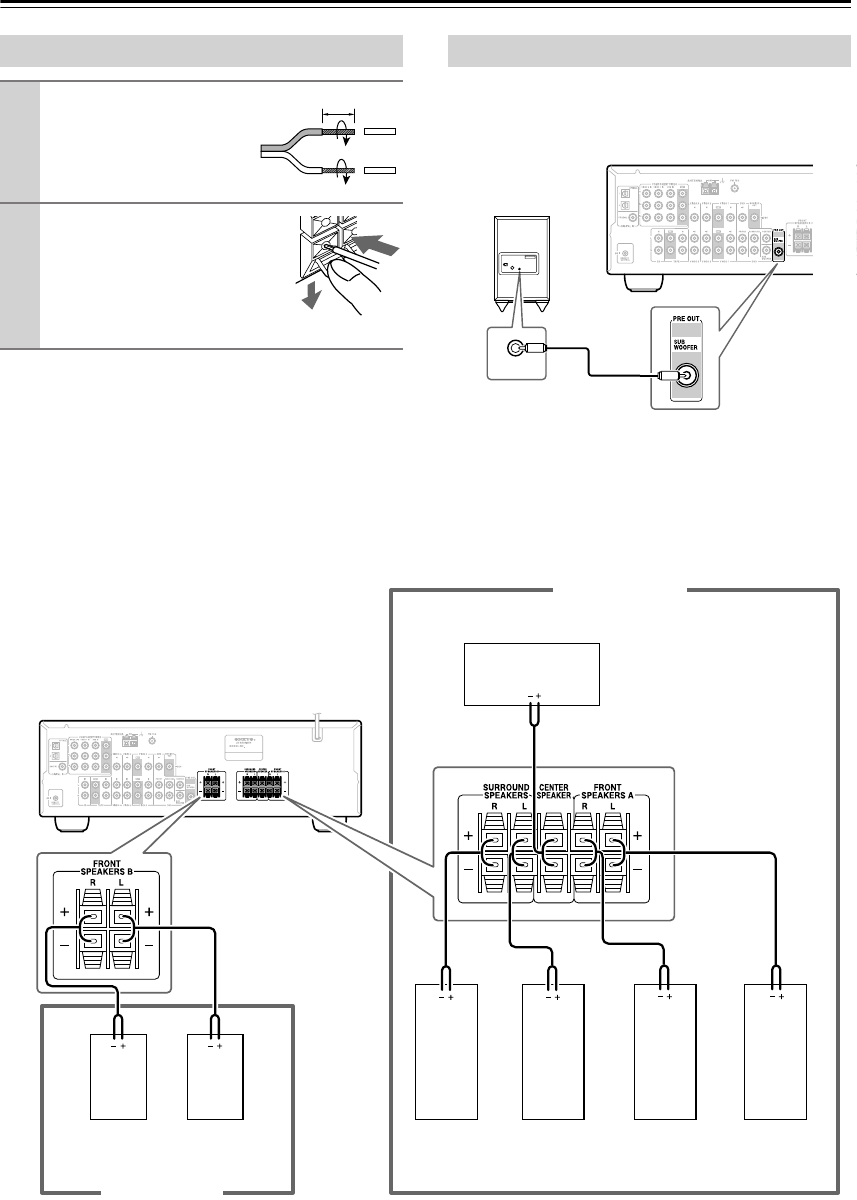
The following illustration shows which speaker should be connected to each pair of terminals.
Connecting Speaker
1
Strip 3/8" (10 mm) of insu-
lation from the ends of the
speaker cables, and twist
the bare wires tightly, as
shown.
2
While pressing the lever, insert
the wire into the hole, and then
release the lever.
Make sure that the terminals are
gripping the bare wires, not the
insulation.
3/8" (10 mm)
Connecting a Powered Subwoofer
LINE INPUT
LINE INPUT
Powered
subwoofer
Front left
speaker
Front right
speaker
Center speaker
Surround
right
speaker
Surround
left
speaker
Speaker Set A
Front left
speaker
Front right
speaker
Speaker Set B
HT-S4100_En.book Page 22 Friday, February 22, 2008 2:15 PM