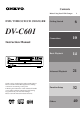
Contents Before Using Your DVD Changer DVD / VIDEO CD / CD CHANGER Getting Started 2 6 DV-C601 Connections 10 Basic Playback 14 Advanced Playback 21 Function Setup 32 Others 40 Instruction Manual NEXT SELECTION OPEN / CLOSE PAUSE STOP PLAY POWER REPEAT C D PLAY STANDBY / ON ON DIMMER DISPLAY DISC SKIP DISC 1 DISC 2 DISC 3 DISC 4 DISC 5 DISC 6 OFF DVD / VIDEO CD / CD CHANGER Thank you for purchasing the Onkyo DVD Changer.
WARNING: TO REDUCE THE RISK OF FIRE OR ELECTRIC SHOCK, DO NOT EXPOSE THIS APPLIANCE TO RAIN OR MOISTURE. CAUTION: TO REDUCE THE RISK OF ELECTRIC SHOCK, DO NOT REMOVE COVER (OR BACK). NO USER-SERVICEABLE PARTS INSIDE. REFER SERVICING TO QUALIFIED SERVICE PERSONNEL.
Precautions CAUTION: For Canadian model VISIBLE LASER RADIATION WHEN OPEN AND INTERLOCK FAILED OR DEFEATED. DO NOT STARE INTO BEAM. For models having a power cord with a polarized plug: CAUTION: TO PREVENT ELECTRIC SHOCK, MATCH WIDE BLADE OF PLUG TO WIDE SLOT, FULLY INSERT. CAUTION: NOTE: THIS CLASS B DIGITAL APPARATUS COMPLIES THIS PRODUCT UTILIZES A LASER. USE OF CONTROLS OR ADJUSTMENTS OR PERFORMANCE OF PROCEDURES OTHER THAN THOSE SPECIFIED HEREIN MAY RESULT IN HAZARDOUS RADIATION EXPOSURE.
Precautions 1.Regional restriction codes (region number) Regional restriction codes are built-in to DVD Changers and DVD videos for each sales region. If the regional code of the DVD Changer does not match one of the regional codes of the DVD video, playback is not possible. The region number can be found on the rear panel of the DVD Changer. (e.g: Region 1) 2.About This Manual This manual explains the basic procedures for operating your DVD Changer.
Table of Contents Important Safeguards/Precautions/Table of Contents .......... 2–5 Getting Started Features .................................................................................... 6 Supplied Accessories ................................................................ 7 Preparing the Remote Controller .............................................. 8 Installing the remote controller batteries ............................ 8 Using the remote controller ............................................
Features ■ Highlights that Set the DV-C601 ■ Audio Features • Dolby* Digital Audio Output • 6-Disc playback • Audiophile-Class Audio Performance • Direct Digital Path • DTS** Compatibility • Full 96-kHz/24-Bit Audio Resolution • Video CD playback • Full 96-kHz/24-bit resolution with 96-kHz/24-bit discs • Digital Audio Output (coaxial) • Optical Digital Audio Output • Direct digital path for signal purity • 1 Pair of Analog Outputs (RCA) • Enhanced black-level setting • Next Selection ■ Other Feat
Supplied Accessories After unpacking, check whether the box contains all items listed below. If anything is missing, contact the ONKYO dealer where you bought the DVD Changer. The number of accessories is indicated in brackets.
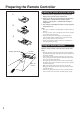
Preparing the Remote Controller Installing the remote controller batteries 1 1. Remove the battery compartment cover by pressing and sliding it away from the remote controller unit. 2. Insert two AA (R6- or UM-3)-size batteries into the battery compartment. Carefully follow the polarity diagram (positive (+) and negative (–) symbols) inside the battery compartment. 3. After batteries are installed and seated correctly, replace the compartment cover.
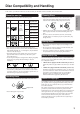
Disc Compatibility and Handling In this section, you will learn which discs can be used with your DV-C601, and how to handle, clean, and store them. Discs You can Use Cleaning Discs Disc mark Contents Disc size Maximum playback time Approx. 4 hours (single sided disc) Approx. 8 hours (double-sided disc) Approx. 80 minutes (single-sided disc) Approx. 160 minutes (double-sided disc) 12 cm VIDEO CDs Audio + Video (moving pictures) 12 cm Approx. 74 minutes 8 cm Approx.
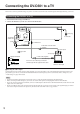
Connecting the DV-C601 to a TV Here is how to connect your DVD Changer to your TV set. In this case, both the video and audio signals will be played back by your TV set. Connecting the DV-C601 to a TV 1. Switch off the DVD Changer and theTV set. 2. Connect the DV-C601 to yourTV set as shown in the illustration.
Connecting to an Audio System and TV with COMPONENT VIDEO Inputs ■ It is also possible to “split” the audio and video signals by sending the video signal to your TV set and the audio signal to an amplifier.
Other Audio Playback Options ■ You can enjoy high-quality surround audio playback by connecting the DV-C601 to an amplifier equipped with a Dolby Digital, Dolby Pro Logic Surround, or DTS decoder. Furthermore you can transfer the signal of audio CDs to your amplifier in the digital domain if it is fitted with a digital input. See pages 10 and 11 for the video hookup of the DV-C601 to your TV set.
Getting Started Warnings • If you connect to the digital input of an amplifier that does not have a Dolby Digital decoder or DTS decoder, set the DV-C601’s “Audio Out Select” function to “PCM.” Any other setting may damage your ears or speakers when using high volume levels. • During playback of DTS-encoded audio CDs, excessive noise may be output from the ANALOG OUTPUTs.
CAUTION Keep your fingers clear of the disc drawer as it is closing to avoid personal injury. Playing back Discs POWER STANDBY/ON STANDBY/ON indicator 2 OPEN / CLOSE NEXT SELECTION DVD / VIDEO CD / CD CHANGER DISC SKIP DISC 1–6 PAUSE STOP PLAY POWER DV- C 601 REPEAT C D PLAY STANDBY / ON ON DIMMER DISPLAY DISC SKIP DISC 1 DISC 2 DISC 3 DISC 4 DISC 5 DISC 6 OFF This section shows you the basics on how to playback a disc.
To obtain a higher picture quality Occasionally, some picture distortion not usually visible during a normal telecast may appear on the TV screen during playback of a DVD video. This is due to the fact that DVD videos provide a higher resolution and therefore also more data to process. While the amount of noise depends on the TV you connect the DVD Changer to, reducing the sharpness setting on your TV when viewing DVD videos may alleviate the problem.
FR PLAY FF OPEN/CLOSE PAUSE/STEP Playing back Discs (continued) STOP / / / , ENTER 2 Fast reverse Fast forward 8 SlowMotion 30 Last Play 1 2 4 5 3 6 7 8 9 +10 0 REMOTE CONTROLLER RC-425DV You can play back discs at various speeds, and resume playback in various ways. Use the remote controller for the following functions. DVD VCD Direct Playback, Stop and Pause DVD VCD CD Fast Reverse and Fast Forward Playback ■ Direct Playback via the On-Screen Menu 1. Switch on your TV set.
PLAY PLAY PAUSE/STEP SLOW 1 2 3 1 2 4 5 6 4 5 6 7 8 7 8 9 +10 0 +10 0 9 RC-425DV REMOTE CONTROLLER DVD 1/4 The DVD Changer memorizes this location. 2 Only for the DVD video 1/8 the normal speed 1/4 1/8 the normal speed 1/4 the normal speed PLAY 1/2 1/2 the normal speed Press the PLAY button. The DVD Changer resumes playback from the location where playback was stopped. 1/8 TV screen 1/8 Press the STOP button at the location where you want to halt playback.
Locating Titles, Chapters, or Tracks DVD video Title 1 Chapter 1 Chapter 2 Title 2 Chapter 1 Chapter 2 VIDEO CD/ Audio CD Chapter 3 Track 2 Track 1 Track 3 Track 4 Track 5 Normally, DVD videos are divided into “titles”, while the titles are themselves sub-divided into “chapters”. VIDEO CDs and audio CDs are divided into “tracks”. You can quickly locate any specific title, chapter, or track.
DOWN PLAY UP / / / ENTER TOP MENU 1 2 4 5 6 7 8 3 9 +10 0 REMOTE CONTROLLER RC-425DV DVD VCD CD Getting Started CLEAR Numeric buttons SEARCH Selecting Chapters or Tracks ■ Direct Selection using the Numeric Buttons Note: Steps 1 and 2 are only necessary for DVD videos. Start with step 3 if you want to select a Track of a Video or audio CD.
Selecting a Precise Scene or Audio Passage PLAY 1 2 4 5 6 7 8 3 9 +10 0 Numeric buttons SEARCH It is also possible to directly select a given location and to start playback from there. This may come in handy when you want to view a given scene (DVD videos/Video CDs) or listen to a specific passage (audio CD) within the currently selected Title or Track.
Repeat Functions 1 2 4 5 6 7 8 9 3 +10 0 REPEAT A-B RC-425DV Your DVD Changer allows you to repeat a given Title, Chapter/track or disc indefinitely. It is also possible to repeat a given scene or audio passage (A–B Repeat).
Setting the Desired Playback Order PLAY / / / ENTER RETURN Title : 2 Chapter : 25 Title : 2 Chapter : 12 Title : 1 Chapter : 1 1 2 3 4 5 6 7 8 9 +10 0 REMOTE CONTROLLER MEMORY CLEAR Numeric buttons DISPLAY RC-425DV Your DV-C601 comes with a special 28-step memory that allows you to program the order in which the Titles and Chapters/tracks are to be played back. Such “sequences” can include material from several discs.
Disc number Title number Chapter number ENTER 2 2 5 1 2 ENTER Memory 2 Leaving the MEMORY display page To leave the MEMORY display page, press the MEMORY button. Correcting an entry of a previously programmed step: a) Use the / buttons to move the cursor to the corresponding memory number. b) Select the entry (D, T or C) you wish to change with the buttons.
Additional Playback Functions Numeric buttons 1 2 4 5 6 7 8 9 3 +10 0 DISC 1–6 REMOTE CONTROLLER RC-425DV DISC +/– NEXT SELECTION CD Next Selection: Preparing the next Audio Track During playback of an audio CD, you can already prepare the next track that will be played as soon as the current one is finished. The difference with direct selection of a track or disc is that playback of the prepared track starts only after the current track is finished (i.e. not right away).
2 4 5 6 7 8 9 3 +10 0 CD PLAY REMOTE CONTROLLER RC-425DV CD Getting Started 1 Using the DVD Changer as CD player 1 CD PLAY Press the CD PLAY button while the DVC601 is stopped or playing back a CD. The RPT message appears on the display and the REPEAT indicator lights to signal that all audio CDs will be repeated in sequence. CD PLAY Notes: Function Setup • The CD PLAY button does not work while the DV-C601 is playing back a disc other than an audio CD.
Additional Playback Functions (continued) TITLE Title : 1: 1 CHAPTER Chapter : 3: 3 Title : 2 Chapter : 2 Title : 3 Chapter : 1 PLAY UP The DV-C601’s Random playback functions allow you to select a mode where the DVC601 decides which Title or Chapter/track to play next. A similar function is available on most CD players.
DVD Video Functions / / / / / / 1 2 4 5 6 7 8 9 3 +10 0 ZOOM CLEAR ANGLE Angle : 1 Angle : 2 Angle : 3 1 2 4 5 6 7 8 9 3 +10 0 DVD DVD Zooming in CLEAR Changing the Camera Angle One of the new features of the DVD carrier is that some discs contain scenes shot from different angles. The following function allows you to select the desired angle. 1 1 ZOOM Press the ZOOM button during normal or slow (see page 17) playback or while playback is paused (“still”, see page 16).
DVD Video Functions (continued) / / / AUDIO Good morning! Bon jour! ¡Buenos días! 1 2 4 5 6 7 8 9 3 +10 0 REMOTE CONTROLLER CLEAR RC-425DV Your DV-C601 allows you to select the following audio-related settings. The number of options depends on the DVD video you are playing back. It is not possible to select an option for which there is no data on the DVD. Audio Playback Settings Language: A DVD video may contain several language versions of a movie. Select the preferred language.
Getting Started DVD Notes: Connections • Some discs allow you to change Audio settings only via the disc menu. In that case, press the MENU button and choose the desired language. • The Audio settings are not saved internally. When you switch off the DVD Changer or open the disc tray, the DV-C601 returns to the default setting. See page 34. • When you select an option that is not available on the selected DVD video, the DV-C601 ignores your setting and goes on using the previously selected language, etc.
DVD Video Functions (continued) / / / Good evening! Bon soir! ¡Buenas tardes! Some DVD videos also contain subtitles – sometimes even in several languages. Here is how to display them and select the language (if several languages are available). 1 2 4 5 6 7 8 9 +10 0 SUBTITLE ON/OFF SUBTITLE 3 REMOTE CONTROLLER CLEAR RC-425DV DVD Using the Subtitle Feature Selecting the Subtitle Language Turning Subtitles On or Off 1 1 SUBTITLE Press the SUBTITLE button during playback.
Using The On-Screen Display Functions VCD 8 9 +10 0 DISPLAY REMOTE CONTROLLER RC-425DV DVD Current title number DISPLAY Press the DISPLAY button during playback. Each time you press the DISPLAY button, the on-screen display changes as follows. DVD video Current chapter number e.g.
Advanced Settings SETUP ENTER RETURN The DV-C601 contains a lot more functions than have been covered so far. Most of these functions can only be accessed via the on-screen menu. Please note that not all available functions apply to all disc types supported by the DV-C601. Setting the language, for instance, has no effect for audio CDs. 1 2 3 4 5 6 7 8 9 +10 0 REMOTE CONTROLLER / / / RC-425DV Setting Procedure 1 Switch on your TV set.
Details CD Page Disc Menu Language Allows you to select the language to be used by the disc menus (menus included on the discs you are playing back). 34 Audio Language DVD Allows you to select the sound track language. 34 Subtitle Language DVD Allows you to select the subtitle language. 35 TV Shape DVD Allows you to adapt the picture size to the aspect ratio of your TV. 35 Black Level DVD VCD Allows you to set the “blackness” of the screen.
Advanced Settings (continued) LANGUAGE On-Screen Language Disc Menu Language Audio Language Subtitle Language ENG ENG ENG --- LANGUAGE Functions On-Screen Language DVD VCD CD This function allows you to select the language for the on-screen displays. • English • French • Spanish Disc Menu Language DVD This function allows you to select the language used by the disc menus. Note that you can only select a language supported by the DVD video in question.
Getting Started PICTURE TV Shape 4:3LB Black Level Nrml PICTURE Settings TV Shape DVD Use this function to select the subtitle language, or to switch the subtitles off altogether. • English • French • Spanish This is where you can specify the shape of your TV screen. This is important for determining whether you would like to see the whole picture, or a slightly bigger version.
Advanced Settings (continued) AUDIO Audio Out Select Dynamic Range Control Karaoke Vocal Extended Audio Feature Bitstream On Off Off AUDIO Settings Audio Out Select DVD VCD CD This function allows you to select the outputs and format for audio playback. Always select the setting that best matches your amplifier’s capabilities and input connectors. The “Bitstream” and “PCM” options refer to the DV-C601’s digital outputs. See also “Other Audio Playback Options” on page 12.
OPERATION Pause/Still Parental Lock Title Stop PBC On Gray Off On OPERATION Settings DISPLAY Settings VCD Pause/Still DVD CD This function allows you to activate or suppress the display of onscreen icons that inform you about the operational status. Off: On: Operational icons or messages (e.g. “Play”, “ displayed. Operational icons or messages (e.g. “Play”, “ displayed on-screen.
Advanced Settings (continued) OPERATION Settings (continued) 3. Press the / buttons to select the country whose standards were used to rate the DVD video. See the information supplied with the DVD for details. Viewable Level8 Level7 Level6 Level5 Level4 Level3 Level2 Level1 4. Press the / buttons to select the Parental Lock level, then press the ENTER button. ■ Changing the Parental Lock level Perform steps 2 – 4 above.
Table of Languages Getting Started Table of Languages and Their Abbreviations ––– Esperanto Estonian Basque Persian Finnish Fiji Faroese Frisian Irish Scottish Gaelic Galician Guarani Gujarati Hausa Hindi Croatian Hungarian Armenian Interlingua Interlingue Inupiak Indonesian Icelandic Hebrew Yiddish Javanese Georgian Kazakh Greenlandic Cambodian Kannada Kashmiri Kurdish Kirghiz Latin Abbreviation of the Language Language LN LO LT LV MG MI MK ML MN MO MR MT MY NA NE NO OC OM OR PA PL PS PT QU RM RN RO
Troubleshooting If your DV-C601 does not seem to work as expected, check the following table for the possible cause before contacting your ONKYO dealer or service. Symptoms and Corrections Correction Page No power. • The power plug is disconnected. • Insert the power plug firmly. 10, 11 No picture. • The TV is not set to receive DVD signal output. • Select the appropriate video input mode on the TV so that the DV-C601’s picture appears on the TV screen. • The video cable is not securely connected.
Identification of Controls See the pages in [ ] for details.
Identification of Controls (continued) Display • Pressing of the DIMMER button changes the brightness of the Display.
Most steps in this manual need to be performed using the supplied remote controller. That is why the functions of the remote controller’s buttons are explained in the relative chapters and sections. See the pages in [ ] for details.
Specifications DVD Changer/Outputs DVD Changer Power supply AC 120 V, 60 Hz Power consumption 19 W Weight 7.0 kg, 15.