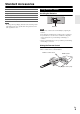
Contents DVD Receiver DR-645 Introduction ...................................2 Connections...................................8 Basic Operation...........................18 Instruction Manual Settings ........................................25 Listening to the FM Radio ..........29 Troubleshooting ..........................31 Thank you for purchasing an Onkyo DVD Receiver. Please read this manual thoroughly before making connections and plugging in the unit.
Introduction WARNING: TO REDUCE THE RISK OF FIRE OR ELECTRIC SHOCK, DO NOT EXPOSE THIS APPARATUS TO RAIN OR MOISTURE. CAUTION: TO REDUCE THE RISK OF ELECTRIC SHOCK, DO NOT REMOVE COVER (OR BACK). NO USER-SERVICEABLE PARTS INSIDE. REFER SERVICING TO QUALIFIED SERVICE PERSONNEL.
Precautions 1. Recording Copyright—Unless it’s for personal use only, recording copyrighted material is illegal without the permission of the copyright holder. 2. AC Fuse—The AC fuse inside the unit is not userserviceable. If you cannot turn on the unit, contact your Onkyo dealer. 3. Care—Occasionally you should dust the unit all over with a soft cloth. For stubborn stains, use a soft cloth dampened with a weak solution of mild detergent and water. Dry the unit immediately afterwards with a clean cloth.
This unit contains a semiconductor laser system and is classified as a “CLASS 1 LASER PRODUCT”. So, to use this model properly, read this Instruction Manual carefully. In case of any trouble, please contact the store where you purchased the unit. To prevent being exposed to the laser beam, do not try to open the enclosure. CAUTION: CLASS 1M VISIBLE AND INVISIBLE LASER RADIATION WHEN OPEN. DO NOT VIEW DIRECTLY WITH OPTICAL INSTRUMENTS. THIS PRODUCT UTILIZES A LASER.
Standard Accessories * FM antenna × 1 RCA video cable × 1 AC power cord × 1 Batteries (AAA, R03, UM-4) × 2 Remote control (RC-798S) × 1 Instruction manual (this document) × 1 Using Remote Control Installing the Batteries Note • In catalogs and on packaging, the letter at the end of the product name indicates the color. Specifications and operations are the same regardless of color. Batteries Note • If the remote control doesn’t work reliably, try replacing the batteries.
Features Highlights • Compact-Size Home Entertainment DVD Systems for iPod • iPod Direct Connection via Top Panel • Front Panel USB Interface for Flash Drives *3 “HDMI, the HDMI Logo, and High-Definition Multimedia Interface are trademarks or registered trademarks of HDMI Licensing LLC in the United States and other countries.
Contents Introduction Important Safety Instructions ......................................... 2 Precautions....................................................................... 3 Standard Accessories ..................................................... 5 Using Remote Control .................................................... 5 Features ............................................................................ 6 Connections Connecting the DVD receiver..........................................
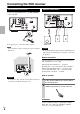
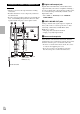
Connections Connecting the DVD receiver FM Antenna Connection Speaker Connection Connect the supplied FM antenna to the FM ANTENNA socket on the unit. If reception is poor, connect the outdoor antenna. Subwoofer Note • Before attaching a 75 ohm coaxial cable, disconnect the supplied FM antenna. Caution • To avoid damaging the speakers with a sudden high-level signal, be sure to switch the power off before connecting the speakers. Before connection Check the impedance of your speakers.
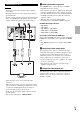
A HDMI video/audio output jack Connection to a TV Caution • Turn the power off to all components before making connections. • Read the instructions of each component you intend to use with this unit. • Be sure to insert each plug securely. To prevent hum and noise, avoid bundling the signal interconnection cables together with the AC power cord or speaker cables. B C A Use an HDMI cable to connect the unit to an HDMI compatible television or monitor.
Connection to Audio Components etc. Caution • Turn the power off to all components before making connections. • Read the instructions of each component you intend to use with this unit. • Be sure to insert each plug securely. To prevent hum and noise, avoid bundling the signal interconnection cables together with the AC power cord or speaker cables. F E D D Digital audio output jack Digital audio from DVD-Video, CD and Video CD is output from this jack.
Identifying the Parts Main Unit a b c d a Remote control sensor Receives signals from the remote control. Point the remote control at this sensor when operating the remote control. b Display c Disc tray d VOLUME knob Turn this knob (or press q VOL w of the remote control) to adjust the volume level. e f gh i jk l m n ■ Top view e 9 ON/STANDBY button/STANDBY indicator Use this button to turn the unit on and standby. The STANDBY indicator lights in the standby mode.
a 9 ON/STANDBY button Use this button to turn the unit on and standby. The STANDBY indicator lights in the standby mode. It turns off when the unit is turned on. Remote Control a c e g b t d v f x h z i s u c DVD button Use this button to select a “DVD Source”. w d SUBTITLE button Use this button to select the displayed subtitles during DVD playback. y A j B k l o C n F p q H e AUDIO button Use this button to select the audio for playback.
p 7 button In DVD, iPod or USB mode, use 7 to skip tracks/files/songs. e PRESET button In FM mode, use e PRESET to select a preset channel. q PROG button In DVD or USB mode, use PROG to programme tracks. MEMORY button In FM mode, use MEMORY to preset stations. r Number buttons Use these buttons to enter track numbers, passwords, etc. s SLEEP button When the unit is on, use SLEEP to set the sleep timer. TIMER button In the standby mode, use TIMER to set the wake up timer.
Discs Type of discs that can be played on this unit This unit can playback discs bearing any of the following logos: This unit does not support disc types not listed. DVD Video • Single-sided or double-sided discs • Single layer or dual layer discs • Dolby Digital, MPEG or Linear PCM digital audio • MPEG-2 digital video • This unit can play DVD-R discs recorded in DVD video format. • This unit can play DVD-RW discs recorded in DVD video format or DVD video recording format.
• The disc must be finalized in order to play. • This unit is NOT compatible with multi-session discs. • The CD-ROM must be ISO 9660 compatible. • It may take time to display a progressive JPEG picture. • Depending on the file size and compression rate, some JPEG pictures cannot be displayed correctly. • Some MP3 players etc. that can connect via the USB terminal cannot be played back with this unit. ABOUT DIVX VIDEO: DivX® is a digital video format created by DivX, Inc.
iPod To play your iPod through this unit, you must first attach the Universal Dock Adapter for your model of iPod. Handling precautions Prepare the adapter that came with your iPod. Compatible iPod models Made for: • iPod touch (1st and 2nd generation) • iPod classic • iPod (5th generation) • iPod nano (1st, 2nd, 3rd, 4th and 5th generation) Note How to open the dock cover • Before using this unit, update your iPod with the latest software, available from the Apple Web site.
USB flash drive compatibility • Only USB flash drive can be used. • Some MP3 players etc. that can connect via the USB port cannot be played back with this unit. • Hard disk drives, CD/DVD drives, and others connected via USB cannot be used. • The unit cannot copy, move, or delete files. • Playable format: FAT12, FAT16, FAT32 • NTFS, HFS, HFS+ cannot be used. • Max. number of playable folders: 300 • Max. number of playable files: 650 • USB flash drive cannot be used by way of the USB hub.
Basic Operation Basic Operation 1 2 3 Press 9 ON/STANDBY to turn the unit on. • The unit turns on with the source that was last selected. Press DVD, iPod/USB, FM, or LINE to select a source. The selected source is shown on the front panel’s display. Press LINE repeatedly to switch between LINE 1 and LINE 2.
Basic Operation Recording a Source You can record a source onto a CD recorder or a cassette tape recorder connected to the COAXIAL DIGITAL AUDIO OUT jack or the LINE OUT jacks. 1 2 Select a source to be recorded by pressing DVD, iPod/USB, FM, or LINE. Start recording. • When the recording device is connected to the LINE 1 IN jack and the LINE OUT jack, you cannot select the LINE 1 Source for the recording source. Listening to a Disc 1 2 3 4 5 Dimmer Press DVD to select “DVD Source”.
On-screen Menu An on-screen menu is shown when a DVD, USB or Video CD with Playback Control (PBC) content is loaded. The way in which the menu works may differ according to disc. DVD menus Use q/w/e/r to select the menu item from a DVD, and confirm the selection using the ENTER. MP3 and Windows Media-formatted audio files When a disc or USB is loaded, a list of directories appears on the screen and the first file will automatically start playback.
Basic Operations for iPod, Disc and USB Flash Drive Pausing playback (Freezing the picture) Press 1/3 to pause audio playback. Any DVD or Video CD image is frozen. Press 1/3 again to restart playback. Caution Selecting a Chapter or Track Use the number buttons to select tracks or chapters for playback. For instance, to select track number 35, press 10+, 10+, 10+ and 5. To select a MP3 or WMA file, enter 3 digit numbers. As an example, to select number 5, press 10/0, 10/0 and 5.
Selecting Subtitles Repeated presses of SUBTITLE cycle through available languages on a disc. • Subtitles do not always appear immediately after the language has been selected. It may take a few seconds until the subtitles appear. • Some captions on some discs cannot be removed or changed using this button. Some discs may have only one sub-caption language, in which case, the choice is obviously restricted to one subtitle or no subtitles.
Changing the Display Mode Each time DISPLAY is pressed during playback, following information appears on the screen. ■ DVD ` Title Elapsed time ` Title Remain time ` Chapter Elapsed time ` Chapter Remaining time ` Display off ■ CD/Video CD ` Single Elapsed time ` Single Remain time ` Total Elapsed time ` Total Remain time ■ DivX® ` Title Elapsed time ` Title Remain time ` Chapter Elapsed time ` Chapter Remaining time ` Display off Time Search (VCD/CD) You can start playback from the specified hour/minute.
Time Search You can start playback from the specified hour/minute/ second. 1 2 Enter your desired hour, minute and second using the number buttons. Playback starts from the selected part. Up to 20 chapters/tracks can be programmed in the desired order. 2 3 4 En 24 1 During playback, press SEARCH twice. “GO TO -:- -:-” appears on the screen. Programmed Playback (DVD/VCD/CD) 1 Programmed Playback (MP3/WMA) 2 3 4 5 If another source is selected, press DVD to select “DVD Source”.
Settings Settings Introduction This chapter describes how to use the SETUP menu. Most settings and adjustments are required to be set when you first use the system. 1 2 3 4 5 6 Turn on the unit and the connected television or monitor. • The SETUP menu is available only in the “DVD Source” mode or the “USB Source” mode. If another source is selected, press INPUT on the unit to select the “DVD Source” or the “USB Source”. • You can also use the remote control’s DVD or iPod/USB to select source.
OSD (ON SCREEN DISPLAY) LANGUAGE 3D PROCESSING Select the desired language for on screen menus of the unit from the following: (European and North American) `ENGLISH `FRANÇAIS `DEUTSCH `ITALIANO `ESPAÑOL (Hong Kong) `English `Chinesetrad ■ REVERB MODE This setting provides following sound effects: `OFF `CONCERT `LIVING ROOM `HALL `BATHROOM `CAVE `ARENA `CHURCH • This function is effective only when playing back a DVD disc recorded with Dolby Digital. This control has no effect on other discs.
VIDEO SETUP TV MODE This setting allows the selection of interlaced (INTERLACE) or progressive-scan (PROGRESSIVE) video from the component video outputs. ` PROGRESSIVE: For progressive scan TV: turn on the progressive scan mode. ` INTERLACE: For ordinary TV: turn on the interlace mode. • When your TV is not compatible with progressive scan, never select “PROGRESSIVE”. No picture will be shown on the monitor.
PREFERENCE TV TYPE `PAL: Select this when the unit is connected to a PAL TV. `AUTO: Select this when the unit is connected to a Multi TV. `NTSC: Select this when the unit is connected to an NTSC TV. AUDIO, SUBTITLE, DISC MENU You can select a preferred language for audio, subtitle and disc menu. • When you select a preferred language that is not recorded on the DVD, one of the recorded languages is automatically selected.
Listening to the FM Radio Listening to the FM Radio 1 2 Press FM to select “FM Radio”. Hold down q TUNING w for more than 1 seconds to select the station you want to listen to (Auto selection). When a station is tuned in, the tuning process will stop automatically. Repeat this step until the station you want to listen to is found. • If you want to stop the tuning process, press q TUNING w.
Listening to an External Source 1 Connect a cassette tape deck etc. to LINE 1 IN jack of the unit using commercially-available RCA cables. Or Connect the audio output jack of a portable audio player to the LINE 2 IN jack of the unit. • When you connect the portable audio player to LINE 2 IN jack of the unit, use the stereo mini plug cable. 2 3 Wake Up Timer The unit can be programmed to turn on at a specified time. • Adjust the clock before setting the timer.
Troubleshooting Troubleshooting To keep the warranty valid, never try to repair the system yourself. If you encounter problems when using this unit, check the following points before requesting service. If normal operation cannot be obtained, unplug the power cord from the outlet and plug it again. This resets the internal micro-computer which can be disturbed during electrical storms, power interruptions, etc.
■ Disc does not play Insert a readable disc and ensure that the label side faces up. Check the disc type, color system and regional code. Check for any scratches or smudges on the disc. iPod ■ No Sound or Video Make sure your iPod is connected properly. Press MENU to exit the system setup menu. If there’s no video, make sure your iPod supports TV out. Disable the password for parental control or change the rating level. Make sure your iPod is playing.
Specifications Amplifier Section DVD Player Section Rated Output Power All channels: (North American) 20 watts minimum continuous power per channel, 8 ohm loads, 2 channels driven from 20 Hz to 20 kHz, with a maximum total harmonic distortion of 10% (FTC) (Others) 2 ch × 40 W at 4 ohms, 1 kHz (IEC) THD (Total Harmonic Distortion) 10% (Power Rated)/0.05% Damping Factor 30 (1 kHz, 4 Ω, 1 W) Input Sensitivity and Impedance 600 mV/47 kΩ (LINE) Rated RCA Output Level and Impedance 1000 mV / 1.
■ HDMI Output Resolution OUT 1080p/1080i ■ Video Outputs Component Composite 1 1 ■ Audio Inputs Analog LINE1/LINE2 ■ Audio Outputs Digital 1 (Coaxial) Analog 1 (LINE) Subwoofer Pre Output 1 Speaker Outputs SPEAKERS (L/R) Phones 1 (3.5 ø) ■ Others USB iPod Connector 1 1 • Design and specifications are subject to change without notice. • Weight and dimensions are approximate.
Memo En 35
Sales & Product Planning Div. : 2-1, Nisshin-cho, Neyagawa-shi, OSAKA 572-8540, JAPAN Tel: 072-831-8023 Fax: 072-831-8163 ONKYO U.S.A. CORPORATION 18 Park Way, Upper Saddle River, N.J. 07458, U.S.A. Tel: 800-229-1687, 201-785-2600 Fax: 201-785-2650 http://www.us.onkyo.com/ ONKYO EUROPE ELECTRONICS GmbH Liegnitzerstrasse 6, 82194 Groebenzell, GERMANY Tel: +49-8142-4401-0 Fax: +49-8142-4401-555 http://www.eu.onkyo.