Compact Disc Player C-7000R Instruction Manual En
Introduction WARNING: TO REDUCE THE RISK OF FIRE OR ELECTRIC SHOCK, DO NOT EXPOSE THIS APPARATUS TO RAIN OR MOISTURE. CAUTION: TO REDUCE THE RISK OF ELECTRIC SHOCK, DO NOT REMOVE COVER (OR BACK). NO USER-SERVICEABLE PARTS INSIDE. REFER SERVICING TO QUALIFIED SERVICE PERSONNEL.
Precautions 1. Recording Copyright—Unless it’s for personal use only, recording copyrighted material is illegal without the permission of the copyright holder. 2. AC Fuse—The AC fuse inside the unit is not userserviceable. If you cannot turn on the unit, contact your Onkyo dealer. 3. Care—Occasionally you should dust the unit all over with a soft cloth. For stubborn stains, use a soft cloth dampened with a weak solution of mild detergent and water. Dry the unit immediately afterwards with a clean cloth.
This unit contains a semiconductor laser system and is classified as a “CLASS 1 LASER PRODUCT”. So, to use this model properly, read this Instruction Manual carefully. In case of any trouble, please contact the store where you purchased the unit. To prevent being exposed to the laser beam, do not try to open the enclosure. CAUTION: CLASS 1M VISIBLE AND INVISIBLE LASER RADIATION WHEN OPEN. DO NOT VIEW DIRECTLY WITH OPTICAL INSTRUMENTS. THIS PRODUCT UTILIZES A LASER.
Features • Plays Audio CD, CD-R, CD-RW, MP3 CD, and WMA CD* • DIDRC (Dynamic Intermodulation Distortion Reduction Circuitry) • Separate Digital/Analog Circuitry • Separate Massive Transformers for Digital and Analog Circuitry (Toroidal Transformer for Analog Circuitry) • Thermally Regulated High-Precision Clock • Silent Disc Mechanism with Solid Die-Cast Aluminum Tray • Separate Anti-Vibration Aluminum Panels for Top, Front, and Sides • Side-mounted Circuit Board Construction to Reduce Vibration • PLL Ultra
Technologies DIDRC (Dynamic Intermodulation Distortion Reduction Circuitry) Since the advent of digital audio, the values of S/N (signal-to-noise) ratio have risen significantly. However, it is also recognized that in terms of perceived S/N, analog audio sources are not inferior to digital sources. Generally, S/N measures the ratio when sound is and not produced, but takes no account of the noise generated during sound reproduction.
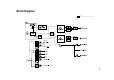
Block Diagram DIDRC (Dynamic Intermodulation Distortion Reduction Circuitry) En 7
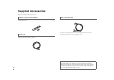
Supplied Accessories Make sure you have the following accessories: Remote controller and two batteries Remote controller (RC-796C) . . . . . . . . . . . . . . . . . . . . . . . . . . . . . . . . . . . . . . . . . . . . . . (1) Batteries (R03/AAA). . . . . . . . . . . . . . . . . . . . . . . . . . . . . . . . . . . . . . . . . . . . . . . . . . . . . (2) Audio connection cable Audio connection cable (0.8 m/2.6 ft) . . . . . . . . . . . . . . . . . . . . . . . . . . . . . . . . . . . . . . .
Contents Introduction Important Safety Instructions .................................................................................2 Precautions...............................................................................................................3 Features ....................................................................................................................5 Technologies ............................................................................................................
Before Using the Compact Disc Player Installing the Batteries 1 To open the battery compartment, press the small hollow and slide the cover. Using the Remote Controller Installing the Compact Disc Player To use the remote controller, point it at the compact disc player’s remote control sensor, as shown below.
Getting to Know the Compact Disc Player Front Panel a b c d e k f l g h i j m n The page numbers in parentheses show where you can find the main explanation for each item. a ON/STANDBY button (➔ 21) Use this button to set the compact disc player to On or Standby. b Standby LED (➔ 21) Lights when the compact disc player is in Standby mode. c Remote control sensor (➔ 10) The sensor receives control signals from the remote controller. d Display (➔ 12) See “Display”.
Display ab k l c d e f g hi j m For detailed information, see the pages in parentheses. a 1 indicator (➔ 22) Lights during playback. b 3 indicator (➔ 22) Lights when playback is paused. c MEMORY indicator (➔ 26, 27, 28) Lights during memory playback. d FOLDER indicator (➔ 23) Lights together with the folder name. e TRACK indicator (➔ 22) Lights together with the track number or file name. f TOTAL indicator (➔ 21) Lights when the total and remaining time of the track are shown.
Rear Panel a a AUDIO OUTPUT ANALOG L/R jacks Connect the analog audio in jack of an amplifier or similar to this jack, using the supplied audio cable. b AUDIO OUTPUT DIGITAL AES/EBU jack This balanced AES/EBU output is for connecting a component with a balanced AES/EBU input. c AUDIO OUTPUT DIGITAL COAXIAL jack This coaxial digital audio output is for connecting components with coaxial digital audio inputs, such as preamplifier.
Remote Controller You can also use the remote controller to control your Onkyo C-7000R. For detailed information, see the pages in parentheses. a j b c k a 8 button (➔ 21) Sets the compact disc player to On or Standby. f !/"/#/$ and ENTER buttons Used to select and adjust settings. b DIMMER button (➔ 24) Adjusts the display brightness. g SEARCH button (➔ 29) Search for a folder on a disc containing MP3 or WMA tracks. c DISPLAY button (➔ 30) Displays information about the current input source.
Disc Note Supported Discs CD playback with copy-control function The compact disc player supports the following discs. Audio CD PCM CD-R Audio CD, MP3, WMA CD-RW Audio CD, MP3, WMA • Do not use discs designed for purposes other than audio, such as CD-ROMs for PC use. Abnormal noise could damage the speakers or compact disc player. • The compact disc player supports CD-R and CD-RW discs.
Playback of MP3 and WMA CDs MP3 and WMA files recorded on a CD-R/CD-RW can be played with this compact disc player. • Use discs which have been recorded following the ISO9660 Level 2 file system. (The supported directory depth is eight levels, the same as ISO9660 Level 1) Discs recorded with the hierarchical file system (HFS) cannot be played. • Always close the disc tray. Note • A disc recorded with a recorder or personal computer may not play in some cases.
Connections Connections Cable and Jacks Balanced AES/EBU This is a professional digital audio interface. Balanced AES/EBU cables are used for better noise immunity and longer cable runs. The maximum sampling rate for PCM output is 44.1 kHz/16 bit, 2ch. Optical digital audio OPTICAL Coaxial digital audio Optical digital connections allow you to enjoy digital sound. The maximum sampling rate for PCM input is 44.1 kHz/16 bit, 2ch. Coaxial digital connections allow you to enjoy digital sound.
Connecting the Power Cord Compact Disc Player C-7000R AC INLET Supplied power cord To an AC wall outlet (Plug type varies from country to country.) 1 Make sure that the main power of the compact disc player is turned off. 2 Connect all of your components. 3 Connect the supplied power cord to the compact disc player’s AC INLET. 4 Plug the power cord into an AC wall outlet. Tip • To reduce noise, do not tie the signal cable and power cable together.
Connecting a Preamplifier or Integrated Amplifier Analog Connection Digital (Optical or Coaxial) Connection Preamplifier P-3000R Preamplifier P-3000R L R Connect either of them. Compact Disc Player C-7000R This is an example of analog connection using the preamplifier P-3000R. Compact Disc Player C-7000R This is an example of digital connection using the preamplifier P-3000R. Connect either of them.
Digital (AES/EBU) Connection Preamplifier P-3000R Compact Disc Player C-7000R This is an example of AES/EBU connection using the preamplifier P-3000R.
Turning On & Basic Operations Basic Operations Turning On/Off the Compact Disc Player Turning On the Compact Disc Player ON/STANDBY POWER 8 1 Set POWER to the ON position (^) on the front panel. 2 Press 8 to turn on the compact disc player. The compact disc player comes on, the display lights, and the Standby LED goes off. You can also use compact disc player’s ON/STANDBY. Turning Off the Compact Disc Player 1 Press 8 to set the compact disc player to Standby.
Playing the Disc 0 3 2 1 2 Place the disc on the tray with the label-side facing up. 76 ■ To Select Tracks Press 6 to select the next track/file or 7 to select the previous track/file. • If you press 7 during playback or while playback is paused, the beginning of the current track/file is selected. • If you select a track/file while playback is stopped, press 1 to start playback. • When 7/6 are pressed, the following Disc information is displayed for MP3/WMA.
Selecting Files (MP3/WMA) Selecting Files in Navigation Mode For MP3/WMA CDs, files (MP3/WMA files) may be organized in a hierarchically, with folders containing files and subfolders, as shown below. Root Folder #1 2 Press " or ENTER (front panel: 1). The first folder name in ROOT appears on the display. If the disc contains no folders, the first file name appears. 3 Use #/$ or 7/6 to select other folders and files at the same level. To move up a level, press ! or 3 (front panel: 2).
Setting the Display Brightness Selecting Files in All Folder Mode 2 1 3 Press " (front panel: 1). The first file name inside the folder appears. Use #/$ or 7/6 to select the files within the folder. DIMMER To select another folder, press 3 again (front panel: 2), and then use 7/6 to select it. 76 4 3, 7, 1, 6, 2 Press ENTER or 1 to start playback. Playback will start with the specified file or folder and continue until all of the file on the disc have been played.
Advanced Operations Advanced Operations Repeat Playback 1 Press REPEAT repeatedly to select Repeat All, Repeat 1 or Repeat Off. The “~” or “~ 1” indicator lights. Repeat All → Repeat 1 → Repeat Off Repeat All REPEAT Repeat 1 In repeat playback, you can play an entire disc repeatedly, play one track repeatedly, or combine it with memory playback to play the playlist repeatedly, or random playback to play all of the tracks on the disc in random order repeatedly.
Memory Playback (CD) 1 0 Press MEMORY. The MEMORY indicator lights. MEMORY indicator DISPLAY 2 7, 1, 6, 5, 4 ENTER Use 7/6 to select the first track you want to add to the playlist, and then press 1 or ENTER. Track number Playlist number Repeat this step to add additional tracks to the playlist. You can alternatively use the number buttons to select tracks. 3 MEMORY CLEAR In memory playback, you can create a playlist of up to 25 tracks.
Memory Playback (MP3/WMA) Memory Playback in Navigation Mode 2 1 1 Press MEMORY. The MEMORY indicator lights. 2 Press " or 2. The compact disc player enters Navigation mode and “[ROOT]” appears on the display. ■ To Change the Display While the memory setting operations, press DISPLAY to change the display information as follows: File name → Folder name → Folder number/File number Note • See “Selecting Files (MP3/WMA)” for the Navigation Mode information (➔ 23).
Memory Playback in All Folder Mode 2 1 76 3, 7, 1, 6, 2 4 Press " (front panel: 1). 5 Use #/$ or 7/6 to select the files. 6 Press 1 to memorized the first file. 7 Press 3 (front panel: 2), then repeat steps 3 to 6. To memorize other files of the same folder in the playlist, repeat steps 5 to 6. 8 Press ENTER (front panel: 1). Memory playback starts. Note • See “Selecting Files (MP3/WMA)” for the All Folder Mode information (➔ 24).
Random Playback Selecting a Folder (Search Mode) Tip 7, 6 • Random playback is cancelled when you press 0 to open the disc tray. • Random playback is cancelled when you press 8 or ON/STANDBY to turn off the compact disc player. ENTER RANDOM 1 SEARCH In random playback, all of the files on the disc are played in random order. This mode can only be used while playback is stopped. 1 While playback is stopped, press RANDOM. The RANDOM indicator lights.
Displaying Disc Information During playback or pause (Audio CD Display) DISPLAY Folder name: Name of the current folder. Elapsed file time: The length of time that the current file has been playing (default display). Remaining file time: The amount of time remaining for the current file (REMAIN indicator appears). Title name: Title of the current file (if ID3 tag present). When there is no ID3 tag, the message “TITLE-NO DATA” appears.
Custom Setup Custom Setup Setup Procedures Preferences AUDIO 7, 1, 6 #, $ ENTER SETUP 1 Press SETUP. 2 Use #/$ or 7/6 to select the preference you want to change. The preferences are explained in the next column. 3 Press ENTER or 1. 4 Use #/$ or 7/6 to select the preference’s options. 5 Press ENTER or 1. When the preference has been set, “FINISH” appears on the display. To cancel the procedure at any point, press SETUP.
EXTRA ■ ID3-VER1 `READ (default) `NO READ This preference determines whether or not version 1.0/1.1 tags are read and displayed. When set to “NO READ”, version 1.0/1.1 ID3 tags will not be displayed. ■ ID3-VER2 `READ (default) `NO READ This preference determines whether or not version 2.2/2.3/2.4 tags are read and displayed. When set to “NO READ”, version 2.2/2.3/2.4 ID3 tags will not be displayed.
Others Troubleshooting Power Can’t turn on the Compact Disc Player. • Make sure that the power cord is properly plugged into the wall outlet (➔ 18). • Unplug the power cord from the wall outlet, wait 5 seconds or more, then plug it in again. The Compact Disc Player turns off unexpectedly. • When the set ASb starts running, the compact disc player will automatically go Standby (➔ 32). Audio There’s no sound. • Check all connections and correct as necessary (➔ 17).
Disc Playback Can’t play a disc. • The disc is upside down. Load the disc with the labelside facing up (➔ 15, 22). • The disc is dirty. Remove the disc and clean it (➔ 15). • If condensation appears, unplug the power cord and leave the compact disc player more than 3 hours at room temperature. • Make sure the disc is standard. See “Disc Note” (➔ 15). • CD-R/CD-RW that are not finalized cannot be played. External Components No sound is heard from a connected component.
Specifications C-7000R Frequency Response Signal to Noise Ratio Audio Dynamic Range THD (Total Harmonic Distortion) Audio Output/Impedance Optical Coaxial AES/EBU Rated RCA Output Level and Impedance Digital Outputs Analog Stereo Outputs Balance Output 2 Hz - 20 kHz 116 dB 100 dB 0.0015 % –22.5 dBm 0.5 Vp-p / 75 Ω 3.3 Vp-p / 110 Ω 2.
2-1, Nisshin-cho, Neyagawa-shi, OSAKA 572-8540, JAPAN Tel: 072-831-8023 Fax: 072-831-8163 http://www.onkyo.com/ 18 Park Way, Upper Saddle River, N.J. 07458, U.S.A. Tel: 800-229-1687, 201-785-2600 Fax: 201-785-2650 http://www.us.onkyo.com/ Liegnitzerstrasse 6, 82194 Groebenzell, GERMANY Tel: +49-8142-4401-0 Fax: +49-8142-4401-555 http://www.eu.onkyo.