
Operation Manual

9
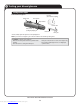
TESTING YOUR BLOOD GLUCOSE
Preparing your sample site
Before you test your blood glucose, wash your hands and forearm (if applicable)
thoroughly with warm, soapy water. Rinse and dry.
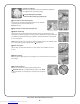
Lancing and sampling from your ngertip
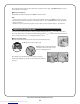
Remove the blue (or black) cap by snapping it o
Insert a sterile lancet into the lancing device
Insert the lancet into the holder and push in rmly. Twist the protective disk until it
separates from the lancet and save the disk for later use.
Do Not twist the lancet.
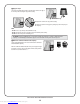
Replace the blue (or black) cap by snapping it back on
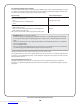
Adjust the depth setting
The lancing device has nine puncture depth settings, numbered 1 through 9. The smaller numbers are for a
shallower puncture, and the larger numbers are for a deeper puncture. Shallower punctures work for children and
most adults. Deeper punctures work well for people with thick or callused skin. Twist the blue (or black) cap until
the correct setting appears.
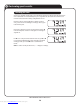
NOTE: A shallower puncture may be less painful. Try a shallower setting rst and increase the depth until you nd
the one deep enough to get a large enough drop of blood ( approximate size).
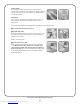
Cock the lancing device
Slide the cocking control back until it clicks. If it does not click, it may have been cocked when you inserted
the lancet.
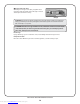
Puncture your nger
Hold the lancing device rmly against the side of your nger. Press the release button. Remove the lancing device
from your nger.
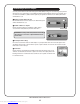
Get a round drop of blood
Gently squeeze and/or massage your ngertip until a round drop of blood
( approximate size) forms on your ngertip. If the blood smears or runs, Do Not
use that sample. Wipe the area and gently squeeze another drop of blood or puncture
a new site.
Downloaded from www.Manualslib.com manuals search engine