
User's Manual

41 - English
OPERATION
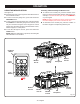
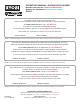
PROGRAMMING THE OUTDOOR KEYPAD
See Figures 76 - 77.
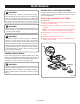
Install outdoor keypad and battery as described earlier
in the Installation section.
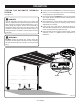
Open the garage door.
Press and hold the PROGRAM button on the garage door
opener’s console until the LED lights on the bottom of
the opener flash three times, indicating the console is in
programming mode.
Open the cover on the outdoor keypad and press the ON/
PROGRAM button. The keypad will light up.
Enter your desired PIN (4 digits), then press the 0 button
and hold until the door moves.
When the 0 button is released, the opener’s LED lights
should illuminate to indicate the set-up is complete.
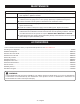
Once the outdoor keypad is programmed, press the ON/
PROGRAM button and enter your PIN to open or close
the garage door.
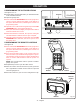
PROGRAMMING THE REMOTE CONTROLS
See Figure 78.
Press and hold the PROGRAM button on the garage door
opener’s console until the LED lights on the bottom of
the opener flash three times, indicating the console is in
programming mode.
Press and hold either button on the remote control for
three seconds to sync the button the garage door opener.
The LED lights on the garage door opener will flash three
times to confirm that the button and the opener are
synced.
NOTE: The second button can be synced to another
garage door opener.
Repeat this process to sync the other remote.
After the remote controls have been synced, press the
left or right button on either remote control to open and
close the garage door.
Store the remotes on your car’s visor using the visor clip.
Program
Button
Enter
Button
Program
Console
Door
Remote
Control
Buttons
Fig. 77
Fig. 76
Fig. 78