HCG-801-E.book Page 1 Tuesday, December 13, 2011 5:35 PM Portable, cordless, single-channel ECG Monitor Model HCG-801 • Instruction Manual Thank you for purchasing the OMRON Portable ECG Monitor. Before using this unit for the first time, please be sure to read this instruction manual carefully and use the unit properly. Please keep this instruction manual on hand for future reference. OMRON assumes no responsibility for personal injury or damage sustained by or through use of this product.
HCG-801-E.book Page 2 Tuesday, December 13, 2011 5:35 PM Contents Before Using the Unit Introduction .............................................................................................................. 3 Intended Use........................................................................................................... 3 Notes on Safety ........................................................................................................ 4 1. Know Your Unit ..................................
HCG-801-E.book Page 3 Tuesday, December 13, 2011 5:35 PM Introduction Your OMRON HCG-801 is an easy-to-use electrocardiograph unit that can record and store electrocardiogram (ECG) measurements of your heart rhythm. Each ECG reading records about 30-second measurement and these ECG readings can help your doctor monitor your condition. It also includes guidance screens to help you obtain good results when taking measurements.
HCG-801-E.book Page 4 Tuesday, December 13, 2011 5:35 PM Notes on Safety This unit is designed for monitoring the ECG waveform. Never use the unit to monitor vital signs and acute events. - Self-diagnosis and treatment is dangerous. The measurement results are for monitoring purposes only, and should never be used as a basis for starting or modifying treatment without independent confirmation by medical examination. - The values displayed by the unit are the values at the time of measurement.
HCG-801-E.book Page 5 Tuesday, December 13, 2011 5:35 PM Notes on Safety • Do not use batteries of a type other than that specified in this manual. • Do not apply over clothing or touch the electrodes with your left hand. • Do not take measurements when there are drops of water on your skin, such as from sweat or after bathing. • Do not take measurements where the unit will be exposed to strong electromagnetic forces. Caution! • Do not expose the unit to static electricity.
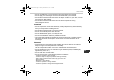
HCG-801-E.book Page 6 Tuesday, December 13, 2011 5:35 PM 1. Know Your Unit Main Unit K A J B I C D H E G F A. (Power/Cancel) button Turns the power on/off and cancels measurement. B. Chest electrode Place this against your chest when taking a measurement. C. Display Displays the wave pattern after measurement, and displays menus and setting options. D. MENU button Displays or closes the menu screen. E. F. button Selects the highlighted menu option or ECG data. Clears error messages. H.
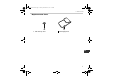
HCG-801-E.book Page 7 Tuesday, December 13, 2011 5:35 PM 1. Know Your Unit Replacements Parts L L. SD memory card M M.
HCG-801-E.book Page 8 Tuesday, December 13, 2011 5:35 PM 1. Know Your Unit Display The screen is used to display the guidance screens and results of ECG readings, adjust settings, and manage ECG data stored on the SD memory card or in unit memory. Menus N O P Q R Menu screen Settings (SET menu) screen The main menu screen is displayed when you press the MENU button. The setting menu screen is displayed when you select the SET menu and press the OK button. N.
HCG-801-E.book Page 9 Tuesday, December 13, 2011 5:35 PM 1. Know Your Unit ECG Graph This screen is displayed when you use the GRAPH menu to select ECG data stored on the unit. V W S X T Y U S. Calibration guide Serves as a guide when your doctor analyses the stored ECG data. V. SD memory card indicator Displayed when the SD memory card is in the card slot. T. Full 30-second waveform W. Battery level indicator U. Measurement time indicator X. ECG waveform Y.
HCG-801-E.book Page 10 Tuesday, December 13, 2011 5:35 PM 2. Inserting and Replacing Batteries 1. Slide the battery cover in the direction of the arrow, and lift the end of the cover upwards. Note: Do not pull too hard on the cover. 2. Insert two LR03 (AAA) batteries as indicated. Always use LR03 (AAA) batteries. Note: Make sure that the polarity of the batteries is correct. 3. Close the battery cover.
HCG-801-E.book Page 11 Tuesday, December 13, 2011 5:35 PM 2. Inserting and Replacing Batteries Battery life and replacement When the “Please insert new batteries.” message appears, replace both batteries with new ones. • Always turn the unit off before replacing the batteries. • Dispose of the used batteries according to applicable local regulations. Battery life • Two new LR03 (AAA) batteries will last for approximately 400 measurements. (If measurements are taken once a day at room temperature (22 °C).
HCG-801-E.book Page 12 Tuesday, December 13, 2011 5:35 PM 2. Inserting and Replacing Batteries • Remove the batteries from this unit when you are not going to use it for a long period of time (approximately three months or more). • Do not use batteries of a different type together. • Do not use new and used batteries together.
HCG-801-E.book Page 13 Tuesday, December 13, 2011 5:35 PM 3. Setting the Date and Time Always set the date and time before using the unit for the first time. Check the date and time are correct before using the unit, reset them if necessary. The date and time are important indicators of when a measurement was taken. Note: The date and time format can be changed to different territorial standards. (Refer to “8.7 Date Format” on p. 36) 1. Press the unit on.
HCG-801-E.book Page 14 Tuesday, December 13, 2011 5:35 PM 3. Setting the Date and Time 3. Press the OK button to confirm the day setting. The day setting is set and the month setting is highlighted. The display cycles through the settings, day -> month -> year -> hour -> minute, with each press of the OK button. Note: If the setting for the date format has been changed (refer to “8.7 Date Format” on p. 36), the order in which items are highlighted may differ from the example above. 4.
HCG-801-E.book Page 15 Tuesday, December 13, 2011 5:35 PM 4. Using SD Memory Card The unit includes an SD memory card for storing ECG data, which can then be viewed by your doctor later. This section describes how to insert and eject an SD memory card, and how to format a card so it can be used to store ECG data. Notes: • If you need to purchase a new SD memory card, consult your Omron Customer Service Department (Tel. 0870-7502771). • Do not store data other than ECG data from the unit on the card. 4.
HCG-801-E.book Page 16 Tuesday, December 13, 2011 5:35 PM 4. Using SD Memory Card 2. Open the SD memory card slot cover and insert the SD memory card into the slot. Notes: • Check that the card is correctly aligned and insert it into the slot as shown. Back to front Upside down Back to front and upside down • Insert the card until it clicks into position. Write Protection (Locking the SD Memory Card) • Make sure that the write-protect switch is not locked, before inserting the SD memory card.
HCG-801-E.book Page 17 Tuesday, December 13, 2011 5:35 PM 4. Using SD Memory Card 3. Close the SD memory card slot cover.
HCG-801-E.book Page 18 Tuesday, December 13, 2011 5:35 PM 4. Using SD Memory Card To eject the SD memory card 1. Check that the device is turned off. Caution! Only eject an SD memory card when the unit is turned off. 2. Open the SD memory card slot cover and press the memory card. The lock is released and the card is ejected slightly. 3. Remove the memory card. 4. Close the SD memory card slot cover.
HCG-801-E.book Page 19 Tuesday, December 13, 2011 5:35 PM 4. Using SD Memory Card 4.2 Formatting an SD Memory Card You will need to format the SD memory card before you use it for the first time, and in the following circumstances. • If you use an SD memory card that has been used by other devices. • If a memory card error occurs. Notes: • When you format an SD memory card, any data stored on the card is erased. Always copy any data you wish to keep to a computer before formatting an SD memory card.
HCG-801-E.book Page 20 Tuesday, December 13, 2011 5:35 PM 4. Using SD Memory Card 3. Press the OK button. The message “All data in SD will be deleted. Format SD?” is displayed. 4. Press the the OK button. button to select YES, then press If you press the OK button while NO is selected, the SD memory card will not be formatted. 5. Press the OK button. A message warning you not to remove the SD memory card while it is being formatted is displayed and the SD memory card is formatted.
HCG-801-E.book Page 21 Tuesday, December 13, 2011 5:35 PM 5. Important Notes on Taking a Measurement In order to obtain a good ECG reading, it is important that measurements are taken correctly. Before taking a measurement for the first time, read these instructions carefully and make sure you observe the following points each time you take a measurement. • Make sure that the electrodes are directly touching your skin.
HCG-801-E.book Page 22 Tuesday, December 13, 2011 5:35 PM 6. Taking a Measurement 1. Press the button to turn the unit on. The unit displays a reminder that self-measurement is not the same as medical diagnosis and then the guidance screens are displayed. (The guidance screens are displayed twice.) Note: You can press the START button to begin a measurement even while the guidance screens are being displayed. 2. Make sure that you are in a relaxed position.
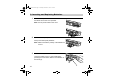
HCG-801-E.book Page 23 Tuesday, December 13, 2011 5:35 PM 6. Taking a Measurement 4. Place the chest electrode on bare skin about 5 cm below your left nipple. Notes: • Make sure that you are relaxed and that your chest is free of tension. • Press the chest electrode close against your bare chest. Do not place the electrode on clothing as this will result in an inaccurate measurement. Chest electrode About 5 cm Press closely to your chest.
HCG-801-E.book Page 24 Tuesday, December 13, 2011 5:35 PM 6. Taking a Measurement 5. While maintaining the same posture, press the START button. Measurement starts During measurement Measurement ends The unit beeps every second. About 30 seconds The measurement ends automatically, indicated by 4 rapid beeps. The measurement takes about 30 seconds to complete. The unit beeps every second during measurement.
HCG-801-E.book Page 25 Tuesday, December 13, 2011 5:35 PM 6. Taking a Measurement A measurement result message is displayed when the measurement has been completed. (Refer to p. 27 for details.) If you press the OK button while the result message is displayed, the list of ECG data stored on the SD memory card or unit is displayed. Note: If the “Please insert new batteries.” error message is displayed immediately after measurement, the ECG data may not be stored.
HCG-801-E.book Page 26 Tuesday, December 13, 2011 5:35 PM 6. Taking a Measurement Common Causes of Inaccurate Measurement Results The following situations can result in inaccurate measurement results or errors. 26 • The index finger is not placed closely on the electrode. • The unit is held incorrectly. • The unit is being held in the left hand. Always use your right hand to hold the unit when taking a measurement. • Unit placed on clothing. • The rear of the unit is placed against the chest.
HCG-801-E.book Page 27 Tuesday, December 13, 2011 5:35 PM 6. Taking a Measurement Measurement Result There are 13 messages regarding the measurement result. A letter of the alphabet indicates each of the 13 possible messages. This letter is displayed together with the time and date of the measurement when the GRAPH menu is displayed. Important: Do not interpret measurement results yourself, consult your doctor. a b c d e f g h i j k l m Stable waveform. Fast heart rate. Fast and irregular heart rate.
HCG-801-E.book Page 28 Tuesday, December 13, 2011 5:35 PM 7. Displaying ECG Data The GRAPH menu is used to display the list of ECG data stored on the SD memory card or in unit memory. 1. Press the MENU button while the unit is turned on, the GRAPH menu is highlighted. If you then press the OK button, the list of ECG data is displayed. 2. Select the ECG data you wish to view from the GRAPH menu list, then press the OK button to display the detailed view of the waveform.
HCG-801-E.book Page 29 Tuesday, December 13, 2011 5:35 PM 7. Displaying ECG Data Press the button to move down the list, and the button to move up. The most recent measurement result is displayed at the top of the list and is automatically highlighted, with any previous measurement results listed below it in chronological order. When the SD memory card is in the SD memory card slot, the list of ECG data stored on the card is displayed.
HCG-801-E.book Page 30 Tuesday, December 13, 2011 5:35 PM 8. Adjusting the Settings You can use the SET menu to adjust various settings. You can press the START button to begin measurement even while the SET menu is displayed. 8.1 Basic Operation The following procedure describes how to select and adjust a setting. Refer to the following pages for details of the options available for each setting. 1. Press the MENU button, while the unit is on, to display the menu screen.
HCG-801-E.book Page 31 Tuesday, December 13, 2011 5:35 PM 8. Adjusting the Settings 4. Press the or button to select the desired setting, then press the OK button to see the options for that setting. 5. Adjust the settings then press the OK button to confirm the changes.
HCG-801-E.book Page 32 Tuesday, December 13, 2011 5:35 PM 8. Adjusting the Settings 8.2 Date and Time Select this item if you need to reset the date and time for some reason. For details on setting the date and time, refer to p. 13. Note: You will be prompted to set the date and time when you first insert the batteries. 8.3 Volume The current volume level is displayed at the bottom of the screen. The mark indicates the volume level. * The default setting is the maximum volume level.
HCG-801-E.book Page 33 Tuesday, December 13, 2011 5:35 PM 8. Adjusting the Settings 8.4 Brightness The current brightness level is displayed at the bottom of the screen. The mark indicates the brightness level. * The default setting is the maximum brightness level. Press the button or button, to adjust the brightness. The brightness can be set to one of nine levels. The brightness increases as the marker moves to the right.
HCG-801-E.book Page 34 Tuesday, December 13, 2011 5:35 PM 8. Adjusting the Settings 8.5 Contrast The current contrast level is displayed at the bottom of the screen. The mark indicates the contrast level. * The default setting is medium contrast level. Press the button or button to adjust the contrast. The contrast can be set to one of nine levels. The contrast increases as the 34 marker moves to the right.
HCG-801-E.book Page 35 Tuesday, December 13, 2011 5:35 PM 8. Adjusting the Settings 8.6 Language This setting specifies the language to be used for the screen display. The currently selected language is displayed at the bottom of the screen. * The default language is English. Press the button or button to select the desired language, then press the OK button to confirm your selection.
HCG-801-E.book Page 36 Tuesday, December 13, 2011 5:35 PM 8. Adjusting the Settings 8.7 Date Format You can select one of four formats, DD/MM/YY HH:MM (24 hour clock), DD/MM/YY HH:MM (AM/PM), MM-DD-YY HH:MM (AM/PM), or YY/MM/DD HH/MM (AM/PM). The date is displayed at the bottom of the screen using the currently selected format. * The default date format is DD/MM/YY HH:MM (24 hour clock). Press the button or button to select the desired format, then press the OK button to confirm your selection.
HCG-801-E.book Page 37 Tuesday, December 13, 2011 5:35 PM 8. Adjusting the Settings 8.8 Messages This setting specifies whether to display or hide the message that appears after a measurement has been completed. The current setting is displayed at the bottom of the screen. * The default setting is Display. 1. Press the button or button to highlight the Display or Hide, then press the OK button to confirm your selection. Note: Even if Hide is selected, results messages are saved by the unit.
HCG-801-E.book Page 38 Tuesday, December 13, 2011 5:35 PM 8. Adjusting the Settings 8.9 Overwrite The unit will overwrite the oldest stored reading when the SD memory card or unit memory is full. A message will warn that this will happen, you can choose to hide or display this message. (The default setting is to hide the message.) The current setting is displayed at the bottom of the screen. 1. Press the button or button to highlight Display or Hide, then press the OK button to confirm your selection.
HCG-801-E.book Page 39 Tuesday, December 13, 2011 5:35 PM 9. Managing ECG Data 9.1 Erasing ECG Data Erasing All ECG Data You can use the SET menu to erase all the ECG data stored on the SD memory card or in unit memory. Note: If an SD memory card is inserted in the unit, all data on the card will be erased. 1. Press the button to scroll through the settings and select Erase all data. 2. Press the OK button. The message “Erase all data in SD memory?” is displayed.
HCG-801-E.book Page 40 Tuesday, December 13, 2011 5:35 PM 9. Managing ECG Data 3. Press the button. button and select YES, then press the OK The number of sets of data to be deleted is displayed. 4. Press the button. button and select YES, then press the OK All the ECG data is erased and the screen from step 1 appears. Note: If you press the OK button after selecting NO, the screen from step 1 appears.
HCG-801-E.book Page 41 Tuesday, December 13, 2011 5:35 PM 9. Managing ECG Data 4. Press the OK button. The confirmation message “Erase selected data?” is displayed. 5. Press the button. button and select YES, then press the OK The ECG data is erased and the screen from step 1 appears. * By default, NO is highlighted. Note: If you press the OK button after selecting NO, the screen from step 1 appears. Important: Never remove an SD memory card while data is being erased.
HCG-801-E.book Page 42 Tuesday, December 13, 2011 5:35 PM 9. Managing ECG Data 9.2 Copying Data to an SD Memory Card You can copy ECG data from the unit’s internal memory to an SD memory card. This allows you to copy data to the SD memory card if measurements have been taken while the SD memory card was not inserted. Note: The unit’s internal memory can only store a maximum of five measurement results. 1. Press the button and select Data copy to SD. 2. Press the OK button.
HCG-801-E.book Page 43 Tuesday, December 13, 2011 5:35 PM 9. Managing ECG Data 4. Press the OK button. The ECG data is copied to the SD memory card. Caution! Never remove the SD memory card while data is being copied to it. If the SD memory card is removed while data is being copied, the data may be lost or damaged. Notes: • The copied data is displayed and the screen from step 1 appears. • If the same ECG data already exists on the SD memory card, the data is not copied.
HCG-801-E.book Page 44 Tuesday, December 13, 2011 5:35 PM 9. Managing ECG Data 9.3 Copying data from the SD memory card to a PC Copying data from the SD memory card to a PC Please follow these instructions to copy data from the SD memory card to a PC. 1. Make sure the PC is equipped with an SD memory card port or connect a commercially available SD memory card reader/writer to your PC. 2. Create a new folder on your PC where you want to save a copy of the ECG data. 3.
HCG-801-E.book Page 45 Tuesday, December 13, 2011 5:35 PM 9. Managing ECG Data Copying data from a PC to the SD memory card Please follow these instructions to copy data from a PC to the SD memory card. 1. Make sure the PC is equipped with an SD memory card port or connect a commercially available SD memory card reader/writer to your PC. 2. Insert the SD memory card in the SD port of your PC and confirm that there is an “hcg801” folder in the SD memory card.
HCG-801-E.book Page 46 Tuesday, December 13, 2011 5:35 PM 10. Care and Maintenance 10.1 Lists and Explanations of Messages This section includes a list of all messages that may appear on the display. Refer to these if you are not sure what a displayed message means. Notice Messages Message Description Action Analysing. The ECG data is being analysed. No action required. Wait until analysis ends. Can not measure. Please follow the instructions for use. A ECG wave-pattern could not be detected.
HCG-801-E.book Page 47 Tuesday, December 13, 2011 5:35 PM 10. Care and Maintenance Warning Messages Message Cause Remedy Formatting SD memory. DO NOT REMOVE SD The SD memory card is being formatted. Wait until the message disappears. Do not remove the SD memory card until formatting has been completed. Storing on SD memory. DO NOT REMOVE SD ECG data is being written (saved) to the SD memory card. Wait until the message disappears.
HCG-801-E.book Page 48 Tuesday, December 13, 2011 5:35 PM 10. Care and Maintenance Message Cause Remedy SD is write-protected. The unit is unable to access data because the SD memory card inserted is write-protected. Refer to the instruction supplied with the memory card and insert the SD memory card with writeprotection turned off. No saved data. The battery power has run low and the ECG data stored on the unit has disappeared. Insert new batteries and reset the Date and Time and other settings.
HCG-801-E.book Page 49 Tuesday, December 13, 2011 5:35 PM 10. Care and Maintenance Error # Message Cause SD memory error Cannot read data. An error occurred while trying to read ECG data stored on the SD memory card. 22 SD memory error Cannot erase data. An error occurred while trying to erase ECG data stored on the SD memory card. 23 SD memory error Cannot write data. An error occurred while trying to save ECG data on the SD memory card. 24 Error formatting SD memory.
HCG-801-E.book Page 50 Tuesday, December 13, 2011 5:35 PM 10. Care and Maintenance 10.2 Troubleshooting Refer to this table for problems that do not result in a message on the display. Problem Cause Nothing happens when you press the button. The batteries are worn out. The batteries are inserted incorrectly. Replace both batteries with new ones. Insert the batteries with their polarities correctly aligned. Measurement starts but the message “Analysis impossible. Please measure again.” appears.
HCG-801-E.book Page 51 Tuesday, December 13, 2011 5:35 PM 11. Maintenance and Storage 11. Maintenance and Storage • Clean the unit with a cloth lightly dampened with water, disinfectant alcohol or detergent, then wipe it dry with a dry cloth. Do not wipe the SD memory card slot cover. • Wipe the electrodes using a cloth dampened with disinfectant alcohol. • Do not wipe the unit with benzene, gasoline, paint thinner, concentrated alcohol, or other volatile detergents.
HCG-801-E.book Page 52 Tuesday, December 13, 2011 5:35 PM 12. Technical Data Model Induction system Heart rate range Accuracy Enclosure ingress protection Display Memory HCG-801 Bipolar single channel 2 to 200 beats/min. Bandwidth: 0.
HCG-801-E.book Page 53 Tuesday, December 13, 2011 5:35 PM 12. Technical Data This device fulfills the provisions of EC directive 93/42/EEC (Medical Device Directive). Important information regarding Electro Magnetic Compatibility (EMC) With the increased number of electronic devices such as PC's and mobile (cellular) telephones, medical devices in use may be susceptible to electromagnetic interference from other devices.
HCG-801-E.book Page 54 Tuesday, December 13, 2011 5:35 PM 13. General Information About the Heart and ECG Measurements The heart is a muscular pump controlled by electrical impulses generated by the body. It is divided into two by the septa and each side has two chambers – an atrium and a ventricle – linked by a one-way valve. The left atrium and ventricle control oxygenated blood, and the right atrium and ventricle de-oxygenated (“used”) blood.
HCG-801-E.book Page 55 Tuesday, December 13, 2011 5:35 PM 13. General Information About the Heart and ECG Measurements About the ECG Waveform The ECG waveform shows the rhythm of your heartbeat during the 30-second measurement and displays the electrical activity causing the heart to beat. The waveform for each heartbeat shows the progress of the electrical impulse across and through the heart.
HCG801-E.fm Page 56 Friday, January 6, 2012 5:59 PM Manufacturer OMRON HEALTHCARE Co., Ltd. 53, Kunotsubo, Terado-cho, Muko, Kyoto, 617-0002 JAPAN EU-representative OMRON HEALTHCARE EUROPE B.V. Scorpius 33, 2132 LR Hoofddorp THE NETHERLANDS www.omron-healthcare.com EC REP Production facility OMRON HEALTHCARE Co., Ltd. Mie, JAPAN OMRON HEALTHCARE UK LTD. Opal Drive, Fox Milne, Milton Keynes, MK15 0DG, U.K. Subsidiary OMRON MEDIZINTECHNIK HANDELSGESELLSCHAFT mbH John-Deere-Str.