PRO HD CART Flat Panel Television Cart OM# PN # OM1004410 Pro HD Cart = L3-OM1004410-PRO-02010vB VERSION B Maximum screen size: 55” Maximum weight 125 lbs – 56.7 KG CAUTION: DO NOT EXCEED MAXIMUM LISTED WEIGHT CAPACITY. SERIOUS INJURY OR PROPERTY DAMAGE MAY OCCUR! EN ES FR Instruction Manual Manual De Instrucciones Manuel D’instructions EN ES FR Images may differ from actual product El producto real puede variar respecto a la imagen mostrada. Le produit réel peut différer de l'illustration.
WARNING! – ENGLISH • WARNING! SEVERE PERSONAL INJURY, PROPERTY DAMAGE AND DEATH CAN RESULT FROM IMPROPER INSTALLATION OR ASSEMBLY. READ THE FOLLOWING WARNINGS BEFORE BEGINNING. • Furniture items are heavy and should only be moved with two or more individuals with proper lifting techniques. Do not attempt to move or adjust furniture with other items and objects on top or within the furniture. Furniture pads or glides should be used on solid surface or laminate flooring.
WEIGHT CAPACITY MAXIMUM WEIGHT CAPACITY MÁXIMA CAPACIDAD DE PESO CAPACITE DE CHARGE MAXIMALE POUNDS (LBS) / KILOGRAMS (KG) LIBRAS (LB) / KILOGRAMOS (KG) LIVRES (LB) / KILOGRAMMERS (KG) MAXIMUM SCREEN SIZE TAMAÑO DE PANTALLA MÁXIMO TAILLE D’ÉCRAN MAXIMALE COMPLETE UNIT 125 (LBS) / 56.7 (KG) 55” SHELF 40 (LBS) / 18.1 (KG) N/A ES EL USO CON EL PRODUCTOS MÁS GRANDE QUE EL PESO MÁXIMO Y TAMAÑO PUEDE CAUSAR INESTABILIDAD Y POSIBLEMENTE HERIDAS.
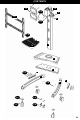
CONTENTS 11 10 P-G 9 12 8 P-F P-O 7 13 6 5 4 P-A 3 P-B P-C P-P 1 2 P-D P-E P4
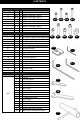
CONTENTS Monitor Kit L-U-vB Pouch Location Part # 1 M-A 2 M-B 3 M-C 4 M-D 5 M-E 6 M-F 7 M-G 8 M-H 9 M-I OM1004410vA Pouch Location Part # 1 P-A 2 P-B 3 P-C 4 P-D 5 P-E 6 P-F 7 P-G 8 P-H 9 P-I 10 P-J 11 P-K 12 P-L 13 P-M 14 P-N 15 P-O 16 P-P Contents Pouch Location Part # 1 2 3 4 5 6 7 8 N/A 9 10 11 12 13 14 15 16 Qty 4 4 4 4 4 4 4 4 4 Description Philips screws M4 x 15mm Philips screws M4 x 35mm Philips screws M5 x 15mm Philips screws M5 x 35mm Philips screws M6 x 15mm Philips screws M6 x 35mm Philips sc
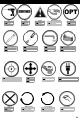
SYMBOL KEY EN ES FR EN ES FR Drill Agujerear Percer EN ES FR Pencil Mark Marque con lápiz Marque de crayon EN ES FR EN ES FR Remove Retire Retirez EN ES FR EN ES FR Caution Precaución Attention EN ES FR Phillips Screwdriver Destornillador Phillips Tournevis Phillips EN ES FR Find Center Position Encuentre la posición del centro Repérez la position centrale EN ES FR Level Nivel Niveau EN ES FR EN ES FR Adjust Ajuste Ajustez Tighten Fastener Ajuste el sujetador Serrez l'attache EN ES FR
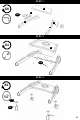
STEP 1 5 X8 4 P-A 3 2 1 STEP 2 X4 6 P-B STEP 3 X4 P-C P-P P7
STEP 4 X4 7 P-D P-E P-N P8
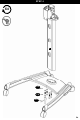
STEP 5 13 P9
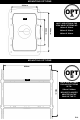
MOUNTING OPTIONS 200mm A 11 NOTE: USE OPTION A FOR VESA HOLE PATTERNS OF: 300mm 200mm 100mm 100mm X 200mm 200mm X 200mm 300mm X 200mm MOUNTING OPTIONS 900mm B 12 NOTE: USE OPTION B FOR HOLE PATTERNS UP TO: 500mm 1 500mm X 900mm BE SURE TO CENTER ADAPTER ON THE BACK OF THE TV.
NO SPACERS X4 A M-A – M-H P-H EN ES FR Attach monitor using monitor hardware, M-A, M-B, etc… Coloque la pantalla utilizando los materiales de instalación de la pantalla, M-A, M-B, etc… Installer le moniteur avec les fixations de moniteur, M-A, MB, etc… SPACERS X4 M-I A M-A – M-H P-H EN ES FR Use spacers for recessed mounting holes or to access A/V inputs Use los espaciadores para agujeros de montaje empotrados o para acceder a las entradas de A/V Utilisez les entretoises sur les trous de montage
ADJUSTING THE ADAPTER EN Adjustment May Be Needed ES Puede necesitarse ajuste FR Des réglages peuvent être nécessaires 15 B 16 P12
CONNECT VESA PLATE TO UNIVERSAL ADAPTER X4 B P-G P-F 11 12 P13
NO SPACERS 14 X4 B M-A – M-H P-H EN ES FR Attach monitor using monitor hardware, M-A, M-B, etc… Coloque la pantalla utilizando los materiales de instalación de la pantalla, M-A, M-B, etc… Installer le moniteur avec les fixations de moniteur, M-A, M-B, etc… SPACERS X4 B M-I M-A – M-H P-H EN ES FR Use spacers for recessed mounting holes or to access A/V inputs Use los espaciadores para agujeros de montaje empotrados o para acceder a las entradas de A/V Utilisez les entretoises sur les trous de mont
STEP 6 X2 P-G P-F X2 EN ES FR Hang with monitor attached Cuelgue con el monitor adherido. Accrochez avec le moniteur installé. EN ES FR Hang with monitor attached Cuelgue con el monitor adherido. Accrochez avec le moniteur installé.
STEP 7 10 9 EN ES FR Turn Vuelta Tour EN ES FR Pull Tire Tirer EN ES FR Tilt Mechanism Mecanismo de inclinación Mécanisme d’inclinaison STEP 8 EN ES FR Turn Vuelta Tour EN ES FR Pull Tire Tirer EN ES FR Watch for Pinch Points Tenga cuidado con las partes que pueden apretarle las manos Faites attention aux points de pincement EN ES FR This step may require two people Este paso podría requerir de dos personas.
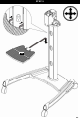
STEP 9 P17
STEP 10 P-O P18
OMNIMOUNT PRODUCT WARRANTY ENGLISH This warranty applies to US Residents who purchase from an authorized OmniMount Dealer. OmniMount products are covered against defects in materials and workmanship for 5 years. OmniMount will repair or replace the defective component or product, at its sole discretion. Failure to follow product care instructions from OmniMount will result in void of warranty. To obtain warranty service, contact OmniMount customer service at 800.MOUNT.IT (800.668.
(EN) English (ES) Spanish (FR) French THANK YOU FOR PURCHASING AN OMNIMOUNT PRODUCT GRACIAS POR ADQUIRIR UN PRODUCTO DE OMNIMOUNT MERCI D’AVOIR ACHETÉ UN PRODUIT OMNIMOUNT OmniMount Systems, Inc. 8201 South 48th Street Phoenix, AZ 85044-5355 1-800-MOUNT-IT (1-800-668-6848) www.omnimountpro.com All trademarks are the property of their respective companies. OmniMount is a registered trademark of P20 OmniMount Systems, Inc.