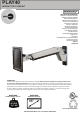
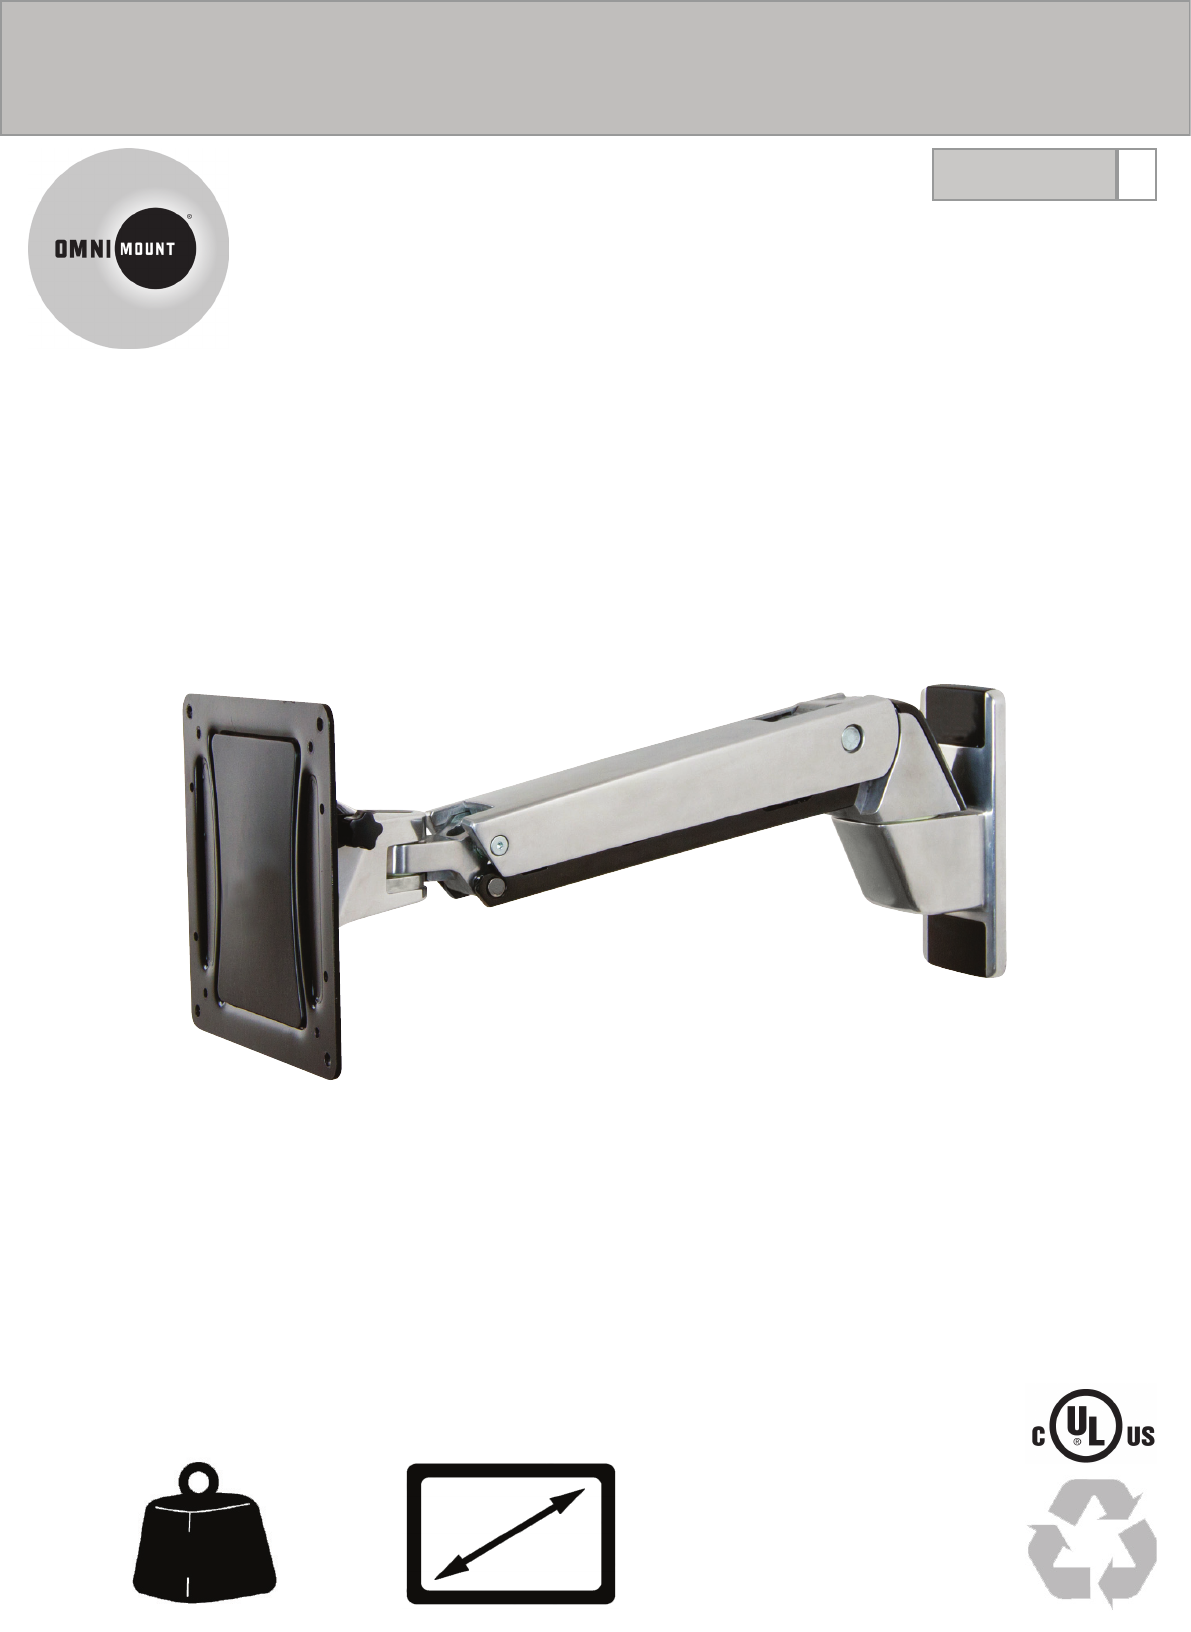
PLAY40 iNTERACTIVE TV MOUNT VERSION G INSTRUCTION MANUAL MANUAL DE INSTRUCCIONES MANUEL D’INSTRUCTIONS BENUTZERHANDBUCH INSTRUCTIEHANDLEIDING MANUALE DI ISTRUZIONI INSTRUKCJA OBSŁUGI NÁVOD K OBSLUZE KEZELÉSI KÉZIKÖNYV ΕΓΧΕΙΡΙΔΙΟ ΟΔΗΓΙΩΝ MANUAL DE INSTRUÇÕES BRUGERVEJLEDNING ASENNUSOPAS MONTERINGSANVISNING MANUAL CU NAVODILA РУКОВОДСТВО ПО ЭКСПЛУАТАЦИИ TALİMAT KILAVUZU BRUKSANVISNING 说明手册 取扱説明書 Important! You will need to adjust this product after installation is complete.
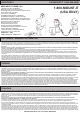
QUESTIONS? 1-800-MOUNT-IT (1-800-668-6848) NEED HELP? PLEASE CALL ¿NECESITA AYUDA? LLÁMENOS.
DISCLAIMER - WARNING INFORMATION DEUTSCH Haftungsausschluss – OmniMount Systems, Inc. hat dieses Handbuchs mit größter Sorgfalt erstellt, um es so genau und vollständig als möglich zu machen. OmniMount Systems, Inc. erhebt jedoch keinen Anspruch darauf, dass die hierin bereitgestellten Informationen alle Einzelheiten, Bedingungen und Änderungen umfassen. Das Unternehmen übernimmt keinerlei Haftung in Verbindung mit der Montage oder Verwendung dieses Produkts.
DISCLAIMER - WARNING INFORMATION ΕΛΛΗΝΙΚΆ Aποποίηση ευθύνης – Η OmniMount Systems, Inc. στοχεύσει να καταστήσει το παρόν εγχειρίδιο ακριβές και ολοκληρωμένο . Εντούτοις, η OmniMount Systems, Inc. δεν αξιώνει ότι οι πληροφορίες που περιέχονται στο πάρόν καλύπτουν όλες τις λεπτομέρειες, τις συνθήκες ή τις παραλλαγές. Επίσης δεν το παρέχει για τυχόν πιθανά περιστατικά που σχετίζονται με την εγκατάσταση ή τη χρήση αυτού του προϊόντος.
DISCLAIMER - WARNING INFORMATION БЪЛГАРСКИ Ограничена отговорност - OmniMount Systems, Inc. има за цел да направи настоящото ръководство точно и пълно. Въпреки това, OmniMount Systems, Inc. Не претендира, че съдържащата се в него информация обхваща всички детайли, условия или варианти. Нито че са посочени всички възможни непредвидени обстоятелства във връзка с монтажа или използването на този продукт.
DISCLAIMER - WARNING INFORMATION РУССКИЙ Ограничена отговорност - OmniMount Systems, Inc. има за цел да направи настоящото ръководство точно и пълно. Въпреки това, OmniMount Systems, Inc. Не претендира, че съдържащата се в него информация обхваща всички детайли, условия или варианти. Нито че са посочени всички възможни непредвидени обстоятелства във връзка с монтажа или използването на този продукт.
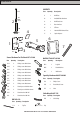
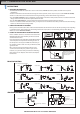
CONTENTS CONTENTS P-K 2 P-M 4 P-F 8x 1x 4x 1 1 Wall Plate 2 1 Arm/Wall Plate Hardware 3 2 Wall Plate Covers 4 1 Rear Arm Cover 5 1 CFT Arm 6 1 200x200 VESA Monitor Plate 7 4 Spider Adapters 6 7 8x Screws/Hardware For Flat Panel 697-613-00 4x Description 3 P-J 1x Quantity 5 1 4x 4x x P-I P-H P-G Part Wall Kit ST8x2 697-641-00 Part Quantity Description M-A 4 Philips screws M4 x 15mm 4x M-B 4 Philips screws M4 x 30mm M-C 4 Philips screws M5 x 15mm M-D 4
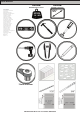
Tools Needed CAUTION! MAXIMUM WEIGHT CAPACITY Tools Needed Herramientas necesarias Outils requis Benötigte Werkzeuge Benodigde gereedschappen Strumenti necessari Potrzebne narzędzia Potřebné nástroje Szükséges eszközök Απαιτούμενα εργαλεία Ferramentas necessárias Nødvendigt værktøj Tarvittavat työkalut Verktyg som krävs Instrumente necesare Необходими уреди Vajalikud tööriistad Nepieciešamie rīki Reikalingi įrankiai Potrebno orodje Potrebné náradie Необходимые инструменты Gerekli Aletler Nødvendige verktøy
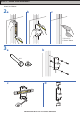
STEP 1 - Placement of Arm on the Wall 1 INSTRUCTIONS 1. MOUNTING CONSIDERATIONS: • Wall Mount Bracket MUST be attached to a stud or solid concrete. DO NOT attach this product to hollow wall or any other configuration. • Make sure Arm will have desired unobstructed range of motion: up-down, side-to-side, in-out (see section Range of Motion). • Make sure cables will reach their destinations with enough remaining slack to allow Arm full range of motion.
STEP 2 - Wood Stud Installation Wood Stud Mount 2a b c 7/32 x 2.75" 5.
STEP 2 - Solid Wall Installation Solid Wall Mount 2a b c 3/8 x 2.75" 9.
STEP 4 4a b 2 P-K P-F P-F 65mm Washer 5 P-M 1 c d P-K P-I 16mm Bearing P-H Spring Disc P-G 25mm Washer P-J NOTE: Part# P-H must be concave face down for proper assembly.
STEP 5 VESA Mounting Options (mm) 100 x 200 200 x 200 200mm (7-7/8”) 100mm (3-15/16”) 5 A 200mm (7-7/8”) 200mm (7-7/8”) B 300 x 300 300 x 400 600mm (23-5/8”) 400mm (15-3/4”) 300mm (11-13/16”) 300 x 200 400mm (15-3/4”) 600 x 400 400mm (15-3/4”) 300mm (11-13/16”) 400 x 400 D 400mm (15-3/4”) C 300mm (11-13/16”) 200 x 300 200 x 400 400mm (15-3/4”) 300mm (11-13/16”) 200mm (7-7/8”) 400 x 200 PN:888-45-222-W-03 revG: 45-284-026: OM1100549
STEP 5-A - Monitor Installation 200mm (7-7/8”) 100 x 200 200 x 200 B C D 200mm (7-7/8”) 100mm (3-15/16”) A VESA Mounting Options (mm) 200mm (7-7/8”) WARNING! PLEASE SELECT THE PROPER SCREW LENGTH FOR YOUR FLAT PANEL BY HAND TIGHTENING TO CHECK YOUR FLAT PANELS THREAD DEPTH.
400mm 300mm 400mm (15-3/4”) 300mm (11-13/16”) D 400mm 300 x 200 300mm (11-13/16”) 400mm (15-3/4”) 600 x 400 400 x 200 400mm (15-3/4”) 600 x 400 400mm 400 x 400 300mm (11-13/16”) 400 x 400 400mm (15-3/4”) 600mm 300mm 400mm 300mm 300 x 300 300 x 400 600mm (23-5/8”) 400mm 200mm 100mm C 300mm 200 x 300 200 x 400 300 x 300 300 x 400 400mm (15-3/4”) 200 x 300 200 x 400 400 x 400 200mm 300mm (11-13/16”) B 200mm 300 x 300 300 x 400 200 x 300 200 x 400 600 x 400 200mm (7-7/8”) n
STEP 5-B,C,D - Monitor Installation B/ C/D B C D WARNING! PLEASE SELECT THE PROPER SCREW LENGTH FOR YOUR FLAT PANEL BY HAND TIGHTENING TO CHECK YOUR FLAT PANELS THREAD DEPTH.
STEP 6 P-A P-D P-L 8mm 1/4” Drive PN:888-45-222-W-03 revG: 45-284-026: OM1100549
STEP 7 Adjustment · Ajuste · Réglage · Einstellung · Instellen · Regolazione · 調整 · 调节 · 조절 Important! You will need to adjust this product after installation is complete. Make sure all your equipment is properly installed on the product before attempting adjustments. This product should move smoothly and easily through the full range of motion and stay where you set it.
STEP 7 a Lift – Up and down Elevación (arriba y abajo) Ajustement en hauteur : bas et haut Höhenverstellung – rauf und runter Verstel in hoogte – Omhoog en omlaag Sollevamento – Su e Giù Lyft – upp och ned リフト(上下) 升降(上下) 높이 (위/아래로) c b d Tilt – Forward and Backward Inclinación (adelante y atrás) Inclinaison : Avant et arrière Neigung – vor und zurück Kantel – Naar voren en naar achteren Inclinazione – Avanti ed Indietro Vinkla – framåt och bakåt チルト (前後) 倾斜(前后) 기울기 – 앞/뒤로 PN:888-45-222-W-03 revG: 45-
STEP 8 a Lift – Up and down Elevación (arriba y abajo) Ajustement en hauteur : bas et haut Höhenverstellung – rauf und runter Verstel in hoogte – Omhoog en omlaag Sollevamento – Su e Giù Lyft – upp och ned リフト(上下) 升降(上下) 높이 (위/아래로) 1/4” Drive P-Q Increase Lift Strength If the mounted weight is too heavy or this product does not stay up when raised, then you'll need to increase Lift Strength: Decrease Lift Strength If the mounted weight is too light or this product does not stay down when lowered, the
STEP 9 b Increase Friction If this product moves too easily from side-to-side, then you'll need to increase friction: Decrease Friction If this product is too difficult to move from side-to-side, then you'll need to decrease friction: 1 2 3 PN:888-45-222-W-03 revG: 45-284-026: OM1100549
STEP 10 c 1 3 2 Increase Friction If this product moves too easily from side-to-side, then you'll need to increase friction: Decrease Friction If this product is too difficult to move from side-to-side, then you'll need to decrease friction: CAUTION! The bottom nut will turn during adjustment of the top nut; DO NOT apply any tool to the bottom nut. Serious damage to the Arm may occur if these instructions are not followed.
STEP 11 d Tilt – Forward and Backward Inclinación (adelante y atrás) Inclinaison : Avant et arrière Neigung – vor und zurück Kantel – Naar voren en naar achteren Inclinazione – Avanti ed Indietro Vinkla – framåt och bakåt チルト (前後) 倾斜(前后) 기울기 – 앞/뒤로 PN:888-45-222-W-03 revG: 45-284-026: OM1100549
WARRANTY This warranty applies to US Residents who purchase from an authorized OmniMount Dealer. OmniMount products are covered against defects in materials and workmanship for 5 years. OmniMount will repair or replace the defective component or product, at its sole discretion. Failure to follow product care instructions from OmniMount will result in void of warranty. To obtain warranty service, contact OmniMount customer service at 800.MOUNT.IT (800.668.6848) or info@omnimount.com.
THANK YOU Thank you for purchasing an OmniMount product Gracias por adquirir un producto de OmniMount Merci d’avoir acheté un produit OmniMount Vielen dank, dass sie ein OmniMount-produkt erworben haben Dank U voor uw aankoop van een OmniMount-product Grazie per aver preferito un prodotto OmniMount Dziękujemy państwu za zakup produktu firmy OmniMount Děkujeme za zakoupení produktu společnosti OmniMount Az omnimount köszöni, hogy A cég termékét választotta Σας ευχαριστουμε που αγορασατε ενα προϊον της OmniMo