
Owner's manual


29
4.7.1 Local iServer
1. An IP address should be assigned to the iServer dynamically or statically (recommended).
2. Use a browser to access the Local iServer’s WEB page. Simply type the iServer’s IP
address at the browser’s URL location (i.e. 192.168.1.49) followed by an Enter key.
You should then see the iServer’s main WEB page.
3. Click on the Update button.
4. Click on Configuration, you will be prompted with a Password (default is 12345678).
5. On the Configuration page, under Serial Communication section, make sure the
parameters such as Baud Rate, Data Bits, Parity, Stop Bits, Flow Control, etc. match
with your attached serial device and its application software.
6. Make sure to set the End Character (Hex) to 00 and the Timeout to 0.
7. Under Terminal Server section, set Number of Connections to 0.
8. Under Remote Access section, set the Remote Access to enable, Enter the Remote
IP address (would be the IP address of the remote iServer, 192.168.1.50), and use the
default Remote Port number 2000.
9. Set Connection Control to Reconnect and set the Connection Timeout to a desired value.
The Reconnect option is used in Serial Tunneling and it applies only to the Local
iServer. If the tunneling connection between the two iServers goes down due to
network problems, power failure, etc., the Reconnect option will enable the Local
iServer to reconnect with the Remote iServer based on the specified time interval in
the Connection Timeout. For example, based on a timeout of 1000 x 10 ms (10
seconds), the Local iServer will continually attempt to reconnect and re-establish the
tunnel with the Remote iServer every 10 seconds.
10. Click on Save button for the changes to take place.
11. Initialize the serial device application software to establish the connection.
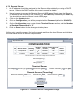
Figure 4.16 Local iServer (Serial-to-Ethernet model)
Configuration Page
CONFIGURATION
CONFIGURATION
http://192.168.1.49
Address
Serial Communication
Remote Access (Tunneling)
Terminal Server
Main Menu
Save Reset
Baud Rate 9600 Data Bit 8 Bits Parity none Stop Bits 1 bit
Flow Control none Transciever RS-232
Modbus/TCP
disable
End Char (Hex) 00 Forward End Char enable Timeout 0 msecs
Serial Port Password disable 1234abcd
Connection Ctrl reconnect
Device No. 1
Connection Timeout 00100 msecs
TCP/UDP TCP Server Type slave Number of Connections 0 Local Port 02000
Remote Access
enable
Remote IP Address 192.168.1.50 Remote Port 02000
Figure 4.16 shows
the valid values that
need to be set in the
Local iServer. The
Baud Rate, Data Bits, Parity,
Stop Bits, Flow Control, and
Transceiver values depend on
what the attached device to
the iServer supports.