
User's Manual


13
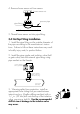
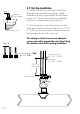
3. Align the sensor cable with the swivel mount
cable port to prevent cable pinching. Use a
3/8 inch wrench or socket to turn the installation
tool shaft clockwise until it is seated in the hole at
the top of the sensor flange.
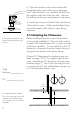
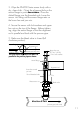
4. Wearing safety face protection, slowly open
the isolation valve to the full open position.
Loosen the lower hex and jam nuts and move them
to the required "H" dimension. Turn the installation
tool shaft clockwise until the sensor flange contacts
the lower hex and jam nuts. Thread the upper hex
nuts down until they contact the sensor flange.
Tighten the upper hex nuts to secure the sensor.
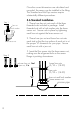
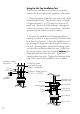
5. Remove cap nuts and withdraw the installation
tool by turning shaft counterclockwise. Be careful
to not damage cable. Snap cable grommet into
top of sensor and replace protector plate and cap
nuts.
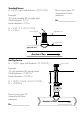
"H"
jam nuts
lower hex nuts
alignment rod
installation tool
shaft
cap nuts
upper hex nuts
direction of flow
protector plate
hex nut
protector plate
cap nuts
protector plate