DIGITAL CAMERA FE-200 Advanced Manual Quick Start Guide Get started using your camera right away. Button operations Menu operations Printing pictures Using OLYMPUS Master Getting to know your camera better Miscellaneous ( Thank you for purchasing an Olympus digital camera. Before you start to use your new camera, please read these instructions carefully to enjoy optimum performance. Keep this manual in a safe place for future reference.
Contents Quick Start Guide P.3 P.10 Test out the functions of the camera buttons by following the illustrations and actually trying them out on the camera. Menu operations P.16 Learn everything about the menus, from basic operations to the functions of each menu and their various settings. Printing pictures P.28 Using OLYMPUS Master P.37 Button operations Getting to know your camera better Miscellaneous 2 EN Learn how to print pictures you have taken.
Gather these items (box contents) LI-10C Battery charger Strap USB cable Other items LI-12B Lithium ion battery AV cable OLYMPUS Master CD-ROM • Basic manual • Advanced manual (this manual) • Warranty card Contents may vary depending on purchase location. Quick Start Guide Digital camera Attach the strap ( Pull the strap tight so that it does not come loose.
Prepare the battery a. Charge the battery W Lithium ion battery 3 Power cable Battery charger 1 AC wall outlet Quick Start Guide Charging indicator Lit (red): Charging Lit (green): Charging complete (Charging time: Approx. 2 hours) 2 ( Battery comes partially charged. b. Insert the battery into the camera 2 3 1 W • Insert the battery side first. 4 5 • To remove the battery, press the latch in the direction of the arrow.
Turn on the power This section explains how to turn on the camera in shooting mode. a. Set the mode dial to h When shooting movies Still picture shooting modes h h B E M f g The camera determines the optimum settings and shoots the picture. This function reduces the blur caused by a moving subject or camera movement when taking pictures. Suitable for taking pictures of people. Suitable for taking pictures of landscapes. Suitable for taking pictures of people at night.
Set date and time About the date and time setting screen Y-M-D (Year-Month-Day) X Y M ----.--.-- --:-- Quick Start Guide CANCEL Hour Minute Date format (Y-M-D, M-D-Y, D-M-Y). D TIME Y/M/D MENU Cancel the setting a. Press the O< button and NY button to select [Y]. ( The first two digits of the year are fixed. O< button X Y M D TIME 2006.--.-2006 .--.-- --:-- NY button CANCEL Y/M/D MENU b. Press the Y# button. Y# button c. Press the O< button and the NY button to select [M].
X Y M D TIME 2006.08 2006 08.26 26 --:-- CANCEL f. Press the Y# button. g. Press the O< button and the NY button to select “hour” and “minute”. Y M D TIME 2006.08 2006 08.26 26 12 12:30 30 Y/M/D SET OK MENU X Y M D TIME 2006.08 2006 08.26 26 12 12:30 30 CANCEL j. MENU X CANCEL h. Press the Y# button. i. Press the O< button and NY button to select year, month and date. Y/M/D Y/M/D Quick Start Guide d. Press theY# button. e. Press the O< button and the NY button to select [D].
Shoot a. Hold the camera Quick Start Guide Horizontal grip b. Focus Vertical grip Place this mark over your subject. Shutter button Press halfway [ ] HQ 2816×2112 [ IN ] 4 The number of still pictures you can store is displayed. The green lamp indicates that the focus and exposure are locked. c. Shoot Shutter button Press completely The card access lamp blinks.
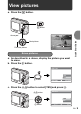
View pictures a. Press the q button. q button [IN IN] HQ Next picture '06.08.26 12:30 100-0001 1 Previous picture Erase pictures a. As described in a. above, display the picture you want to erase. b. Press the S button. Quick Start Guide Arrow pad ERASE YES NO S button BACK MENU SET OK c. Press the O< button to select [YES] and press i.
Button operations 1 2 6 0 9 4 3 5 a c 8 7d b Self-timer Shooting mode Exposure compensation +2.0 HQ 2816×2112 4 Macro/Super macro mode Button operations Flash mode 1 o button Power on: Turning the camera on and off Camera turns on in the shooting mode. • Monitor turns on • Lens extends 2 Shutter button Shooting pictures Shooting still pictures Set the mode dial to anything except n and press the shutter button lightly (halfway).
Recording movies Set the mode dial to n, and lightly press the shutter button to lock the focus, and then press the shutter button completely to start recording. Press the shutter button again to stop recording. 3 q button (playback) Selecting playback mode/turning on the power Switches to the playback mode and the last picture taken is displayed. • Press the arrow pad to view other pictures. • Use the zoom lever to switch among close-up playback, and index display.
j N W 1 SPORT R BACK MENU SET OK • The scene selection screen displays sample images and the shooting mode to best suit the situation. • To switch scenes after selecting a scene, set the mode dial to a different position and then set it to f again. The selection screen is displayed. • By switching to another scene, most settings will be returned to the default settings of each scene.
6 Zoom lever Zooming in and out while shooting or playing back pictures Shooting mode: Zooming in on your subject (Optical Zoom : 5x, Optical Zoom x Digital Zoom : 20x) Zoom out: Turn the zoom lever towards W. Zoom in: Turn the zoom lever towards T. Zoom bar White part: Optical zoom area Red part: Digital zoom area 4 HQ 2816×2112 HQ 2816×2112 4 Playback mode: Switching the picture display Single-frame playback • Use the arrow pad to browse pictures. W T HQ T ’06 06.08 08.
7 MENU button Displaying the menu Displays the top menu. 8 Arrow pad (ONXY) Use the arrow pad to select scenes, playback pictures, and select items on the menus. 9 i button This button is used to confirm your selection. 0 O< button Printing Display a picture to be printed out in playback mode, connect the camera to a printer and press O<. g“Direct printing (PictBridge)” (P.
c Y# button Flash shooting Press the Y# in shooting mode to select the flash mode. Press i to set it. AUTO Auto-flash ! # $ Red-eye reduction flash Fill-in flash Flash off d S button The flash fires automatically in low light or backlight conditions. This emits pre-flashes for red-eye reduction. The flash fires regardless of the available light. The flash does not fire even in low light conditions.
Menu operations K button (Shooting mode) q button (Playback mode) i button MENU button Arrow pad (ONXY) About the menus Press MENU to display the top menu on the monitor. • The contents displayed on the top menu differ according to the mode. Top menu (in still picture shooting mode) 1 PANORAMA Menu operations RESET 16 EXIT MENU SETUP menu items IMAGE QUALITY SETUP EXPOSURE COMP.
Operation guide During menu operations, the button to be used and its function are displayed at the bottom of the monitor. Follow the guide for operations. PANORAMA RESET IMAGE QUALITY SETUP SILENT MODE EXPOSURE COMP. EXIT MENU Operation guide SET OK m button Arrow pad (ONXY) BACK → m: Returns to the previous menu. EXIT → m: Exits the menu. ONXY: Press the arrow pad (ONXY) to select a setting. SET → i: Sets the selected item.
3 Press ON to select [VIDEO OUT] and then press i. • Unavailable settings cannot be selected. • Press X in this screen to move the cursor to the page display. Press ON to change the page. Press Y or i to return to selecting items. 1 SETUP MEMORY FORMAT 2 BACKUP 3 W ENGLISH PIXEL MAPPING K/q BACK NO SET OK MENU SETUP Page display: These marks are displayed if there are more menu items on the next page. 1 R 2 X 3 OFF '06.08.16 12:30 VIDEO OUT BACK NTSC AF ILLUMINAT.
1 IMAGE QUALITY Changing the image quality Still picture image quality and their applications Image quality/image size SHQ 2816 × 2112 HQ 2816 × 2112 SQ1 2048 × 1536 SQ2 640 × 480 Compression Application Low • This is useful for printing large images compression on A3 size or full-size paper. • This is useful for performing computer Standard compression image processing, such as contrast adjustment and red-eye correction.
Panorama shooting is possible for up to 10 pictures. Press i to exit panorama shooting. 3 RESET NO Returning changed shooting functions to default settings /YES It restores shooting functions to their factory default settings. Reset settings back to default settings Function Flash Macro mode Ref. Page AUTO P.15 OFF P.14 Exposure compensation 0.0 P.20 Image quality HQ P.19 Self-timer OFF P.14 Silent mode OFF P.20 j SPORT P.
q Playback mode menu When a still picture is selected *1 *1, *2 3 *1 1 7 6 4 ROTATE RESIZE PRINT ORDER PROTECT SLIDESHOW SETUP *1 Cannot be selected if movie is selected. *2 xD-Picture Card (optional) is required. g“SETUP menus” (P.24) SILENT MODE ERASE SET OK EXIT MENU g“Setting operational sounds to mute” (P.20) 5 When a movie is selected 2 4 PRINT ORDER ROTATE RESIZE PROTECT MOVIE PLAY SETUP ERASE SILENT MODE g“SETUP menus” (P.
2 MOVIE PLAY Playing back movies Select [MOVIE PLAY] from the top menu, and press i to play back the movie. Another option is to select a picture with the movie icon (A), and press i to play back the movie. ’06 06.08 08.16 16 12 12:30 30 100-0004 100 0004 MOVIE PLAY OK 4 Operations during movie playback HQ 320×24 32 240 ’06 06.08 08.16 16 12 12:30 30 100-0004 100 0004 00:00 00 00 / 00:36 00 36 Playing time/Total recording time O: Increases the volume. N: Reduces the volume.
3 ROTATE +90° / Rotating pictures 0° /-90° Pictures taken with the camera held vertically are displayed horizontally. This function lets you turn such pictures so that they are displayed vertically. New picture orientations are saved even when the power is turned off. RO OTATE TAT E RO OTATE TAT E RO OTATE TAT E EXIT OK EXIT OK EXIT OK +90° 0° -90° Select an image with XY and then to rotate the display select [+90°]/[0°]/[-90°] with ON. You can rotate several frames in succession.
ALL ERASE .................... Erase all the pictures in the internal memory and the card • Select [YES], and press i. 6 RESIZE Reducing the size of pictures 640 × 480 / 320 × 240 This changes the image size of a picture and saves it as a new file. 7 PRINT ORDER Making print reservations (DPOF) This function allows you to save printing data (the number of prints and the date and time information) with the pictures stored on the card. g“Print settings (DPOF)” (P.
MEMORY FORMAT (FORMAT) ...................Formatting the internal memory/card All existing data, including protected pictures, are erased when the internal memory or card is formatted. Make sure that you save or transfer important data to a computer before formatting. • Make sure there is no card inserted in the camera when formatting the internal memory. • Be sure that the card is inserted in the camera when formatting the card.
8 ........................................................ Adjusting the volume of camera warning sound OFF (No sound) / LOW /HIGH SHUTTER SOUND ................................... Selecting the sound of the shutter button OFF (No sound) / LOW /HIGH VOLUME ........................................................... Adjusting the volume during playback • Press ON to adjust the volume. • The volume can be adjusted to five levels, 1 to 5 and off.
VIDEO OUT .................................................................... Playing back pictures on a TV NTSC /PAL The factory default settings differ according to the region where the camera is sold. To play back images in the camera on a TV, set the video output according to your TV’s video signal type. • TV video signal types by country/region. Check the video signal type before connecting the camera to the TV.
Printing pictures Direct printing (PictBridge) By connecting the camera to a PictBridge-compatible printer, you can print out pictures directly. Select the pictures you want to print and the number of prints on the camera’s monitor. To find out if your printer is compatible with PictBridge, refer to the printer’s instruction manual. What is PictBridge? A standard for connecting digital cameras and printers of different makers and printing out pictures directly. • Available printing modes, paper sizes etc.
2 Turn the printer on and plug the USB cable provided with the camera into the multi-connector of the camera and the printer’s USB port. Multi-connector Connector cover USB cable (provided) • The [EASY PRINT START] screen is displayed. • For details of how to turn the printer on and the position of the USB port, refer to the printer’s instruction manual. 3 Press O<. • Printing starts. • When printing is finished, the picture selection screen is displayed.
5 Disconnect the USB cable from the printer. You can use [EASY PRINT] even when the camera is turned off or in shooting mode. With the camera turned off or in shooting mode, connect the USB cable. The selection screen for the USB connection is displayed. Select [EASY PRINT]. g“EASY PRINT.” (P.29), “CUSTOM PRINT” step 2. (P.30) Other print modes and print settings (CUSTOM PRINT) 1 Display the screen indicated on the right according to procedure 1 and 2 on P.28, and press i.
Selecting a print mode PRINT ALL PRINT PRINT MODE SELECT PRINT ALL PRINT MULTI PRINT MULTI PRINT ALL INDEX EXIT MENU SET OK ALL INDEX PRINT ORDER Prints the selected picture. Prints all the pictures stored in the internal memory or the card. Prints one picture in multiple layout format on a single sheet of paper. Prints an index of all the pictures stored in the internal memory or the card. Prints the pictures according to the print reservation data on the card.
Selecting the picture to print PRINT 100-0004 100 0004 PRINT OK MORE SINGLEPRINT < Prints one copy of the selected picture. When [SINGLE PRINT] or [MORE] has been selected pictures are printed according to the reservation. g Go to step 4. Makes a print reservation for the displayed picture. Sets the number of prints and data to be printed for the displayed picture. SINGLE PRINT MORE Note • Press XY to select the picture you want to print.
5 In the [PRINT MODE SELECT] screen, press MENU. PRINT MODE SELECT PRINT • A message is displayed. ALL PRINT MULTI PRINT ALL INDEX 6 EXIT MENU SET OK Disconnect the USB cable from the camera. • The camera turns off. 7 Disconnect the USB cable from the printer. Print settings (DPOF) How to make print reservations Printing pictures Print reservation allows you to save printing data (the number of prints and the date and time information) with the pictures stored on the card.
Note • DPOF reservations set by another device cannot be changed by this camera. Make changes using the original device. If a card contains DPOF reservations set by another device, entering reservations using this camera may overwrite the previous reservations. • You can make DPOF print reservations for up to 999 images per card. • Not all functions may be available on all printers, or at all photo stores.
6 Select [SET], and press i.
To reset the print reservation data for a selected picture 2 3 4 Select [<] and press i. Select [KEEP], and press i. Press XY to select the picture with the print reservations you want to cancel, and press N to decrease the number of prints to 0. • Repeat this step to cancel print reservations for other pictures. 5 6 When you are finished canceling print reservations, press i. Select the date and time setting, and press i. • The setting is applied to the remaining pictures with print reservations.
Using OLYMPUS Master Flow Using the USB cable provided with your camera, you can connect the camera and computer and download (transfer) the images to your computer using the OLYMPUS Master software, also provided with the camera. Prepare the following items before starting. Install the OLYMPUS Master software gP.38 Connect the camera to the computer using gP.41 the USB cable USB cable Start up the OLYMPUS Master software gP.42 Download image files to the computer gP.
Install the OLYMPUS Master software Before installing the OLYMPUS Master software, please confirm that your computer is compatible with the following system requirements. For newer operating systems, please refer to the Olympus web site as shown on the back cover of this manual.
Note • • • • Mac versions earlier than OS X 10.2 are not supported. Operation is only guaranteed on a Macintosh equipped with a built-in USB port. QuickTime 6 or later and Safari 1.0 or later must be installed. Be sure to remove the media (drag & drop onto the trash icon) before performing the following operations. Failure to do so could result in unstable computer operation and the need to reboot.
4 Follow the on-screen instructions. • When the OLYMPUS Master licensing agreement is displayed, read the agreement and click “Yes” to proceed with the installation. Using OLYMPUS Master • When the “User Information” dialog box is displayed, enter your “Name” and “OLYMPUS Master Serial Number”; select your region and click “Next”. Refer to the sticker on the CDROM package for the serial number. • When the DirectX licensing agreement is displayed, read the agreement and click “Yes”.
2 Double-click the “Installer” icon. • The OLYMPUS Master installer starts up. • Follow the on-screen instructions. • When the OLYMPUS Master licensing agreement is displayed, read the agreement and click “Continue” and then “Agree” to proceed with the installation. • The screen confirming that installation is completed is displayed. 3 Click “Finish”. • The first screen is displayed. 4 Click “Restart”. • The computer restarts. • Remove the CD-ROM from the CD-ROM drive and store it.
4 The camera is recognized by the computer. • Windows When you connect the camera to your computer for the first time, the computer attempts to recognize the camera. Click “OK” to exit the message that is displayed. The camera is recognized as a “Removable Disk”. • Macintosh The iPhoto program is the default application for managing digital images. When you connect your digital camera for the first time, the iPhoto application starts automatically, so close this application and start OLYMPUS Master.
OLYMPUS Master main menu 1 9 8 2 7 3 6 5 4 Using OLYMPUS Master 6 “Create and Share” button Displays the editing menu. 7 “Update Software” button OLYMPUS Master can be updated to the latest version. 8 “Backup Images” button Creates backup images. 9 “Upgrade” button Displays window for optional upgrade to OLYMPUS Master Plus. 1 “Transfer Images” button Downloads images from the camera or other media. 2 “Browse Images” button The “Browse” window is displayed.
3 Select the image files and click “Transfer Images”. • A window indicating that the download is complete is displayed. 4 Click “Browse images now.” • The downloaded images are displayed in the browse window. • To return to the main menu, click “Menu” in the “Browse” window. Using OLYMPUS Master To disconnect the camera 1 Make sure that the card access lamp has stopped blinking. 2 Make the following preparations for disconnecting the USB cable.
Macintosh 1 The trash icon changes to the eject icon when the “Untitled” or “NO_NAME” icon on the desktop is dragged. Drag and drop it on the eject icon. 3 Disconnect the USB cable from the camera. Note • Windows Me/2000/XP: When you click “Unplug or Eject Hardware”, a warning message may be displayed. Make sure that image data is not being downloaded from the camera and that all applications are closed. Click the “Unplug or Eject Hardware” icon again and disconnect the cable.
To view a movie 1 Double-click the movie thumbnail that you want to see in the “Browse” window. • Olympus Master switches to view mode and the picture is enlarged. 2 To play back the movie, click the playback button at the bottom of the screen. The names and functions of the controller parts are shown below.
3 Click “Settings” in the “Photo Print” window. • The printer settings screen is displayed. Make the necessary printer settings. 4 Select a layout and size. • To print the date and time with your image, check the box next to “Print Date”, and select between “Date” and “Date & Time”. 5 Select the thumbnail image that you want to print and click “Add”. 6 Select the number of copies. 7 Click “Print”. Using OLYMPUS Master • A preview of the selected image is displayed on the layout.
To download and save images to a computer without using OLYMPUS Master This camera is compatible with USB mass storage. You can connect the camera to your computer using the USB cable provided with the camera to download and save images without using OLYMPUS Master. The following environment is required to use the USB cable to connect the camera to your computer. Windows: Windows 98SE/Me/2000 Professional/XP Macintosh: Mac OS 9.0 to 9.
To increase the number of languages Please take care that your battery is fully charged ! 1 Make sure that your PC is connected to the Internet. Click “Update Camera” on the OLYMPUS Master main menu. • After selecting the Update Camera function OLYMPUS Master shows a Window with security advices. 2 Plug the USB cable into the USB port on the computer. 3 Plug the other end of the USB cable into the camera’s USB connector. 4 5 Using OLYMPUS Master • The camera turns on automatically.
Getting to know your camera better Shooting tips and information Tips before you start taking pictures The camera does not turn on even when a battery is loaded The battery is not fully charged • Charge the battery with the charger. The battery is temporarily unable to function because of the cold • Battery performance declines in low temperatures, and the charge may not be sufficient to turn on the camera. Remove the battery and warm it by putting it in your pocket for a while.
The date and time have not been set The camera has been used in the same conditions from the time of purchase • No date and time have been set for the camera at the time of purchase. Set the date and time before using the camera. g“Set date and time” (P.6), “X Setting the date and time” (P.26) The battery has been pulled out of the camera • The date and time settings will be returned to the factory default settings if the camera is left without batteries for approximately 1 day.
Subjects that are difficult to focus on • Under certain types of conditions, it is difficult to focus using auto focus. The green lamp on the monitor lights, allowing you to check if the focus is locked. The green lamp blinks. The subject cannot be brought into focus.
The picture is too grainy There are several factors that can cause the picture to appear grainy. Using the digital zoom to take close-up pictures • With the digital zoom, part of the image is cropped and enlarged. The greater the magnification, the grainier the picture appears.
Number of storable still pictures and recording length of movies Still pictures Number of storable still pictures Image quality Image size SHQ 2816 × 2112 5 29 HQ 2816 × 2112 15 86 SQ1 2048 × 1536 29 162 SQ2 640 × 480 130 725 Internal memory Card (128 MB) Movie Getting to know your camera better Remaining recording time 54 Image quality Image size HQ SQ Internal memory Card (128 MB) With sound Without sound With sound Without sound 320 × 240 (30 frames/sec.) 33 sec.
Extending the useful life of the battery • Performing any of the following operations when not actually taking pictures can deplete the battery power. • Repeatedly pressing the shutter button halfway • Repeatedly using the zoom • To save battery power, turn off the camera whenever it is not in use. Functions that cannot be selected from menus • Some items may not be selectable from the menus when using the arrow pad.
Viewing pictures on a computer Viewing the entire picture on a computer screen The size of the picture displayed on a computer screen changes depending on the computer settings. When the monitor setting is 1,024 × 768 and you are using Internet Explorer to view a picture with an image size of 2,048 × 1,536 at 100%, the entire picture cannot be viewed without scrolling. There are several ways you can view the entire picture on the computer screen.
Monitor indication q CARD ERROR q Possible cause There is a problem with the card. Corrective action This card cannot be used. Insert a new card. Writing to the card is prohibited. The recorded image has been protected (read-only) on a computer. Download the image to a computer and cancel the read-only setting. Insert a card or erase unwanted data. Before erasing, backup the data of important pictures using the card, or download such pictures to a computer. Replace the card or erase unwanted data.
Monitor indication CARD SETUP Possible cause This card cannot be used in this camera. Or, the card is not formatted. POWER OFF FORMAT SET OK There is an error in the internal memory. MEMORY SETUP POWER OFF MEMORY FORMAT Corrective action Format the card or replace. • Select [POWER OFF] and press i and then insert a new card. • Select [FORMAT] [YES] and press i. The card is formatted. All data on the card is erased during formatting. Select [MEMORY FORMAT] [YES] and press i.
Functions available in shooting modes and scenes Some functions cannot be set in certain shooting modes. For more details, refer to the table below. Functions available in shooting modes f Shooting mode i l n M Function j N V & 9 — 9 % 9 — 9 Y # ZOOM 9 — 9 — — 9 9*1 9 — 9 BACKUP 9 W 9 PIXEL MAPPING 9 K/q 9 s 9 BEEP 9 8 — 9 9 9 VOLUME — 9 — — X VIDEO OUT AF ILLUMINAT. *2 9 — 9 MEMORY FORMAT (FORMAT) *1 i 9 IMAGE QUALITY R S X — 9 EXPOSURE COMP.
Miscellaneous Camera care Cleaning the camera Exterior: • Wipe gently with a soft cloth. If the camera is very dirty, soak the cloth in mild soapy water and wring well. Wipe the camera with the damp cloth and then dry it with a dry cloth. If you have used the camera at the beach, use a cloth soaked in clean water and wrung well. Monitor: • Wipe gently with a soft cloth. Lens: • Blow dust off the lens with a commercial blower, then wipe gently with a lens cleaner.
( This camera uses a charger specified by Olympus. Do not use any other type of charger. ( The charger can be used within the range of AC 100 V to AC 240 V (50/60 Hz). When using the charger abroad, you may need a plug adapter to convert the plug to the shape of the AC wall outlet. For details, ask at your local electrical shop or travel agent. ( Do not use travel voltage converters as they could damage your charger. Useful use of the accessories The card Pictures can be recorded on the optional card.
Inserting and removing the card Turn off the camera. 1 2 Open the battery/card compartment cover. Battery/card compartment cover 2 1 Inserting the card 3 Orient the card as shown, and insert it into the card slot as shown in the illustration. • Insert the card straight in. • Insert the card until it clicks into place. Notch Contact area Removing the card 4 Push the card all the way in and release slowly. Miscellaneous • The card protrudes slightly and stops. 62 • Grasp the card and remove it.
5 Close the battery/card compartment cover. 1 2 Note • The card access lamp blinks while the camera is reading the images. Reading of images may take some time. Do not open the battery compartment/card cover while the card access lamp is blinking. Doing so may damage the data in the internal memory or the card and render the internal memory or card unusable.
SAFETY PRECAUTIONS CAUTION RISK OF ELECTRIC SHOCK DO NOT OPEN CAUTION: TO REDUCE THE RISK OF ELECTRICAL SHOCK, DO NOT REMOVE COVER (OR BACK). NO USER-SERVICEABLE PARTS INSIDE. REFER SERVICING TO QUALIFIED OLYMPUS SERVICE PERSONNEL. An exclamation mark enclosed in a triangle alerts you to important operating and maintenance instructions in the documentation provided with the product.
Product Handling Precautions ( ( ( ( ( ( ( ( ( ( ( WARNING Do not use the camera near flammable or explosive gases. Do not use the flash on people (infants, small children, etc.) at close range. • You must be at least 1 m (3 ft.) away from the faces of your subjects. Firing the flash too close to the subject’s eyes could cause a momentary loss of vision. Keep young children and infants away from the camera.
• If rechargeable batteries have not been recharged within the specified time, stop charging them and do not use them. • Do not use a battery if it is cracked or broken. • If a battery leaks, becomes discolored or deformed, or becomes abnormal in any other way during operation, stop using the camera. • If a battery leaks fluid onto your clothing or skin, remove the clothing and flush the affected area with clean, running cold water immediately.
Legal and Other Notices • Olympus makes no representations or warranties regarding any damages, or benefit expected by using this unit lawfully, or any request from a third person, which are caused by the inappropriate use of this product. • Olympus makes no representations or warranties regarding any damages or any benefit expected by using this unit lawfully which are caused by erasing picture data.
For customers in North and South America For customers in USA Declaration of Conformity Model Number : FE-200 Trade Name : OLYMPUS Responsible Party : Address : 3500 Corporate Parkway, P.O. Box 610, Center Valley, PA 18034-0610, U.S.A. Telephone Number: 484-896-5000 Tested To Comply With FCC Standards FOR HOME OR OFFICE USE This device complies with Part 15 of the FCC rules. Operation is subject to the following two conditions: (1)This device may not cause harmful interference.
Trademarks Miscellaneous Provisions of warranty 1. If this product proves to be defective, although it has been used properly (in accordance with the written Handling Care and Operating instructions supplied with it), during a period of two years from the date of purchase from an authorized Olympus distributor within the business area of Olympus Imaging Europa GmbH as stipulated on the web site: http://www.olympus.com this product will be repaired, or at Olympus’s option replaced, free of charge.
Specifications (Camera Product type Recording system Still pictures Applicable standards Movie Memory : Digital camera (for shooting and displaying) No. of effective pixels Image pickup device Lens : : : Photometric system Shutter speed Shooting range : : : Monitor Outer connector Automatic calendar system Operating environment Temperature : : : Humidity Power supply Miscellaneous Dimensions 70 Weight EN : : : : Digital recording, JPEG (DCF compatible) Exif 2.
(Lithium ion battery (LI-12B) Product type Standard voltage Standard capacity Battery life Operating environment Temperature Dimensions Weight : : : : Lithium ion rechargeable battery DC 3.7 V 1,230 mAh Approx. 300 full recharges (varies on usage) : 0°C to 40°C (32°F to 104°F) (charging)/ -10°C to 60°C (14°F to 140°F) (operation)/ 0°C to 30°C (32°F to 86°F) (storage) : 32 × 46 × 10 mm (1.3 × 1.8 × 0.4 in.) : Approx. 30 g (1.
Camera diagram Camera Strap eyelet (P.3) In: Shutter button (P.10) Out: Zoom lever (P.13) Flash (P.15) DC IN connector o button (P.5, 10) Microphone (P.26) Connector cover/Multi-connector (P.27, 29, 41) Lens (P.60) Self-timer/AF illuminator lamp (P.14, 27, 54) Monitor (P.60) K button (P.11) Card access lamp (P.54) q button (P.11) Miscellaneous Mode dial (P.11) < button (P.14) Arrow pad (ONXY) (P.14) # button (P.15) i button (P.14) & button (P.14) Y button (P.14) S button (P.15) MENU button (P.
Monitor symbols and icons (Shooting mode 1 2 3 4 5 6 +2.0 7 8 4 HQ 2816×2112 10 16 4 5 7 14 8 13 3 +2.0 11 12 15 14 00:36 HQ 9 Still picture 16 10 12 Movie Item Indications Ref. page 1 Shooting mode P, h, B, F, U, C etc. P.5, 18 2 Self-timer Y P.14 3 Exposure compensation -2.0 – +2.0 P.20 4 Battery check e (full power), f (low power) 5 Green lamp | (Auto Focus Lock) P.8, 54 6 Flash standby Camera movement warning/flash charge # (Lit) P.
(Playback mode 1 2 3 1 10 12 HQ 2592×1944 259 +2.0 ’06 06.08 08.16 16 12 12:30 30 100-0004 100 0004 4 5 6 7 8 2 12 Miscellaneous 1 Battery check 2 Current memory 3 Print reservation/ number of prints Movie 4 Recording 5 Protect 6 Image quality 7 Image size 8 Exposure compensation 9 Date and time 10 File number 11 Frame number Elapsed time/Total recording time (movie) 12 Silent mode 74 EN HQ 320×24 32 240 ’06 06.08 08.
Index Symbols S button (erase) . . . . . . . . . . . . . . . 15 Y# button (flash mode) . . . . . . . . . 15 X& button (macro mode) . . . . . . . 14 i button (OK) . . . . . . . . . . . . . . . . 14 q button (playback). . . . . . . . . . . . 11 O< button (print) . . . . . . . . . . . 14, 29 NY button (self-timer) . . . . . . . . . . 14 K button (shooting) . . . . . . . . . . . . 11 Connector cover . . . . . . . . . 27, 29, 41 CUISINE V . . . . . . . . . . . . . . . . . . . 11 CUSTOM PRINT . . . . . . . . . .
Index display G . . . . . . . . . . . . . . . 13 INDOOR N . . . . . . . . . . . . . . . . . . 11 Internal memory . . . . . . . . . . . . 25, 61 PRINT ORDER . . . . . . . . . . . . . 24, 31 Print settings . . . . . . . . . . . . . . . . . . 33 PROTECT . . . . . . . . . . . . . . . . . . . . 23 L R Landscape l. . . . . . . . . . . . . . . . . 11 Recording movies n . . . . . . . . . . . 12 Recording sound R . . . . . . . . . . . . . 26 Recording time. . . . . . . . . . . . . . . . .
SUNSET S . . . . . . . . . . . . . . . . . . 11 Super macro mode % . . . . . . . . . . 14 T Top menu . . . . . . . . . . . . . . . . . . . . 16 U USB cable . . . . . . . . . . . . . . 29, 37, 41 USB driver . . . . . . . . . . . . . . . . . 38, 48 V VIDEO OUT. . . . . . . . . . . . . . . . . . . 27 VOLUME . . . . . . . . . . . . . . . . . . . . . 26 W Warning sound 8 . . . . . . . . . . . . . 26 X xD-Picture Card. . . . . . . . . . . . . 19, 61 Z Zoom lever . . . . . . . . . . . . . . . . . . .
2006 VH745601