
User manual


OLIMEX© 2012 SHIELD-EKG-EMG
SECTION 4 INSTALLATION EXAMPLE
This is a step by step example of installing SHIELD-EKG-EMG on OLIMEXINO-328 using
Windows. You can refer to the tips keeping in mind that the example utilizes a board with
ATmega328 MCU.
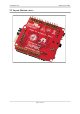
4.1 SHIELD-EKG-EMG and OLIMEXINO-328
In this example we use OLIMEXINO-328; SHIELD-EKG-EMG; USB - USBmini cable;
Arduino 1.0 IDE; two external libraries for the IDE (the latest versions of TimerOnev9 and
FlexiTimer2); the latest FTDI VCP drivers (2.08.14), demo code provided by us that can be
downloaded from the web site and free monitoring software Electric Guru.
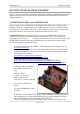
0. IMPORTANT! Before starting you have to prepare the OLIMEXINO-328 board by
removing its wire between the R6 pads (R6 is not mounted). There is increased power
consumption and a chance of electrical failure if you omit to do so. This is only for the
OLIMEXINO-328 board! Don't do the modification if you lack basic electronics skills,
because it is possible to damage the board.
1. Download and extract the Arduino 1.1 IDE package from the Arduino web site:
http://www.arduino.cc/
2. Download and place the two timer libraries required (TimerOne, FlexiTimer2) in
\arduino-1.0\libraries by placing each of them in properly named folder (check the
other libraries for reference)
http://arduino.cc/playground/Code/Timer1
http://www.pjrc.com/teensy/td_libs_MsTimer2.html
3. Download the demo project from product’s web page:
https://www.olimex.com/Products/Duino/Shields/SHIELD-EKG-EMG/
4. Download the FTDI VCP drivers: http://www.ftdichip.com/Drivers/VCP.htm
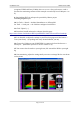
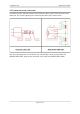
5. Set the jumpers of SHIELD-
EKG-EMG in the following
way:
REF_E – closed
3.3V/5V – 5V position
D4/D9 – D9 position
ANI_SEL – 1 position (channel)
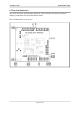
6. Connect the shield to the
board
7.Connect OLIMEXINO-328 to
the USB
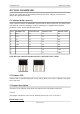
8. Install the VCP FTDI drivers by going in Device Manager; right-clicking over the
unrecognized device and choosing Update Driver and then pointing to the folder
where you downloaded and extracted the FTDI VCP driver.
Here it is advisable to go to Device Manager and from advanced settings of our
Page 12 of 20