
User manual

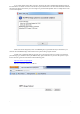

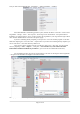


A very handy feature of the utility is point 4, which may be used to automatically upload the image to
the board after a successful convertion. Enter the IP of your board and leave the other fields at defaults. Press the
'Generate and Upload' and wait for your new image to be generated and uploaded. This is a sample of the result
of a successful upload:
Please note that an image file (in this case MPFSImg.bin) is generated and may be used later if you
select the 'Pre-built MPFS image' radio button at the top of the utility program window.
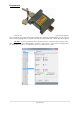
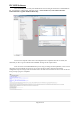
Another way to upload an image for the web server is through the web server itself. You will need a
pre-built image (yes, should be built by the MPFS2 utility again) somewhere in your PC's file system. In your
favorite browser type the IP of the board with the following path:
http://192.168.0.171/mpfsupload
Here is a screenshot of what you will see:
Page 23 of 36