
User manual


After this setup the connection with the PIC-WEB should be ready, but the console will not show anything!.
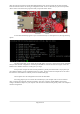
That’s because the board is not running on configuration mode. To run on that mode you just need to push the
“BUT” button on the board. Keep it pressed while you push the “RST” button.
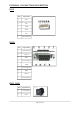
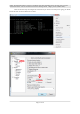
A menu will immediately appear on your console terminal (in our example PuTTY) showing following
options:
The third option allow you to change the board IP number. Just type 3, then enter the new IP compatible
with your local network configuration. After that push ENTER and return to the main menu again. In this case
DHCP must be disabled. Otherwise it will ignore your input.
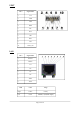
Now you must configure the other network parameters: gateway and subnet mask or if you prefer you
can enable the DHCP to get the configuration from your router. The first and the second options are not used in
this manual. At this moment we will only use the on-board default page.
The last option saves the configuration and restarts the PIC-WEB.
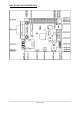
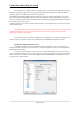
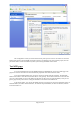
For testing purposes you can connect the board directly to your computer with a crossover ethernet
cable , configure the board with 192.168.0.32 address, 192.168.0.1 gateway, disable DHCP (option 6) and
configure the Ethernet adapter on your computer with 192.168.0.31 and the same gateway. Here is an example of
windows configuration:
Page 18 of 36