
User manual


Connecting and testing the board
The PIC-WEB rev.C manufactured after 1 april 2014, comes with a default code that content an Internet
Bootloader and a demo program (web-server) based on Microchip's TCP/IP stack version 5.42.08 included in
"Microchip Libraries for Applications" released on 15 june 2013.
The bootloader mode makes possible update of the firmware using LAN connection and TFTP.exe (see pages
28-29 of this manual or the README.txt inside the zip for more details) instead of programmer. In the first 4
seconds the bootloader mode will be active and after that if no uploading is triggered the main demo will start (in
this moment the red user LED is on).
In addition to that there is a demo for UEXT interfaces and how we can manipulate devices connected to UEXT
via PIC-WEB webpage.
The older PIC-WEB comes with a default code – web server but with older stack version (TCP/IP 5.00)
and without bootloader!!! So in order to use the latest version of the demo you need PIC-KIT3 or another
programmer available for PIC18F67J60.
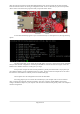
You can test the demo in a couple of simple steps. First of all you have to configure the Ethernet port to
be able to work on your local network. That is possible trough the MCHPStack Configuration Console.
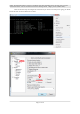
Using the PIC-WEB configuration console
It’s possible to modify the network configuration using the configuration console on the serial port,
allowing a successful operation on your local network. Using the configuration console you can change the PIC-
WEB IP address for example.
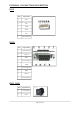
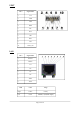
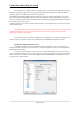
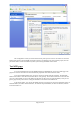
To access to the console menu it is necessary to have a serial DB9 cable and connect the board serial
port to one available COM port on your computer. Then you will need to connect the board using a software like
PuTTY. When you start it select down the menu Serial in category Connections and configurate the session as
it's shown on the screenshot below.
Page 16 of 36