
Quickie 500 manual


Construction Manual www.oldschoolmodels.com Page 5
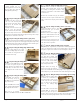
n n Step 15 - Wing Assembly (trailing edge)
Locate one of the 1/4" square balsa
strips. This is used as the wing's trailing
edge. It will need to be trimmed to
length, but leave it slightly oversized
so it extends roughly 1/8" past R1 and
about a 1/4" past the wing tip shown
on the plans. Glue this in place, making
sure it is securely glued to each rib.
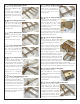
n n Step 16 - Wing Assembly (R2 & R3 cutouts)
Now it's time to cut-away the center
of two ribs - R2 and R3 next to it. Here
are the before and after photos to help
show what needs to be done.
Make sure that the area is completely
clean and smooth, as later on this will
be a channel where the dihedral brace
will slide through. The cleaner it is
now, the easier it will be to slide in the
brace when it's time.
Take your time and use a gentle touch
in this step as you don't want to cut
more than you should, nor do you
want to damage the sheer webs in
these spots as it could weaken the
wing or cause a misalignment.
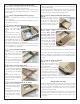
n n Step 17 - Wing Assembly (upper spar)
Locate another of the 3/16" x 3/8”
basswood strips. This is used as
the upper spar. It will need to be
trimmed to length, but leave it
slightly oversized so it extends
roughly 1/16" past R1 and ends
at the outer edge of R6. Glue this
in place, making sure it is securely
attached to each rib and completely pushed into the pre-cut slots
of each rib.
n n
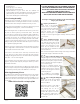
Step 18 - Wing Assembly (upper leading edge sheeting)
Locate one of the un-cut
1/16" x 4" x 24" balsa sheets.
You will need to split this in
to two pieces for the upper
leading and trailing edge
sheeting.
Measure and cut a 1-5/8" x
24" strip and put that aside.
The remaining portion will be the leading edge sheeting.
It’s best to glue the forward edge of the sheeting to the leading
edge first.
To apply constant and firm pressure along the length of the
sheeting we advise using
a yardstick or long straight-
edge. Place the thin edge
of the straight-edge it on
top of the sheeting and
hold (or tape in place) it
until the glue cures.
Carefully position a couple of weights on the rear of the wing to
keep it in place while attaching the sheeting. We used a couple of
larger LiPo packs, but most anything with a little weight will work.
Once the glue holding the front edge of the sheeting has cured,
apply glue to the ribs where the sheeting will attach, as well as the
upper spar. Then gently wrap the sheeting around the curvature of
the wing ribs.
Note: using the same straight-edge, apply constant and firm
pressure to the sheeting by slowly working from the leading edge,
pushing the sheeting on to the ribs. Slowly work your way back to
the rear of this piece of sheeting, until it is attached to the upper
spar.
n n
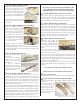
Step 19 - Wing Assembly (upper trailing edge sheeting)
Before attaching the trailing edge
sheeting, lightly sand the trailing edge.
As you can see in this diagram, not much
needs to be removed - just enough to
allow the continuation of the airfoil shape.
Once sanded, use the 1-5/8" strip of
1/16" sheeting you cut away in the
previous step as the trailing edge
sheeting.
You will need to cut out a notch around
WB1 as shown here, before you glue
this piece in position. Take your time
to get a good fit, then apply glue to each
of the ribs, the trailing edge and all of the
rear sheer webs. Then attach the sheeting
in position.
n n Step 20 - Wing Assembly (upper WS sheeting)
Locate two WS pieces
from BP13. These pieces
are glued together to
form a single piece
of center sheeting, as
shown in the photo.
We've purposely made
each piece slightly longer
than needed, to allow
you to adjust their length
to get a perfect fit between the leading and trailing edge sheeting.
To adjust the length, place each piece in position, then trim as
needed on the narrower area, where the two pieces overlap.
When edge gluing the sheeting pieces together, first make sure
the edges are flat (give a quick, swipe or two with a sanding block).
Then tape the two pieces together with a piece of tape. As you lift
the sheeting from the board you’ll see that the tape will act as a
hinge allowing you to put a small amount of adhesive in the joint.
When the adhesive is applied, place the sheeting back down on
the waxed paper, so that it’s flat. When cured, you’ll now have a
single, longer piece of sheeting after you remove the tape.
R2 & R3 before cutting
After cutting