
Quickie 500 manual


Construction Manual www.oldschoolmodels.com Page 15
powered, and if you're going to consider racing them in the AMA
Quickie 500 classes, you'll need it to be glow powered.
You'll need to mount a throttle servo and drill a hole in the firewall
to allow the throttle pushrod through.
A 6 ounce fuel tank easily fits in compartment behind the firewall,
even with a receiver battery and pushrod in the same space.
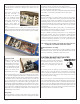
Electric power
If you’re powering your Quickie with an electric power system,
thats ok too - as glow can't be flown everywhere these days. With
an electric power system, the installation is very much the same,
substituting an ESC for the throttle servo and the battery for the
fuel tank. You'll bolt the motor in place, similar to how you'd mount
a glow engine and the batteries and ESC will be in the fuel tank
compartment.
The biggest difference will be you'll need to cut cooling holes in
the firewall (or fuse sides) as well as in the rear of the fuse to allow
sufficient airflow to cool the batteries and ESC.
And, we HIGHLY recommend using some sort of arming plug
when using electrics. This can be something as simple physical
plug that has to be inserted before operation, or some of the more
sophisticated electronic systems on the market today. We don't
recommend anything in particular, so use the system that works
best for you and your pocketbook.
This completes the assembly of the Quickie 500. Now you’ll need
to adjust the control throws and check for balance.
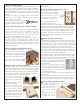
nRecommended C.G. setting:
An important part of preparing the aircraft for flight is properly
balancing the model. This is especially important because of the
various motor/battery combinations that can be used
CAUTION! DO NOT SKIP THIS STEP!
The recommended starting Center of
Gravity (CG) location for the Quickie 500
is measured 2.5" back from the leading
edge of the wing, and you’ll see this
marked on the fuselage plan with this
symbol.
If necessary, move the battery, receiver, and/or add weight to
either the nose or the tail until the correct balance is achieved.
Stick-on weights are available as a last resort from your local hobby
store and can work for this purpose when shifting of the internal
components just isn’t enough.
Balance can vary up to 1/4" behind main spar. It is best to start with
our recommended position. If the model tends to drop its nose in
the turns, move the CG back a little - or forward a little if it tends to
balloon in the turns. When properly trimmed, the Quickie 500 will
fly through the turns flat without the need of any rudder control. As
an added feature, in the event of aileron servo failure, the Quickie
will perform almost as well with the rudder.
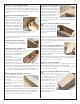
these holes to accept your choice of servos.
Also cut into LP2 is a separate, slightly smaller servo mount. This
is designed to be used if you're using an even smaller servo for
throttle control.
Using some scrap lite ply
from LP1 and LP2, cut
strips that can be glued in
place to double-up where
the servo mounting screws
will be used. Shown here is
an example of one of our
layouts. Your's might be
different, but the idea is the
same.
Finish the installation of your radio gear by adding the receiver,
flight pack battery and the switch. We mounted the receiver to the
fuselage using a bit of self-adhesive hook-and-loop (not included).
nPower system
Installing your power system
of choice is up next. We
mentioned this earlier, but it
bears repeating. Our engine
size recommendation range
is a .25-.46 two-stroke glow
engine or an electric motor
with similar power output.
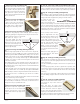
On the fuselage plans, you’ll notice a line referred to as the “thrust
line”. This is the suggested line where the crankshaft of the motor
(or engine) should be located. On the original Quickie 500 design
it was dead center on the firewall, and the same is true with our
kit. The original had zero down thrust and zero right thrust. We
fell that the majority of our kits will be used for sport flying so the
only thing we changed was adding a touch of down-thrust to aid in
every-day flying. We suggest flying the Quickie 500 in the way we
have set-up before changing the thrust angle. If you choose to add
right thrust, it's an easy thing to add a washer or two between the
firewall and the motor mount.
Glow power
If you're planning on using a glow engine, that's a good thing.
The original version was glow powered, our prototypes are glow