
Quickie 500 manual


Page 12 www.oldschoolmodels.com Construction Manual
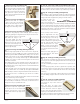
nStep 81 - Fuselage Assembly (LG4/LG5)
Now glue the LG4/LG5 assembly in place on the bottom of the
fuselage, with the back edge of this assembly aligned with the
back edge of F3 - refer to the plans. LG4 (the piece with the large
slot) should be facing outwards and be visible when the piece is
installed.
nStep 82 - Fuselage Assembly (LG1, LG2)
Locate both LG1 pieces from LP1.
These are glued together to form
a thicker LG1. Now this piece
is glued in position inside the
fuselage. It should rest on top of
the LG4/LG5 just installed, and be
pushed back up against F3. Also
note the angle of the slot so it
matches what we've shown in this
photo. This slot should line up with the pre-cut hole in LG5.
Keep the slot in LG1 free of glue during this step.
Now do the same with both LP2 pieces, gluing them inside the
opposite side of the fuselage.
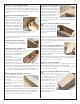
nStep 83 - Fuselage Assembly (TS)
Locate TS from BP4. This is glued to the top
of the fuselage, around the vertical fin as
shown.
nStep 84 - Fuselage Assembly (PG)
Before the top of the fuselage is
sheeted, now is a good time to
plan the route of the rudder and
elevator pushrods through the rear
of the fuselage.
We chose to use DuBro's flexible
pushrod system in our prototypes,
but use what works for you. If using
a flexible pushrod system, you'll
need to secure the outer tubing in a few spots to keep it from
flexing. We've included several pushrod guides (PG) in BP1. These
can be used as needed to support the guides from the servo tray
to the exits pre-cut into the fuselage sides. For the rudder, we cut
a hole into TS for the rudder pushrod to exit on the top of the fuse.
nStep 85 - Fuselage Assembly (top sheeting)
Using the scrap 1/8" sheet from
the BP2-BP8 sheets, you'll now
create the sheeting for the top of
the fuselage.
The sheeting is cut so it is cross-
grained (running from side to side
for strength).
Starting at the front edge of TS,
measure, cut, and glue strips to
form the top of the fuselage. Make sure that the sheeting is not
only glued to the fuselage sides, but also to any formers they touch
as well the other top sheets as you work your way forward 4” at a
time. Stop when you cover F3, as shown on the plans.
nStep 86 - Fuselage Assembly (vertical fin supports)
Using additional 1/8" scrap wood,
form two vertical fin supports for
each side of the fin. These supports
should smoothly blend into the
fuselage stop sheeting and taper
back to the trailing edge of the
fuselage as we've shown here.
Do your best to make both sides the same length and height - just
make sure they are mirror images of each other. Glue them in place
when satisfied.
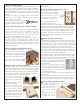
nStep 87 - Fuselage Assembly (top sheeting & H6)
Measure and cut two
shorter strips of 1/4" x 1/8"
balsa strip to finish the top
sheeting. This should run
between the firewall and the
front of F3.
Also locate H6 from LP2. This
is glued on the underside of H4. There are etched lines on H6
to show the halfway mark, so glue this in place so it is centered
between the fuselage sides and so that half of the piece shows, as
seen in the photo.
nStep 88 - Fuselage Assembly (H1, H5)
Locate H1 from LP2 and both H5s from LP1.
Both H5's are glued into the pre-cut slots in
H1 to form the forward hatch stops. Make
sure they are 90° to the hatch surface and
both stops overhang the front end of the
hatch as shown here.
When finished, place the hatch in position on the fuselage and
use a 1/16" drill bit to drill the rear screw holes into both H2/H3's,
using the pre-cut holes in H1 as a guide.
nStep 89 - Ailerons and elevator
Using the two 36" lengths of 5/16" x 1" shaped strip, measure and
cut both ailerons. Make sure they are the same length.
Now using the shorter length of 5/16" x 1" shaped strip, measure
and cut the elevator to length.
nStep 90 - Fuselage Assembly (bottom sheeting)
Measure and cut two
shorter strips of 1/8" x
1/4" balsa strip to glue on
the bottom edges of the
fuselage sides between the
firewall and the front of F3.
Using some scrap 1/8"
x 4" sheeting, measure,
cut and glue together the
sheets that will make up the
bottom sheeting between
LG4/LG5 and F1.