
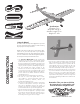
Kaos 60 manual


Page 6 www.oldschoolmodels.com Construction Manual
R1 needs to be flat along it's entire length - from leading to trailing
edge. Any warps or twists you build in now will make it harder to
properly join the wing halves later on.
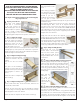
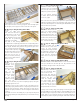
n n Step 14 - Wing Assembly (WH6)
Locate one WH6 from LP1.
This fits into the pre-cut
grooves on the rear portion of
the R1 and R2 ribs.
Again, this has the engraved
circle that should be up
against the root rib and closer
to the leading edge. This
will position the pre-cut circle to the left and slightly above the
centerline of WH6, as shown here. Glue this to the ribs and to the
WH3 and WH4 pieces already installed.
n n Step 15 - Wing Assembly (trailing edge)
Locate one length of 1/4"
square x 36" square balsa stick.
This is used as the trailing edge.
Measure and cut it to length,
giving yourself a 1/4" or so extra
on each end, and make sure
you also include the wing's tip
when making the measurement.
Start at one end and glue the
trailing edge to each rib, making sure it is completely seated in
each rib's rear cutout. Do a little at a time, making sure that the ribs
are properly positioned (Don't be afraid to use one of those 90°
triangles - that's why we included them.)
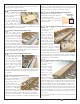
n n Step 16 - Wing Assembly (leading edge)
Locate one length of 1/2" square
x 36" square balsa stick. This is
used as the leading edge.
Using the same technique
you just used for the trailing
edge, cut and glue the leading
edge in place, making sure
it's completely seated in the
notches in each rib.
Start at one end, do a little at a time and work your way to the other
end. Make sure that the ribs are properly positioned (Yup, use that
90° triangle.)
n n Step 17 - Wing Assembly (top spar)
Locate one length of 1/4"
square x 36" square basswood
stick. Measure and cut it to
length, giving yourself a 1/4"
or so extra on each end.
This is used as the top spar
and will fit into the top cutout
of each rib. It is STRONGLY
recommended that you test
fix this first. You might have to sand here and there, as well as
wiggle the basswood to get it to fit into the slots. It is a tight fit.
Once you're satisfied with how it fits, remove it, then glue it in
position to each rib, and to where it contacts the upper portions
of SW1 and SW2.
Make sure it is completely seated in the slot of each rib. Use care
when pushing down - sometime it's better to reach underneath the
ribs and use more of a pinch to seat the spar in places.
n n Step 18 - Wing Assembly (sand trailing edge)
You'll now need to very lightly sand the
trailing edge. Refer to this diagram to
show what I'm on about.
The trailing edge needs a little sanded
off the rear edge it so it will continue
the airfoil shape.
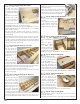
n n Step 19 - Wing Assembly (trailing edge sheeting)
Locate one of the
1/16" x 4" x 36" sheets
of uncut balsa.
First you'll cut this
sheet to length -
roughly 28-1/2" long.
Then you'll need to cut
two lengths of sheeting
1-3/4" wide. One is
used now, the other will
be used when sheeting
underside in a few steps.
Now you'll need to measure
and cutout a notch to perfectly
fit around the WH6 piece you
installed earlier. Remember you
can always take wood off, but it's tricky to put back on, so take your
time and "sneak up" on it, little by little until you have a good fit.
When satisfied, glue this sheeting to each of the ribs, the trailing
edge and where it contacts WH6.
n n Step 20 - Wing Assembly (leading edge sheeting)
Locate another 1/16"
x 4" x 36" sheet of
uncut balsa.
Again, cut this sheet
to length - roughly
28-1/2" long. Then
you'll to measure
and cut the angle
needed for this piece
of sheeting.
It will need to butt-up
against the leading
edge and wrap around to roughly 1/2-way covering the top spar.
This is a straight taper, so take your time, measure, measure,
measure, double-check, then only when happy - it's time to cut.
As the sheeting we get can vary in density, you might have to
apply a bit of Windex® glass cleaner to loosen up the grain. Soak
the outer side of the wood to expand the fibers. Now hold it to
curvature needed, then use a hair dryer or covering heat-gun to
help “set” the balsa’s bend as it dries. Once dry, the you can glue
it in position.
Glue it to the leading edge first, then to each of the ribs and finally
to the top spar.
Sand this lip to
match airfoil