
Kaos 60 manual


Page 14 www.oldschoolmodels.com Construction Manual
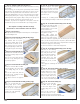
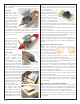
nStep 86 - Fuselage Assembly (FS2)
Locate FS2 from LP5. This
is now glued in place as the
starboard side of the fuselage
box. Again, test fit this first as
there's a lot of tabs to fit into
FS2. When you've figured out
how it all fits, then remove it
and glue into position. It is
recommended to start at the back and work your way forward.
Remember that the front will need to curve to match the profile
of TR2.
Note - the top of this assembly is flat and to make sure it's all true
as the glue dries, it might be easier to flip it over and hold it flat
with a weight or two.
nStep 87 - Fuselage Assembly (F2)
Locate F2 from LP4. This is glued to the
front of the box, forming the surface
where the firewall will be attached later
on. This will have an angled surface when
properly attached (down-thrust and right-
thrust). Epoxy this in place.
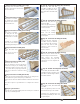
nStep 88 - Fuselage Assembly (WS)
Locate both WS from LP2. These
are glued to the inside of FS1
and FS2 to strengthen the wing
saddle. Glue one to each side as
shown here.
nStep 89 - Fuselage Assembly (WH9)
Locate both WH9s from LP2. These
are stacked together and glued to
the front side of F3, to strengthen the
bottom portion of that former.
Pay attention to the orientation so their
holes line up with the holes in F3.
nStep 90 - Fuselage Assembly (FS2 support)
Cut two small lengths of 1/4" square
basswood that was used for the wing
spars. They should be approximately
1-7/8" long, but no longer. Glue these
in place to the back of F2, where it
meets FS1 and FS2, and so they touch
T2 as shown here.
Epoxy is best here, but be neat with the applications.
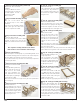
nStep 91 - Fuselage Assembly (fuselage side sheeting)
Locate FS3B and FS3C from BP4, FS3D and FS3E from BP5 and
FS3A from BP6. These 5 pieces
are glued together to form the
fuselage side sheeting.
Refer to the diagram on the
fuselage plan sheets on how
these notch together.
You'll use the same techniques
that you used when edge gluing
sheeting together for the wing and tail surfaces. The only difference
being that these sheets are thicker 1/8"balsa sheets.
Start by gluing FS3A and FS3B together. Then glue FS3C, noting
it's orientation. Then glue FS3D, and finally FS3E to form the
completed sheet.
Make 2 completed sheets.
nStep 92 - Fuselage Assembly (port sheeting)
Now take one of the sheets
from the previous step.
Lightly sand each side
along the seams to make
sure they're flat and free of
extra glue.
Glue this sheet to the port
side of the fuselage box as
shown here. Note that the
extra long tabs of F3 and F5 will fit into the pre-cut holes in the
sheeting. This helps align the sheet properly.
Make sure it is firmly pushed up against the entirety of the fuselage
box as it dries, including the curvature near the front.
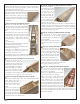
nStep 93 - Fuselage Assembly (starboard sheeting)
Just as you did in the
previous step, attach the
starboard sheeting.
Remember to lightly sand
each side along the seams
to make sure they're flat
and free of extra glue.
Glue this sheet to the
starboard side of the
fuselage making sure it is firmly pushed up against the entirety of
the fuselage box as it dries, including the curvature near the front.
Take a moment to hold the fuselage so you
can look down at the nose. It should look
exactly like this - with the F2 looking like it's
all out-of-whack compared to the rest of the
build. Also the fuselage sides should taper
in towards the nose just like you see here.
nStep 94 - Fuselage Assembly (top view.)
If you recall at the
start of the fuselage
construction you
needed to tape down
the top view with some
waxed paper. If you
haven't, hop on it as we
need it for this step.
Lay the fuselage upside-
down on the top view,
matching it to the plans
along it's entire length. Yes, F2 will be the opposite from the plans,
Here