
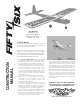
Fifty Six manual

Page 6 www.oldschoolmodels.com Construction Manual
When cured, you’ll now have a single, longer piece of sheeting.
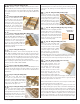
It’s easier to join the shorter lengths
of sheeting together on a flat
surface. Then when the glue has
cured, glue the sheeting in place
on the wing. Start at the leading
edge and gluing a little at a time.
Press the sheeting firmly against
the ribs and wait for the glue to cure before gluing the next section
of sheeting - slowly working your way back to the trailing edge,
being careful not to put a bend (warp) in the wing.
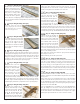
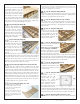
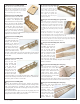
n n Step 24 - Wing Assembly (TE)
Locate one TE from BP14. This is
the trailing edge sheeting. Glue
this in place into the “groove”
pre-cut into rear of each of rib as
shown here. Be sure it is glued to
each of the ribs, to the top of the
trailing edge and to the center
sheeting you just applied.
n n Step 25 - Wing Assembly (LE)
Locate one LE from BP14. This is
the leading edge sheeting. Glue
this in place into the “groove”
pre-cut into the front of each
rib as shown here. Be sure it is
glued to each of the ribs and to
the leading edge, and the center
sheeting.
As the sheeting we get can vary in density, you might have to apply
a bit of Windex® glass cleaner to loosen up the grain and allow
it to bend without cracking. Soak the outer side of the wood to
expand the fibers. Now hold it to curvature needed, then use a
hair dryer or covering heat-gun to help “set” the balsa’s bend as it
dries. Once dry, then you can glue it in position.
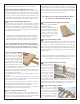
n n Step 26 - Wing Assembly (remove under-side tabs)
Once the glue has cured it’s time to carefully remove the wing
assembly from the board. Once removed, flip it over and it’s time
to remove all the underside tabs that helped hold the ribs in place.
There’s one in the front and one in the back of each rib. On ribs
R2-R6, these are balsa and easily cut away with a hobby knife. R1
ribs are lite ply and might need a bit more persuasion to remove.
When trimming these tabs, make sure you cut them away just
enough so that the airfoil shape of each rib is not interrupted. On
the trailing edge, this will mean that each tab will be cut away so
the trailing edge sits 1/16” proud of each rib.
n n Step 27 - Wing Assembly (CS1, CS4)
Locate two CS1s from BP15 and
one CS4 from BP16. These are used
to create the center sheeting for the
underside of the wing.
Use the same techniques that you
used when forming the upper
sheeting a few steps back. You’ll
need to trim CS4 to fit between the
gap of the CS1’s.
Also note that CS4 has a pre-cut hole in it. This is to allow the aileron
servo wire to exit. This hole should be positioned so it’s closer to the root
rib (R1). When this assembly is completed, glue it in place using the same
techniques as applying the top sheeting.
n n Step 28 - Wing Assembly (LE & TE)
Locate one LE and one TE from BP14. These are the lower leading
edge and trailing edge sheeting and should be applied in the
same was as you applied the top side sheets.
n n Step 29- Wing Assembly (root, tip sanding)
Take a few minutes to carefully sand away any extra wood that
extends past the root (R1) and tip (R6) ribs. Cut and/or sand as
necessary until any extra spar or sheeting material is perfectly flush
with those ribs.
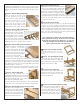
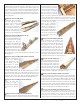
n n Step 30 - Wing Assembly (TP1)
Locate one TP1 from LP1. This
is glued in place to R6 as shown
here. It should be at 90° to R6
(perpendicular) and all the TP1
tabs should fit completely into
the pre-cut slots in R6.
n n Step 31 -Wing Assembly (T2, T3, T4)
Locate T2 and T4 from BP9P as
well as T3 from BP10P.
Make sure you're using BP9P for
the port wingtip - NOT BP9S.
Note the etched lines on T2 and
T3. These are alignment guides for
the piece that fits on top of them.
With the wing sitting up-right, glue T2 on top of TP1 and up against
R6. Then glue T3 on top of T2, aligning T3 witht the edges guides
and up-against R6.. T4 is then glued on top of T4, again aligning it
with the guides and making sure it's up against R6.
n n Step 32 - Wing Assembly (T5, T6)
Locate T5 and T6 from BP9P. These
are glued to the underside of TP1,
T5 first, then T6 using T5's etched
lines as a guide.
n n Step 33 - Wing Assembly (aileron box)
First we’ll create the
mounting rails for the
aileron hatch by using
leftover 1/4” square
basswood you trimmed
when creating the forward
spars. Measure and cut
two lengths that will span
the distance between the
forward and rearward spars. With the wing half laid on it’s top, glue
these two strips to the R5 ribs as shown on the plans. These strips
should be flush with the lower-most pre-cut edges of the R5 ribs.
n n Step 34 - Wing Assembly (aileron box - SH1)
Next locate two SH1s from BP15. These are glued to R5’s small